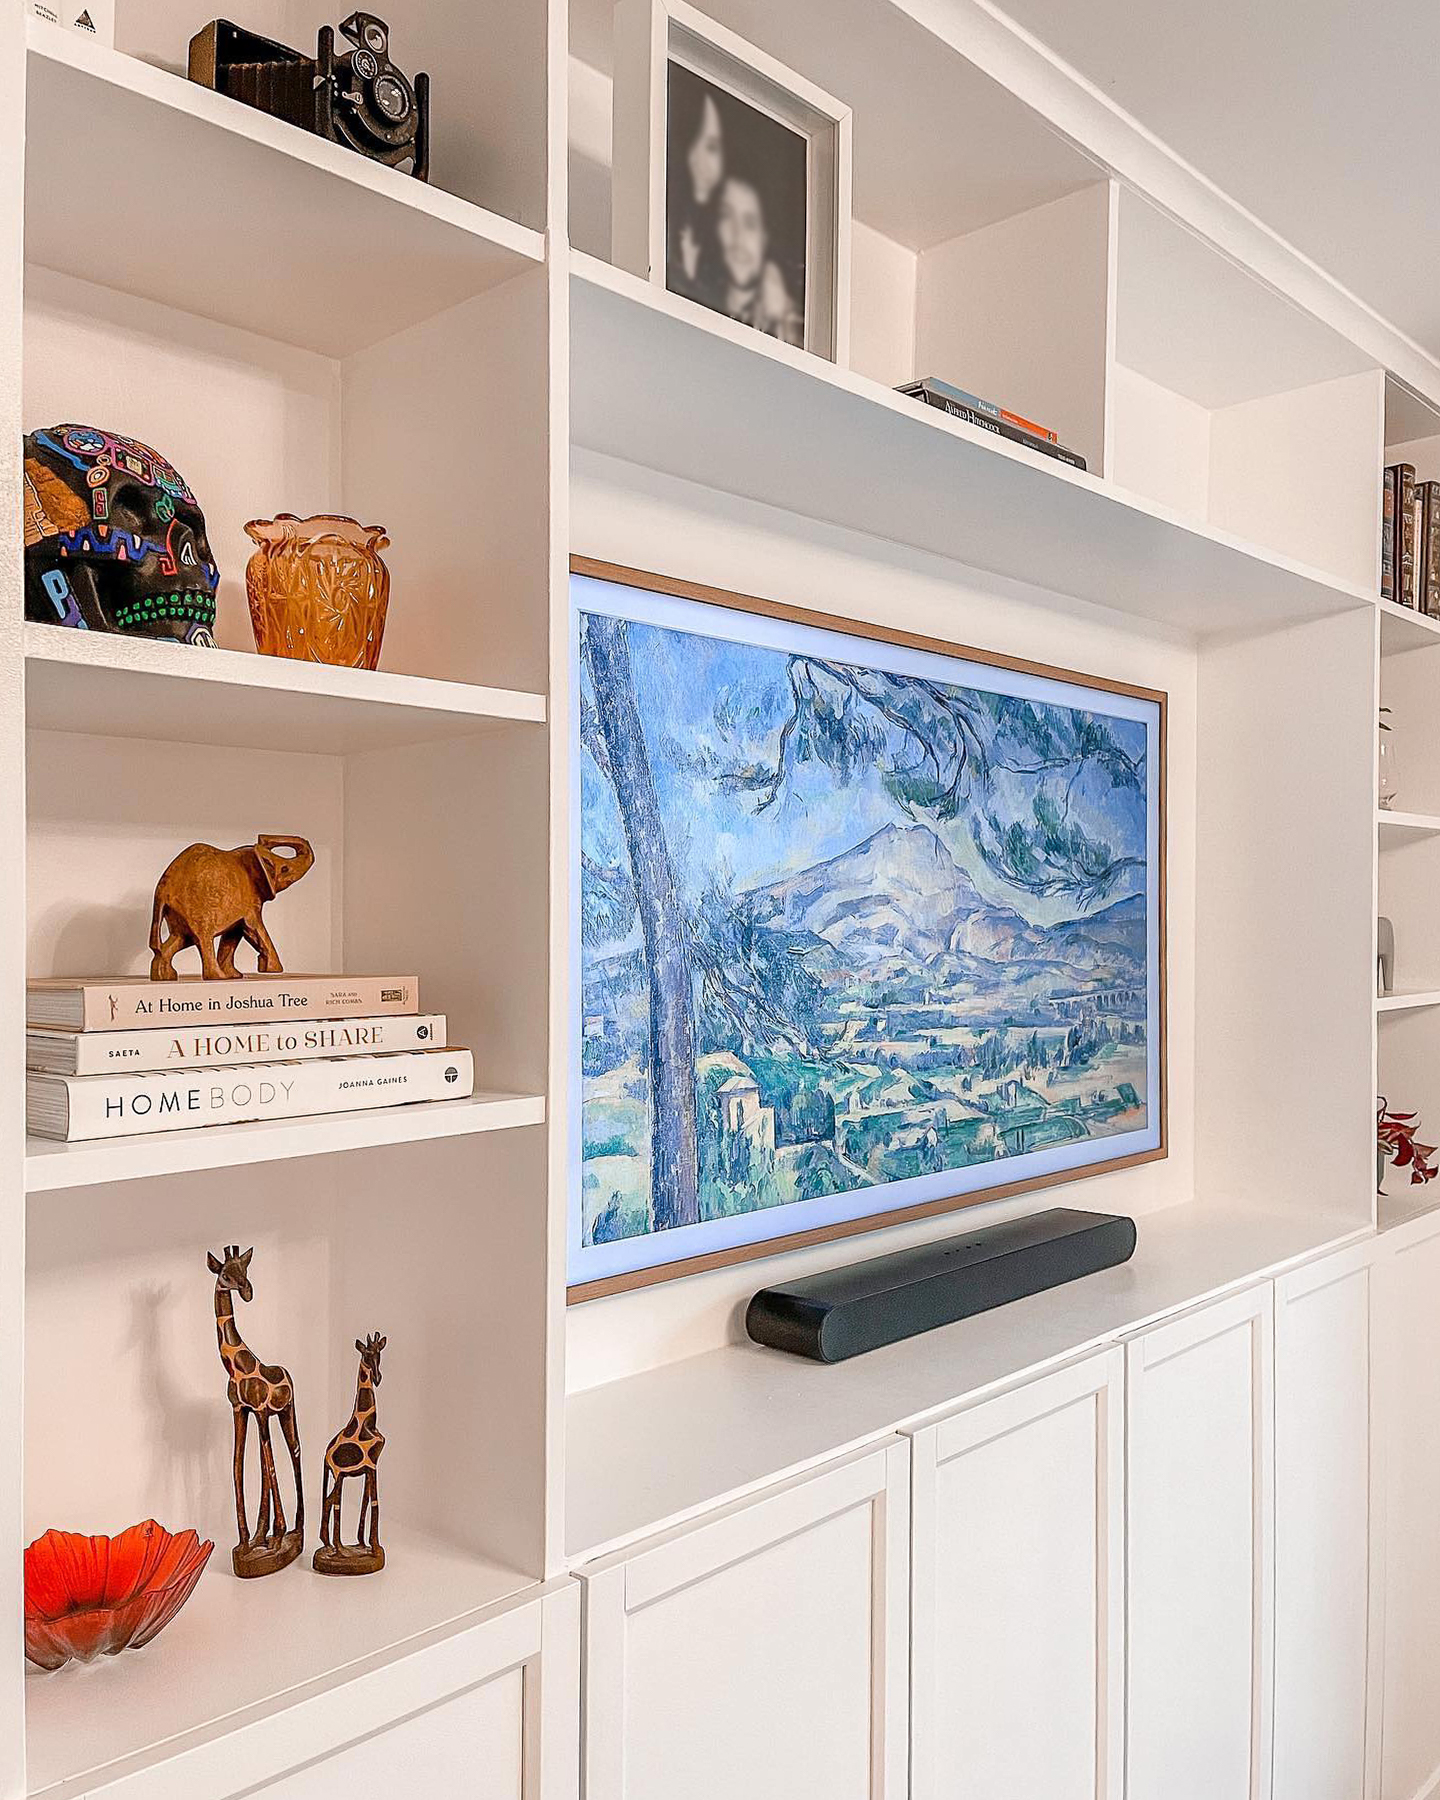

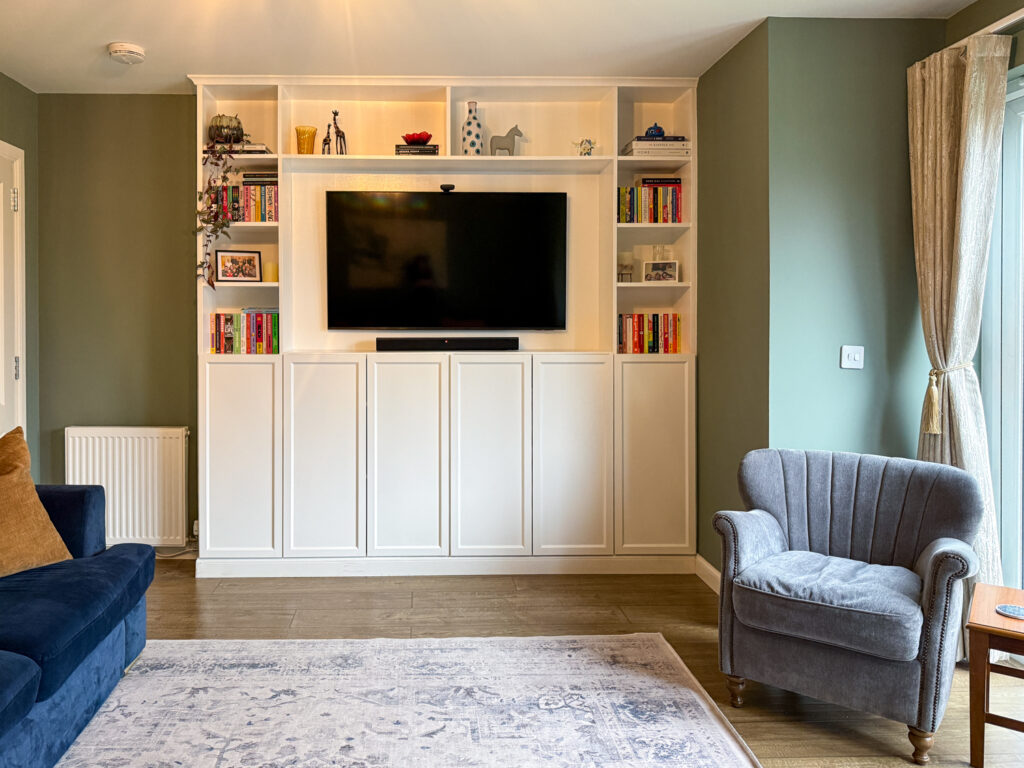
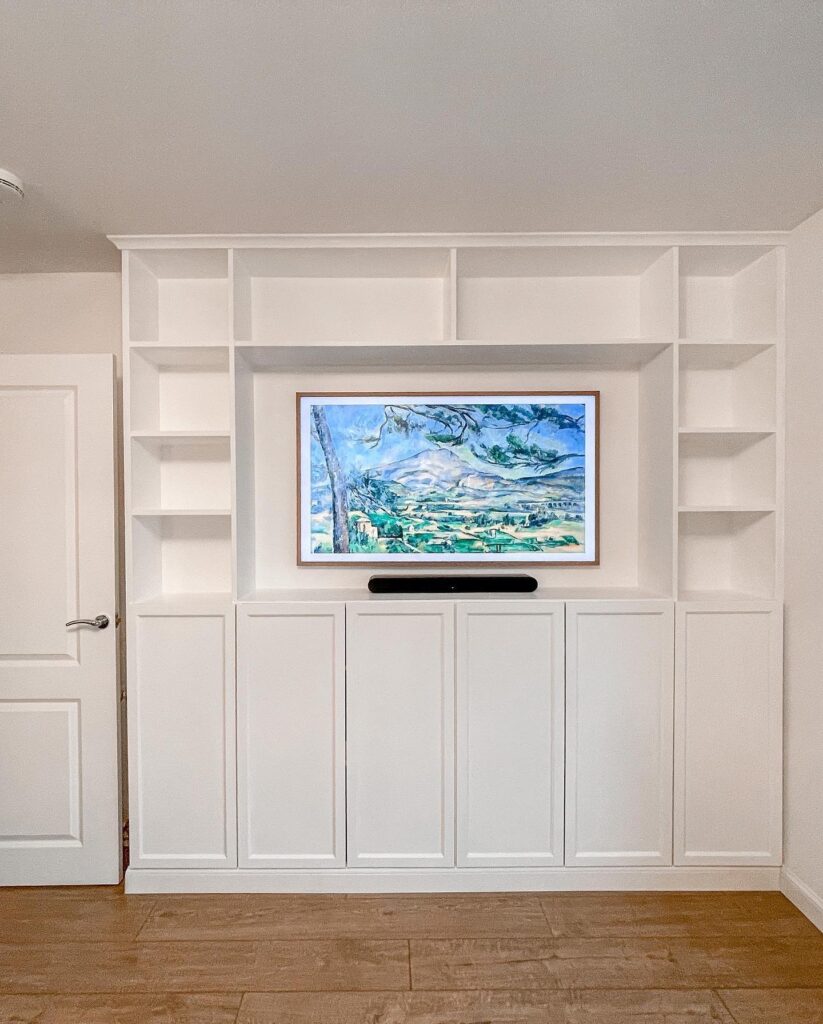
Building an IKEA Billy bookcase media wall was, without question, one of the most satisfying DIY projects this house has seen. If you've read my IKEA Billy bookcase built-in hack for the office, you'll know how much of a difference these budget-friendly bookcases can make when you treat them as building blocks rather than standalone furniture. This living room version takes things a step further, though, because it's designed around a wall-mounted TV, complete with hidden cable routing, Oxberg cupboard doors for storage, and a custom bridge shelf above the screen that makes the whole thing look like one seamless, purpose-built unit.
The result? A media wall that genuinely looks like it cost thousands, built almost entirely from IKEA Billy bookcases and a few materials from the hardware shop. It's the kind of project that makes people walk into your living room and ask who your joiner was. And the honest answer is: it was a weekend, a circular saw, and a very large bag from IKEA.
Why This Billy Bookcase TV Wall Hack Works So Well
There's a reason the Billy bookcase has been a staple of IKEA hacking for years. The dimensions are modular, the price is reasonable, and the finished product is sturdy enough to hold serious weight once it's secured to the wall. What makes this particular build different from the standard Billy built-in is the TV cavity in the centre and the horizontal bridge shelf that spans the gap above the screen. That bridge is what transforms it from “some bookcases around a telly” into something that looks genuinely architectural.
Custom media walls from a joiner will typically set you back anywhere from £2,000 to £5,000 depending on where you are in the country and how bespoke you go. This version came in at a fraction of that, and because the Billy bookcases do the heavy lifting structurally, you don't need advanced carpentry skills to pull it off. You do need a circular saw and some patience, but if you can follow instructions and aren't afraid of a bit of caulk, you can absolutely do this.
What You'll Need
IKEA Shopping List
The exact configuration will depend on your wall width, but for this build, which fits a 55-inch TV comfortably in the centre, here's what went in the trolley:
- 3x BILLY bookcase, white, 40cm wide x 202cm tall: two form the tall side columns, the third becomes the horizontal bridge above the TV
- 2x BILLY bookcase, white, 80cm wide x 106cm tall: these sit side by side in the centre to create the lower cupboard section beneath the screen
- 2x BILLY height extension units: for the top of the tall side columns, taking them closer to the ceiling
- 6x OXBERG doors: two for each of the short bookcases and one for the bottom of each tall side column, giving the entire lower section a clean, closed-off look
Materials
- Timber for the base: roughly 4 inches tall, though the exact height depends on your skirting boards
- Sheet of plywood: cut to size for the countertop across the lower section
- Thin MDF panels: for filling gaps on the sides of the unit
- MDF or pine trim: for the finishing details along edges and joins
- Wood filler: for all those pre-drilled Billy bookcase holes (there are dozens)
- Caulk: for sealing every joint, shelf edge, and gap where the unit meets the wall
- Shellac primer: essential for getting paint to adhere to the laminate surface
- White gloss paint: Dulux works well, but any good quality white gloss will do
Tools
- Drill: for assembling units and securing them to the wall
- Circular saw: for cutting the bridge bookcase and plywood countertop to size
- Mitre saw: for cutting trim at clean angles
- Spirit level: non-negotiable for getting things straight
- Laser level: not essential, but makes the whole process considerably less stressful
- Caulking gun: you'll go through more caulk than you expect
- Sandpaper: for smoothing down wood filler before painting
- Clamps: for holding pieces together while glue sets
- Pocket hole jig: for securing the bridge shelf cleanly
- Paint brushes or a small foam roller
- TV wall mount bracket
One thing worth saying before you start: don't be intimidated by the length of these lists. Most of the materials are inexpensive bits and pieces from B&Q or Wickes, and if you already have a basic toolkit, you'll likely own half of what's listed here. The IKEA units are doing the structural work; everything else is finishing.

How to Build Your IKEA Billy Bookcase Media Wall
Step 1: Plan Your Layout
Before you build a single thing, measure your wall carefully. You need to know the total width, the height from floor to ceiling, and where your plug sockets and aerial points sit. For this build, the two 80cm-wide short bookcases sit side by side in the centre (giving 160cm of width for the lower cupboard section), with a 40cm-wide tall bookcase on each side. The third 40cm-wide bookcase becomes the bridge above the TV, but more on that shortly.
It's worth laying out the assembled units loosely against the wall before committing to anything. This lets you see exactly how the proportions work and where any gaps will fall.
Step 2: Build the Base
Start by removing the existing skirting boards from the wall where the unit will sit. Keep them safe because you'll reattach them later across the front of the base.
Build a simple timber base that spans the full width of the unit. The height should be roughly 2 inches, though the exact measurement will depend on the height of your skirting boards. The idea is that the skirting reattaches to the front of this base, so it looks like the unit is sitting directly on the floor with the skirting running neatly beneath it. This small detail is what makes the finished build look permanent rather than plonked.
If you want an easier route, you can just use a think piece of plywood for this. That's what I did.
Step 3: Assemble and Position the Units
Build all of the IKEA units except for the third tall bookcase (the one that will become the bridge). Assemble the two short 80cm bookcases, the two tall 40cm side bookcases, and the height extension units.
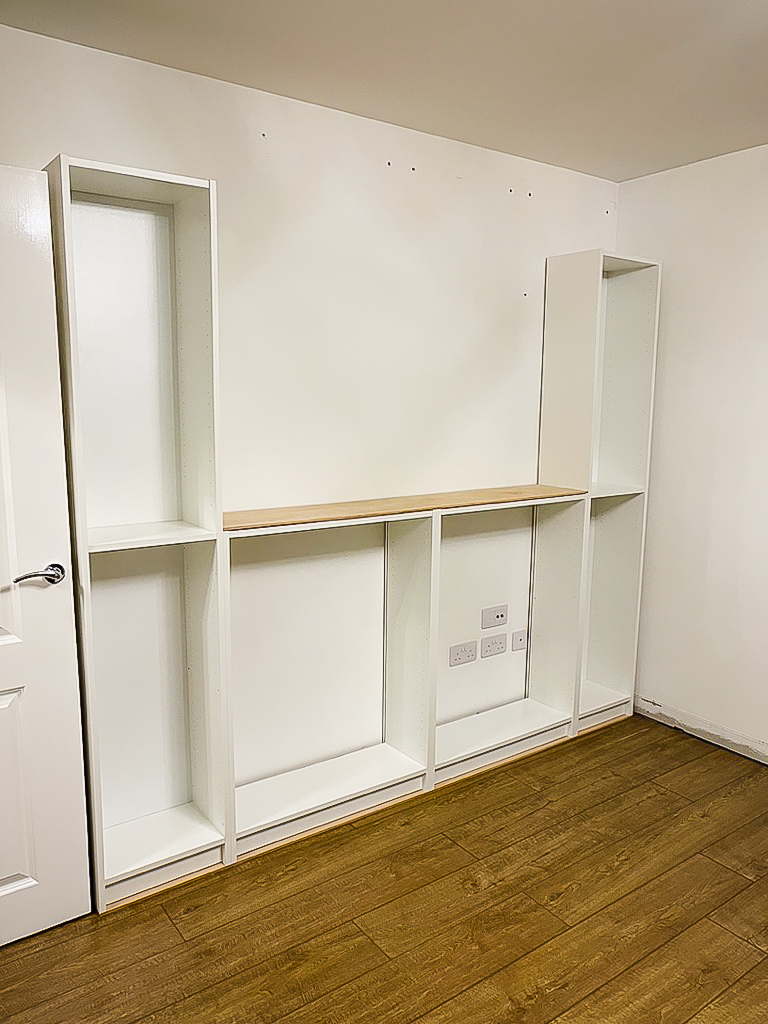
Lift the assembled units onto the base and arrange them in position. The two tall bookcases go on the outside edges. The two short bookcases go in the centre, side by side. Once you're happy with the spacing, screw the units together so they become one solid piece, and then secure them to the wall using brackets. This step is essential for both safety and rigidity. The whole unit needs to be rock solid before you start adding the bridge.
Attach the height extension units to the top of the two tall side bookcases. These create the upper shelving cubbies and bring the unit closer to the ceiling, which is what gives it that built-in feel.
Step 4: Build the Bridge Above the TV
This is the part that separates a media wall from a standard set of built-in shelves, and it's the trickiest section of the whole build, so take your time.
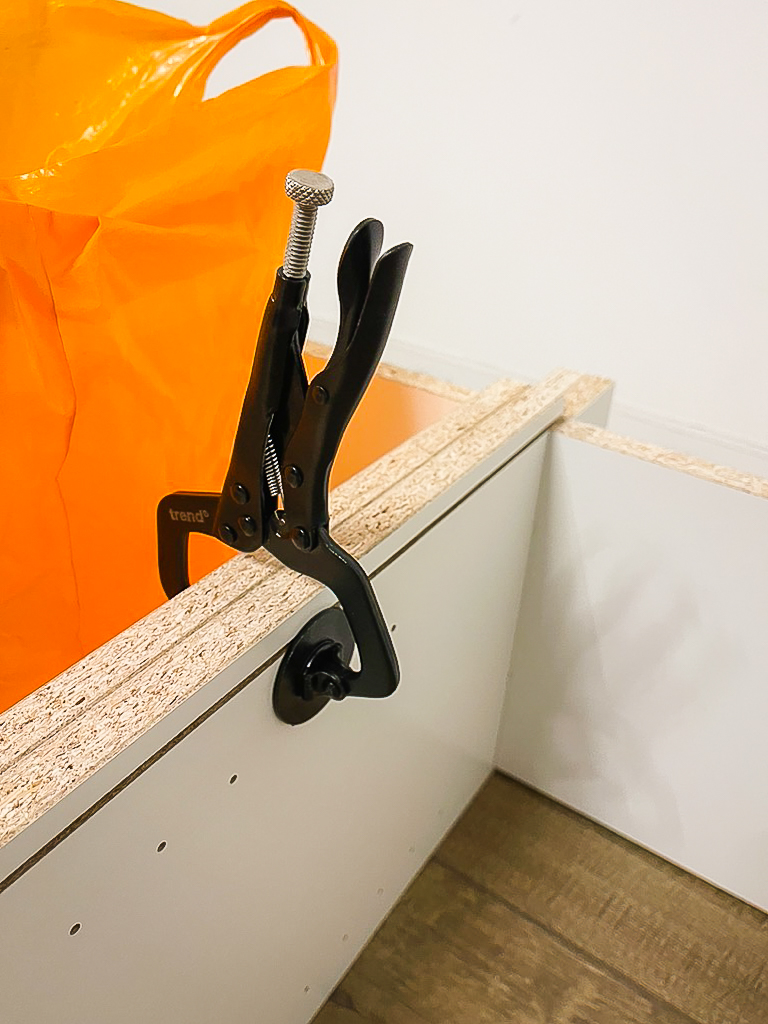
Take the third 40cm-wide, 202cm-tall Billy bookcase. This one gets turned on its side and will span the gap above the TV, connecting the two tall side columns. Using your circular saw, cut it down to 160cm in length. This measurement matches the combined width of the two 80cm short bookcases below, so the bridge sits perfectly above them, flush with the inner edges of the tall side columns.
The structural centre divider inside this bookcase also needs cutting. When the bookcase is on its side, this divider becomes a vertical support within the bridge. Cut it to the same height as the height extension units so that everything lines up cleanly across the top. Attach this divider into the centre of the bookcase ends, then secure it with pocket hole screws driven into the top, connecting it to the space between the height extenders. A pocket hole jig makes this straightforward and keeps the screws hidden.

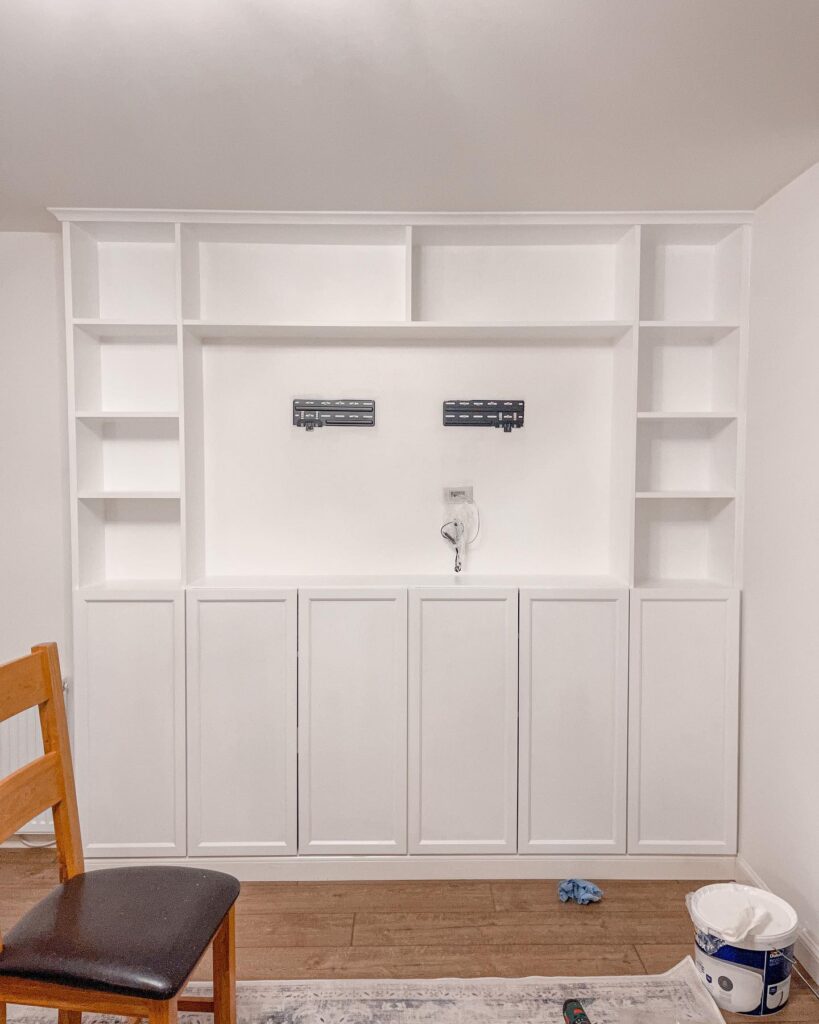
Once the bridge is securely in place, you should have a complete framework: tall shelving columns on each side, a cupboard section below the TV, the TV cavity in the centre, and the bridge shelf above it with additional cubbies across the top.
Step 5: Fill the Gaps with MDF Panels
Unless your wall is perfectly flat and your measurements are millimetre-perfect (and let's be honest, in most UK homes they aren't), you'll have gaps to deal with. On the side where the unit meets the wall, place a thin MDF panel between the bookcase and the wall to bring everything flush. On the opposite exposed side, attach a thin MDF panel so you get a smooth, clean face rather than seeing the seam where the height extender joins the main bookcase. These small touches are what make the unit look bespoke rather than flat-pack.
Step 6: Add Your Trim
Cut your trim to size using the mitre saw (or a small hand saw) and attach it with wood glue. A nail or two will hold it in place while the glue sets, but the glue is doing the real work here. Trim goes along the front edges where bookcase units meet, across the top where the unit reaches the ceiling, and anywhere you want to create a more substantial, furniture-quality edge. This is one of those stages that feels fiddly but makes an enormous difference to the finished look.
Step 7: Reattach the Skirting Boards
Your original skirting boards now need cutting to the right length and reattaching across the front of the timber base. Use wood glue and a couple of nails to fix them in place. Once painted, this skirting will look like it was always there, tying the unit seamlessly into the rest of the room.
Step 8: Cut and Fit the Countertop
Cut a piece of plywood to size for the top of the two short bookcases. This creates a proper surface between the lower cupboard section and the TV cavity, and it hides the chipboard tops of the Billy units. It also gives you a small ledge for a soundbar or a few decorative pieces if you like.
Step 9: Position the Shelves
Place the adjustable shelves at the heights you prefer. One important note here: once the unit is fully caulked, filled, and painted, moving these shelves is difficult without damaging the finish. So take some time now to think about what's going on each shelf and set the heights accordingly before you move on to finishing.
Step 10: Fill, Caulk, and Sand
Billy bookcases come with dozens of pre-drilled holes on the inner sides, and every single one needs filling if you want a polished result. Work your way methodically through the entire unit with wood filler, filling every hole, dent, and imperfection.
Next, run caulk along every shelf edge, every joint between units, every seam where the unit meets the wall, and every gap between the trim and the bookcase surface. Caulk is genuinely the secret weapon of this entire build. It's what takes the unit from “obviously IKEA” to “wait, is that custom?” Be generous with it.
Once everything is dry, sand the whole unit down so there are no bumps or ridges from the wood filler. A smooth surface here means a smooth painted finish.
Step 11: Prime and Paint
Apply shellac primer to every surface. This is not a step you can skip. Billy bookcases have a laminate finish that regular paint won't stick to properly without a good primer, and shellac primer is the best option for ensuring proper adhesion and a long-lasting finish.
Once the primer is dry, apply your white gloss paint. Two coats will give you the best coverage and the smoothest result. Here's a trick that really elevates the finish: paint the wall behind where the TV will hang in the same white gloss. Even though it's just wall, painting it the same colour and sheen as the unit makes it look like a solid panel behind the screen. Because the texture matches, it reads as part of the unit rather than a gap where you can see the wall.
Step 12: Mount the TV and Route the Cables
This build is designed for a 55-inch TV, which fits the central cavity perfectly. Mount your TV using a wall bracket, positioning it centrally within the opening.
For cables, the cleanest approach is to cut a small hole in the wall behind the TV and route all cables down through the wall cavity, bringing them out inside the cupboard below. Because the backs were left off the short bookcases in this build, there's easy access to the plug sockets and cable connections from inside the cupboards. With the Oxberg doors closed, you'd never know there was a single cable back there.
Tips for the Best Finish
Getting the proportions right is everything with this build. The countertop, the bridge, and the skirting are what create the illusion of a single piece of furniture, so spend extra time making sure those elements are level and flush. A laser level pays for itself on a project like this.
Don't rush the caulking stage. It's tedious, but it's genuinely the difference between a result that looks DIY and one that looks professionally fitted. The same goes for filling all those pre-drilled shelf holes in the Billy bookcases. Every unfilled hole is a giveaway.
If your walls aren't perfectly square (and most walls aren't), the MDF side panels are your best friend. They let you create a clean edge even when the wall behind is slightly uneven.

Frequently Asked Questions
A 55-inch TV is ideal for this particular configuration, or even a 60-inch at a push, but you could adjust the build for a larger screen by using wider short bookcases in the centre or by increasing the gap between the side columns. The bridge shelf above would need to be cut to match whatever width you create.
The total cost will vary depending on what you already own, but the IKEA units, Oxberg doors, and all materials (timber, plywood, MDF, trim, filler, caulk, primer, and paint) typically come in between £300 and £500. That's a significant saving compared to a custom joiner, who would likely quote £2,000 to £5,000 for a similar result.
For the two short bookcases in the centre, leaving the backs off makes cable routing and socket access much easier. The Oxberg doors hide everything from view. For the tall side bookcases, you can keep the backs on for a cleaner shelf appearance, or remove them if you prefer the wall colour showing through.
A shellac-based primer is essential for getting paint to adhere to the laminate surface. Once primed, any good quality gloss or satin paint will work. Dulux white gloss was used for this build, but Farrow & Ball or any premium brand would give equally good results. The key is the primer, not the paint.
It would be difficult. This build involves removing skirting boards, screwing units into the wall, and routing cables through the plasterboard. It's really designed as a permanent or semi-permanent installation. For a rental, the standard Billy bookcase built-in hack might be a better starting point as it can be adapted to be less invasive.
Set aside a full weekend. The assembly and positioning can be done in a day, but the filling, caulking, priming, and painting stages need drying time between coats. Two to three days from start to finish is realistic if you're not rushing.
Yes. The Billy bookcase turned on its side, with the centre divider secured using pocket hole screws, creates a solid bridge. Once it's screwed into the side columns and the height extenders, it's completely rigid. Just make sure all connections are tight before you load it with books or decorative items.
If you're looking for more ways to transform IKEA furniture into something that looks far more expensive than it is, have a look at my IKEA Billy bookcase built-in hack for the full step-by-step on the simpler version of this project.
Leave a Reply
The Sunday Letter
Most Sundays, once the house has gone quiet and it's edging towards nine, a letter goes out. It's the one I'd write to a friend with good taste and not nearly enough time: one thing worth reading, one thing worth buying, and one thing to skip. No noise, no pressure to spend, just the considered version of what I've actually been using, loving, or quietly sending back.
If you like the sort of recommendation that still holds up six months later, leave your email below and I'll write to you on Sunday.