
There is something deeply satisfying about stepping outside and picking something you've grown yourself. Not in a full allotment, dig-until-your-back-aches kind of way, but in a small, considered, “this fits perfectly into our actual life” kind of way. That's exactly how our DIY raised vegetable planter came about. We had an awkward strip of grass where the lawn meets the patio, an uneven section that never quite looked right no matter what we did with it. So last weekend, armed with some decking boards and a Ryobi mitre saw, we (and by “we” I actually mean my partner…) built a raised planter that solved the problem and gave us somewhere to grow food we'll actually use in the kitchen. It took one afternoon, cost very little, and genuinely transformed that forgotten corner of the garden.
If you've been thinking about growing your own but don't have the space (or the energy) for a full vegetable patch, a raised planter like this is the perfect starting point. It's contained, manageable, and looks far more intentional than a collection of random grow bags propped up against a wall. Here's exactly how we built ours, step by step, so you can do the same this weekend.
Why Build a Raised Vegetable Planter from Decking Boards?
Growing your own food doesn't need to involve a sprawling garden or a waiting list for an allotment. A raised vegetable planter gives you a defined growing space that's easy to maintain, keeps everything contained, and looks genuinely lovely in the garden rather than like an afterthought. Decking boards are a particularly smart choice for the build because they're already pressure-treated to withstand outdoor conditions. They won't rot in the rain, they're widely available from any timber merchant or DIY shop, and they have a clean, finished look that ties in naturally with patios and outdoor living spaces.
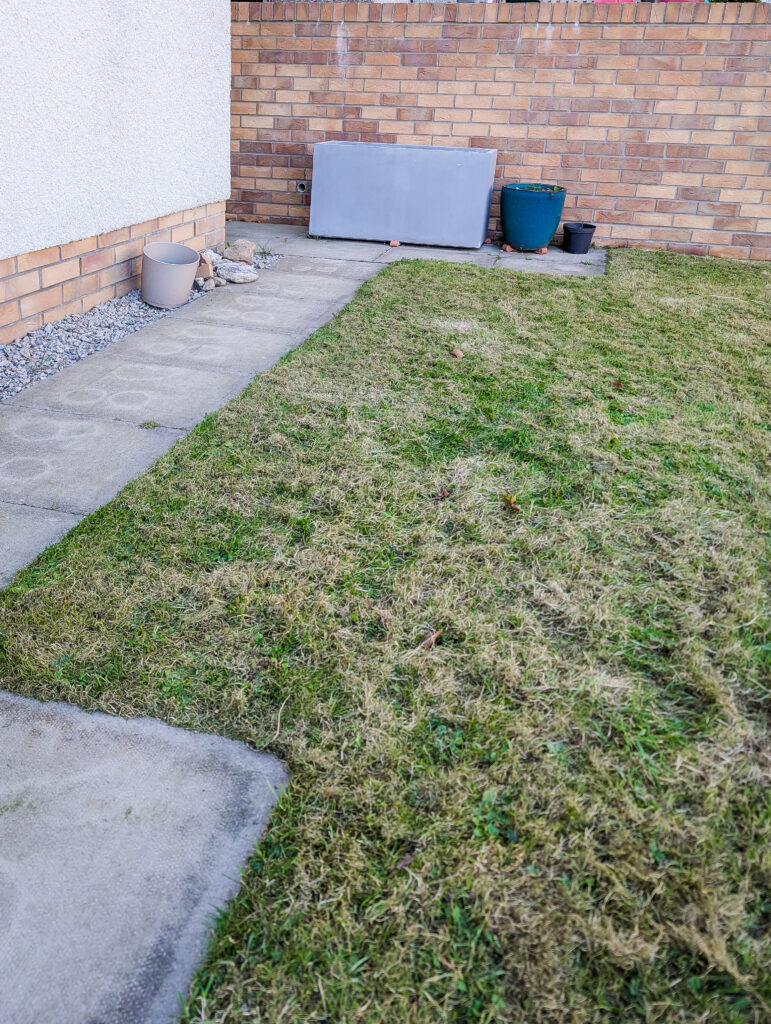
For us, the real motivation was practical. That strip of grass sitting between the patio edge and the house wall had always looked a bit odd. The patio isn't a uniform shape, so the lawn line running alongside it was never going to look neat no matter how carefully we mowed. Building a planter to fill that exact space turned a problem area into something productive and attractive, and now we're growing food in a spot that previously just bothered us every time we looked at it.
The whole build uses just ten decking boards, some metal brackets from B&Q, and basic tools. If you've got a similar awkward strip of garden that isn't earning its keep, this project is absolutely achievable in an afternoon.
What You'll Need
Materials
We used ten standard treated softwood decking boards for the entire build. The clever bit is in how they're cut. Our planter is longer than a single board, so each long side is made from two boards butted together end-to-end, then a second row stacked on top to give the planter height. That's eight boards for the two long sides. The short ends are made from a single board cut in half, with two halves stacked for height at each end. So two boards cover both ends. Ten boards total, no waste.
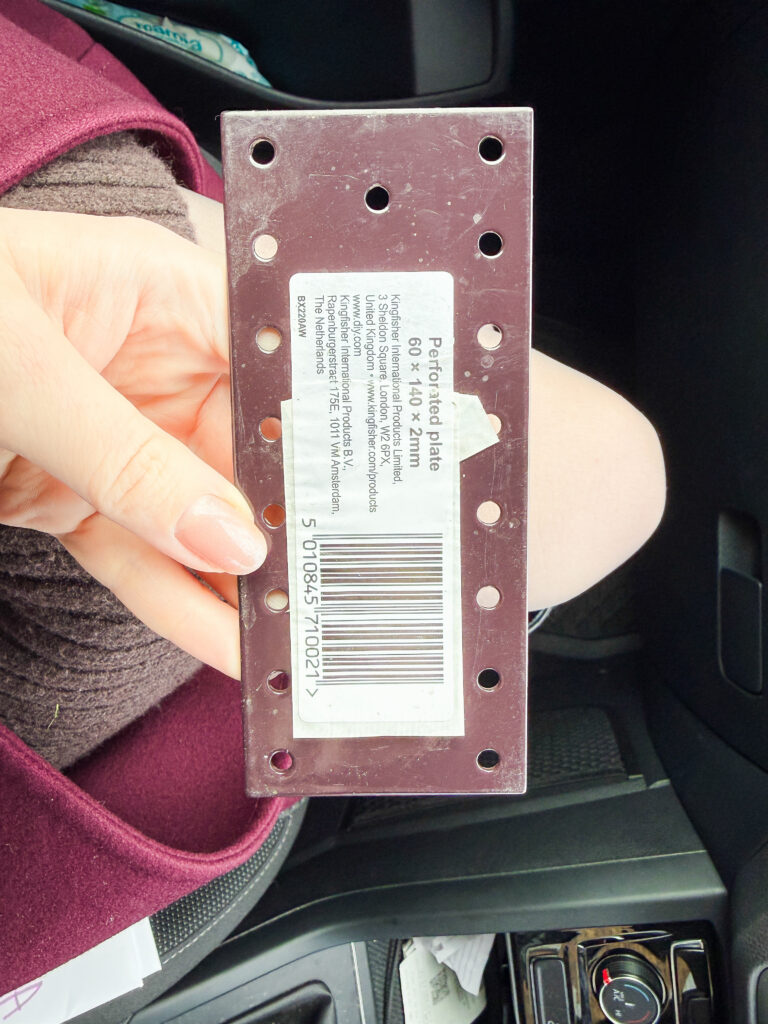
To hold everything together, we used Abru brown powder-coated steel angle brackets (55mm x 70mm x 70mm) at each corner. These screw into the inside corners and keep the frame solid and square. Where the two long boards meet end-to-end on each side, we used Abru steel perforated plates (140mm x 60mm x 2mm) to bridge the join and stop any movement. You'll need a box of outdoor wood screws to fix everything together, plus the screws that come with the brackets.
All the brackets and fixings came from B&Q and cost a few pounds each. The decking boards can be picked up from B&Q, Wickes, or any local timber merchant. Expect the whole lot to come in somewhere between £40 and £90 depending on what you already have knocking around and how large your planter is.
Tools
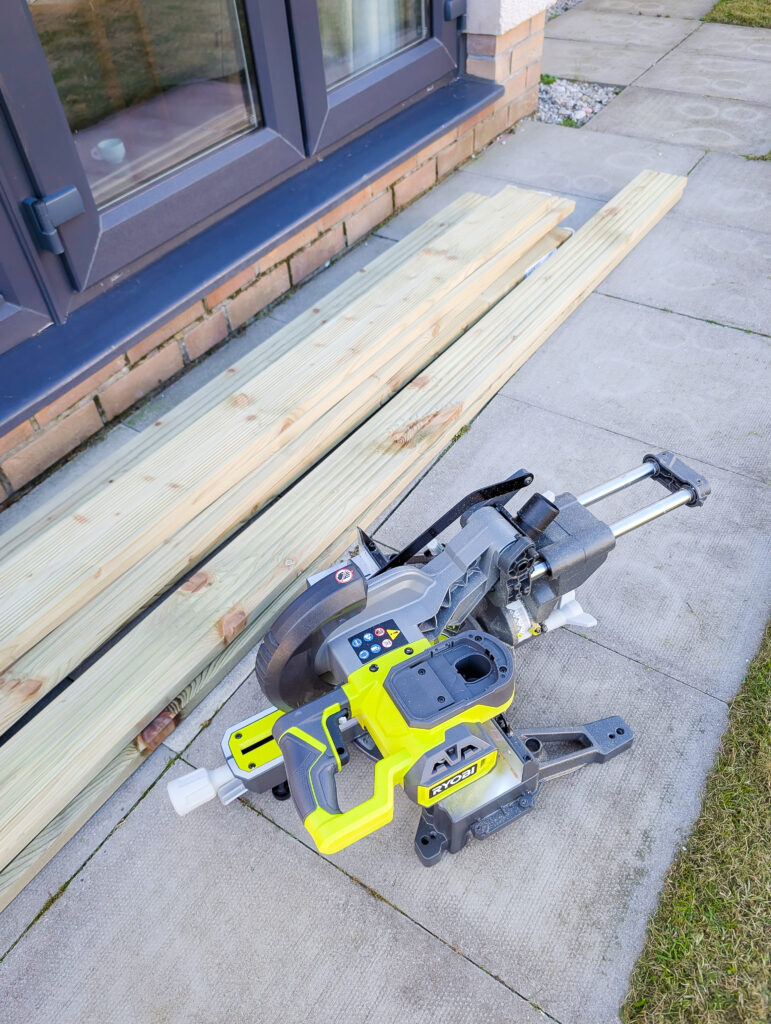
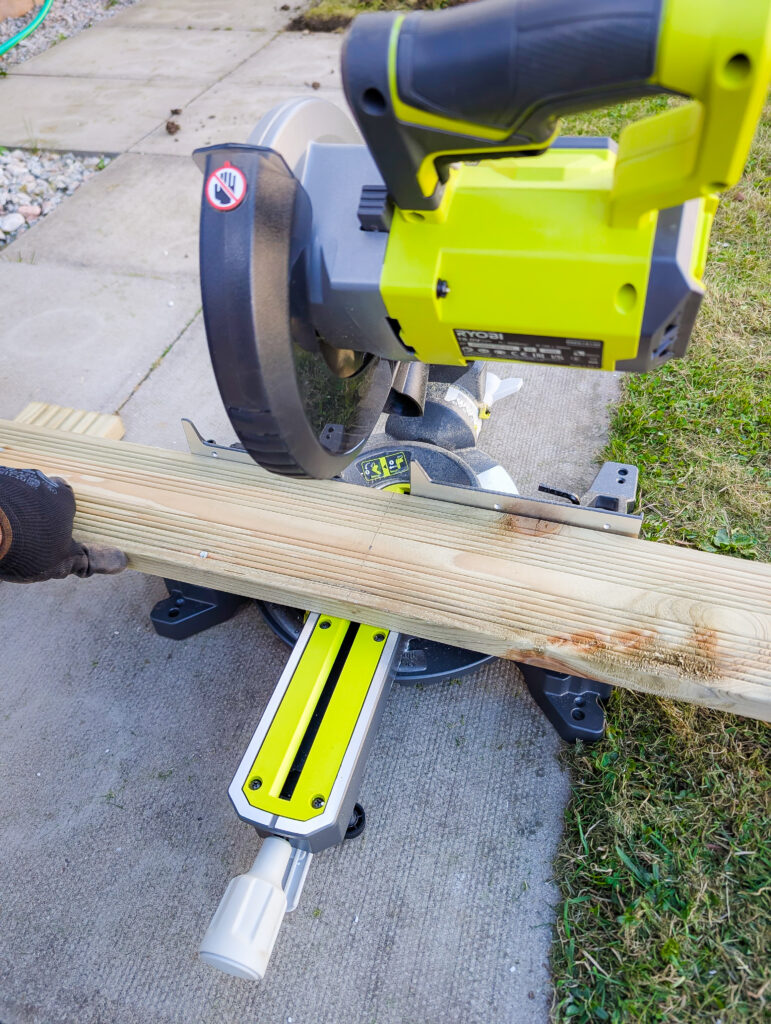
A mitre saw makes the cleanest cuts and speeds everything up considerably. We used a Ryobi cordless mitre saw which made short work of the boards, but a hand saw will do the job perfectly well if that's what you have. Beyond that, you'll need a cordless drill with a screwdriver bit, a tape measure, a pencil for marking up, an edging tool for cutting turf, and a spirit level to check everything is sitting straight.
How to Build a Raised Vegetable Planter: Step by Step
Step 1: Measure Your Space and Plan the Cuts
Start by measuring the space where your planter will sit. Ours was dictated by that awkward grass strip, so we measured the length and width of the area and worked backwards from there. Once you know your dimensions, work out how many boards you'll need for each side. For a planter longer than a single board (like ours), you'll be joining two boards end-to-end for each long side, with a second row on top for height. The short ends are simply one board cut in half and stacked two high.
Mark up your boards clearly with a pencil before cutting anything. Take your time here because getting the measurements right saves a lot of frustration later on. The old rule applies: measure twice, cut once.
Step 2: Cut the Decking Boards to Size
With your measurements marked, cut the boards to length. A mitre saw gives you lovely clean, straight cuts, but a hand saw and a steady hand will work too. For our build, the long boards were cut to length so that two placed end-to-end span the full length of the planter. The two end boards were cut in half to create four shorter pieces, two for each end, stacked for height.
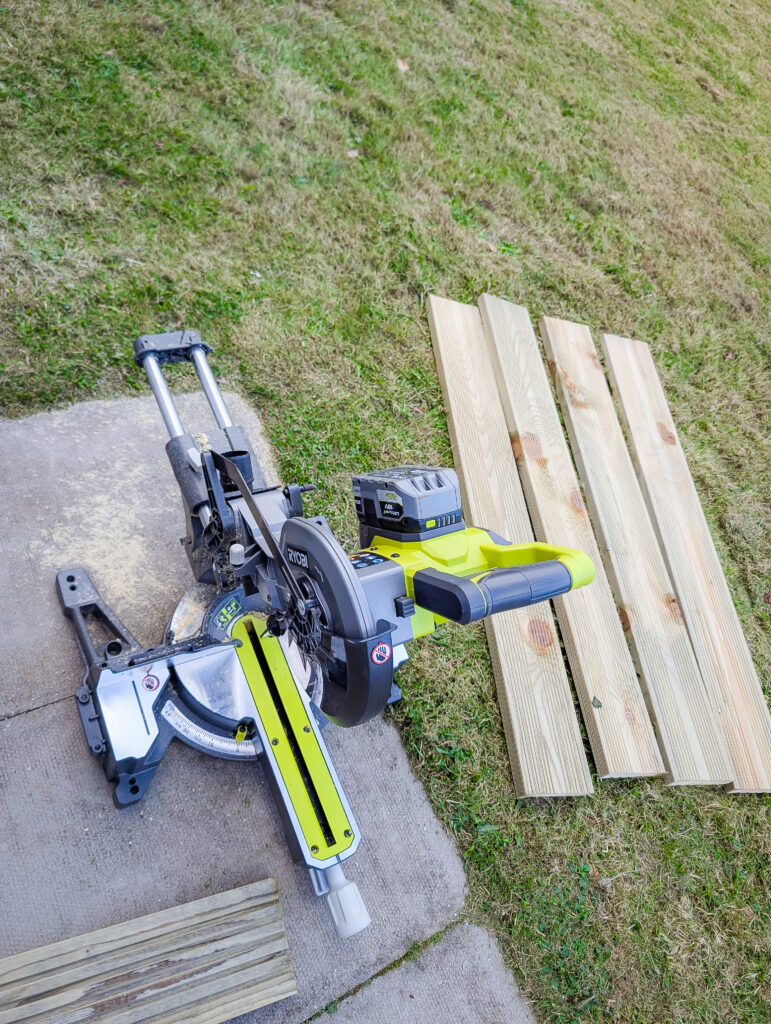
Once all your pieces are cut, lay them out roughly in position to double-check everything fits before you start assembling. It's much easier to trim a board slightly at this stage than to realise something is off once you've started screwing things together.
Step 3: Cut the Turf and Prepare the Ground
This step is what makes the whole project feel properly considered rather than rushed. Rather than just plonking the planter frame on top of the grass, we cut out the turf within the footprint of the planter using a spade. This gives the frame a neat, recessed edge and means the boards sit flush against the ground rather than wobbling on uneven grass.
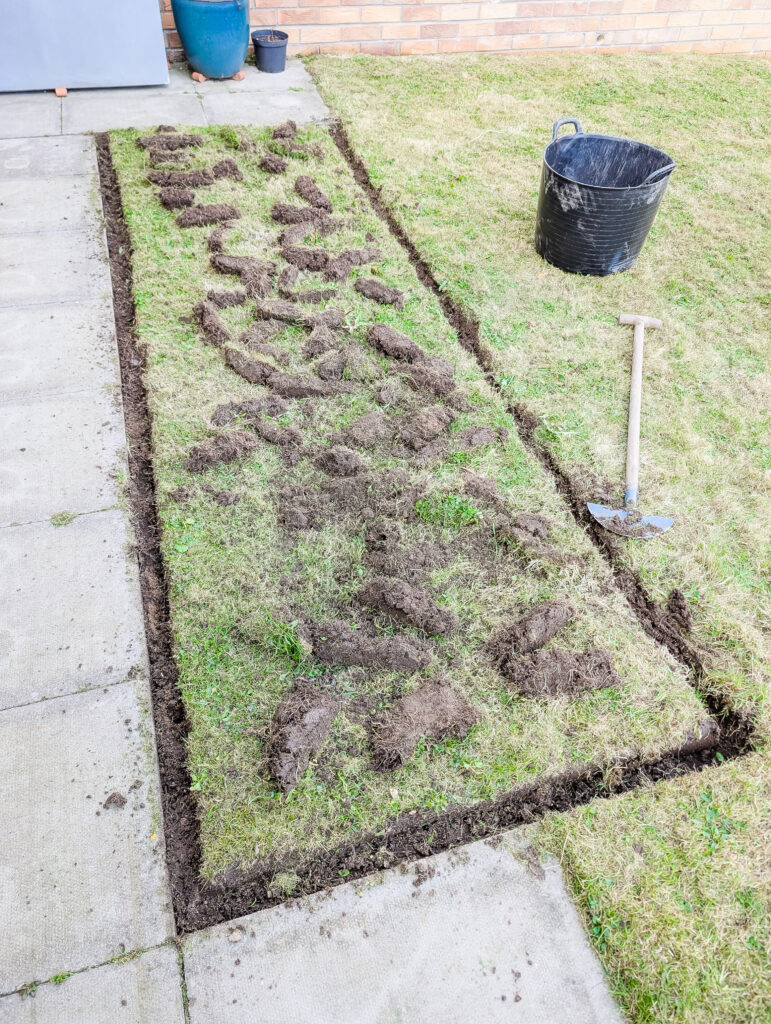
We left the chunks of turf sitting inside the frame rather than carting them off. They'll break down naturally over time and add organic matter to the soil, which is brilliant for growing vegetables. It saves you a job and benefits the planter at the same time.
Step 4: Assemble the Frame
Start by building the short end panels. Take two of your half-board pieces and stack them, then fix an angle bracket at each corner on the inside. The Abru angle brackets screw in neatly and hold everything square. Repeat for the second end.
Next, attach the long side boards. Lay one long board against the end panels and screw it into the angle bracket at each corner. Where two long boards meet end-to-end in the middle of the span, bridge the join on the inside using a perforated plate. Screw the plate into both boards so the join is solid and there's no flex or movement. Repeat for the second row on top, and then do the same on the other long side.
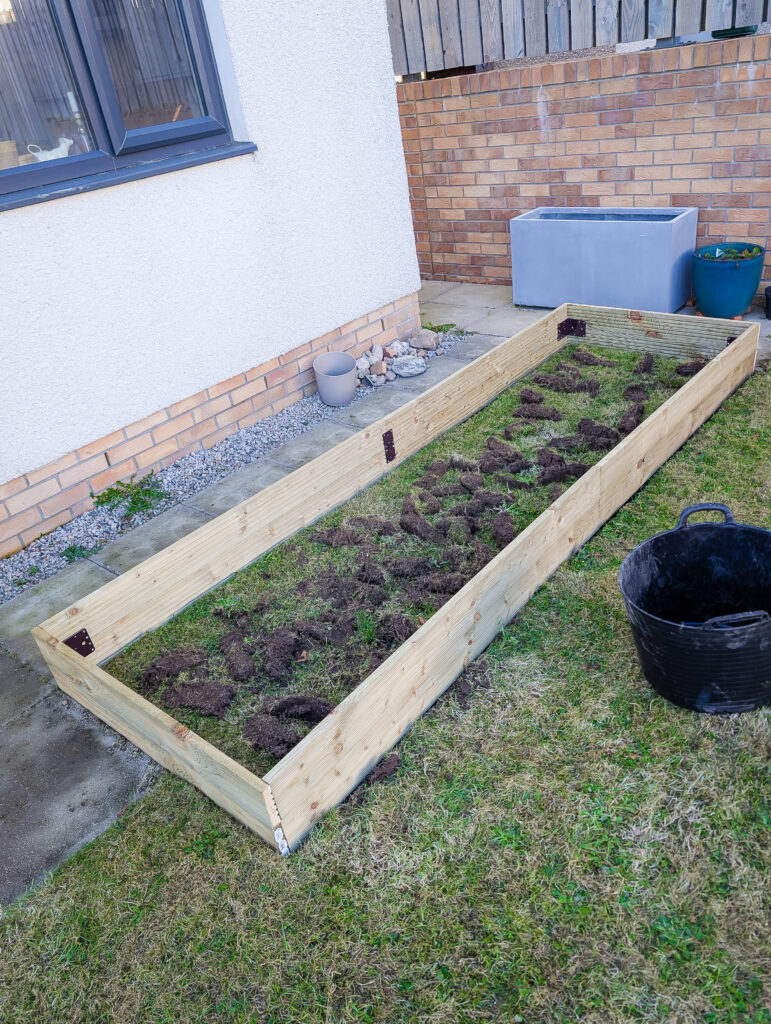
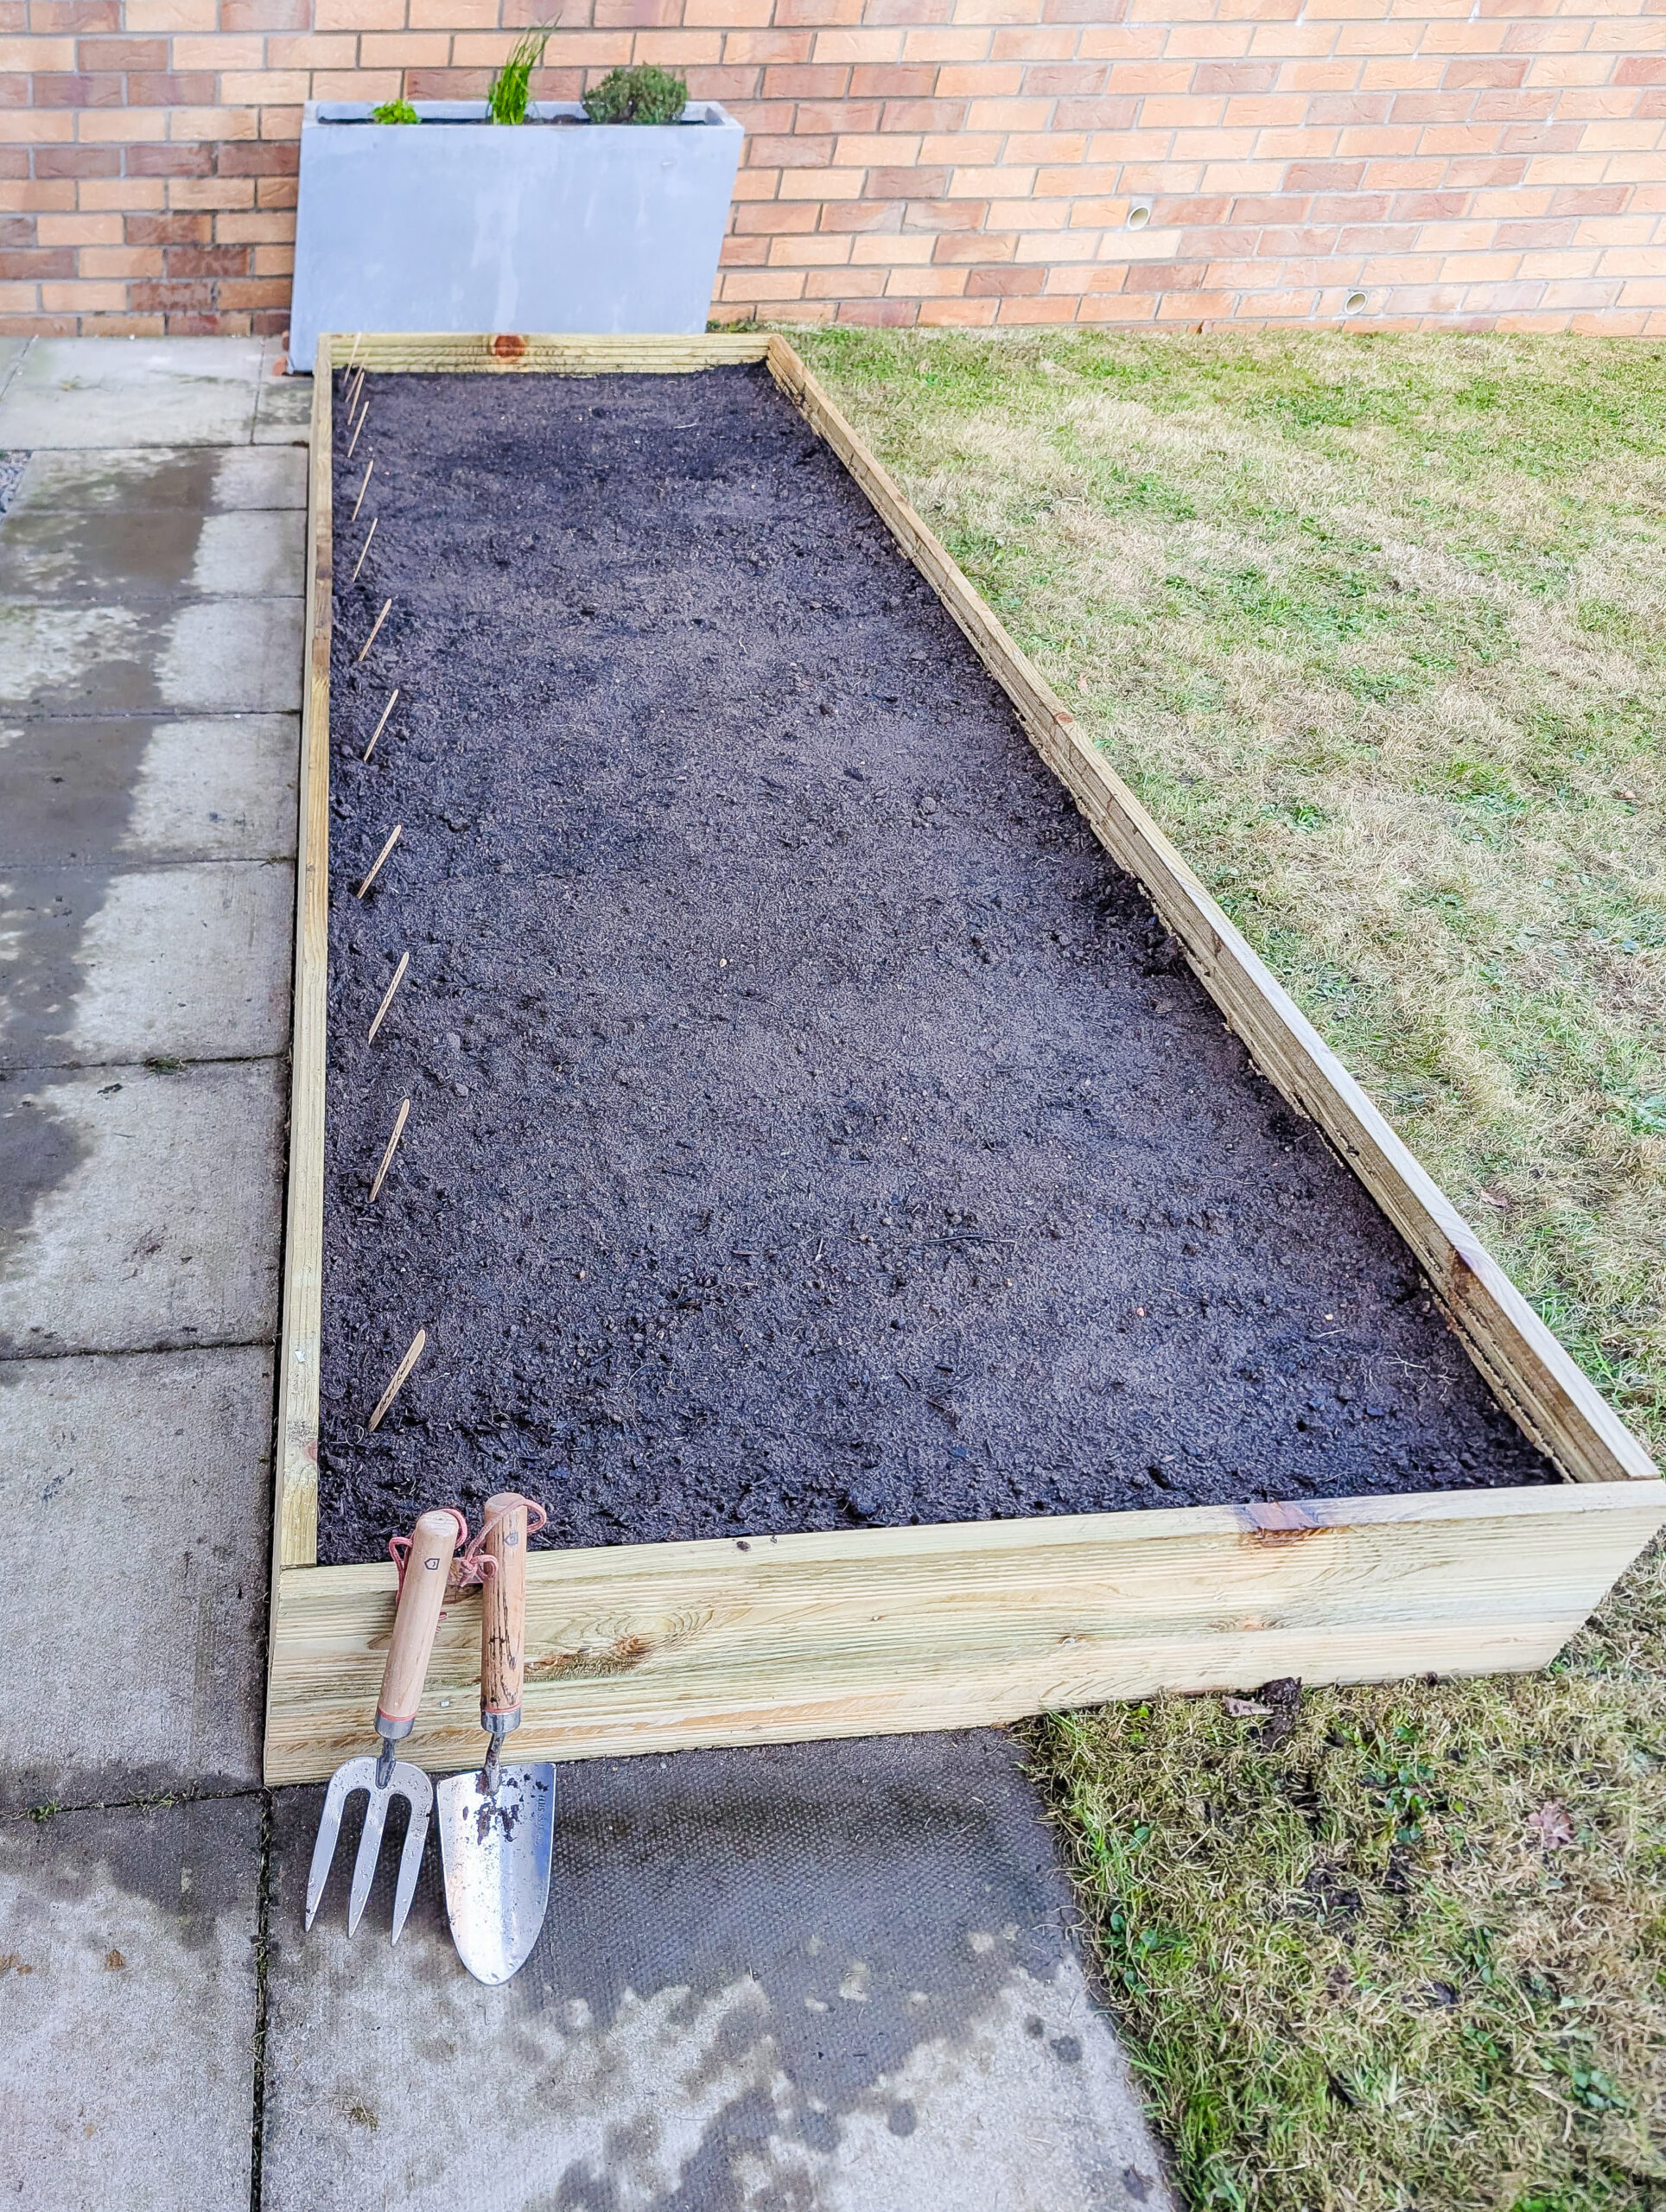
Once the frame is assembled, check it with a spirit level and adjust if anything is slightly off before tightening all the screws fully. You can see in the photos how the brown brackets sit discreetly on the inside of the frame, so they're completely hidden from the outside. The finish looks clean and the frame is solid.
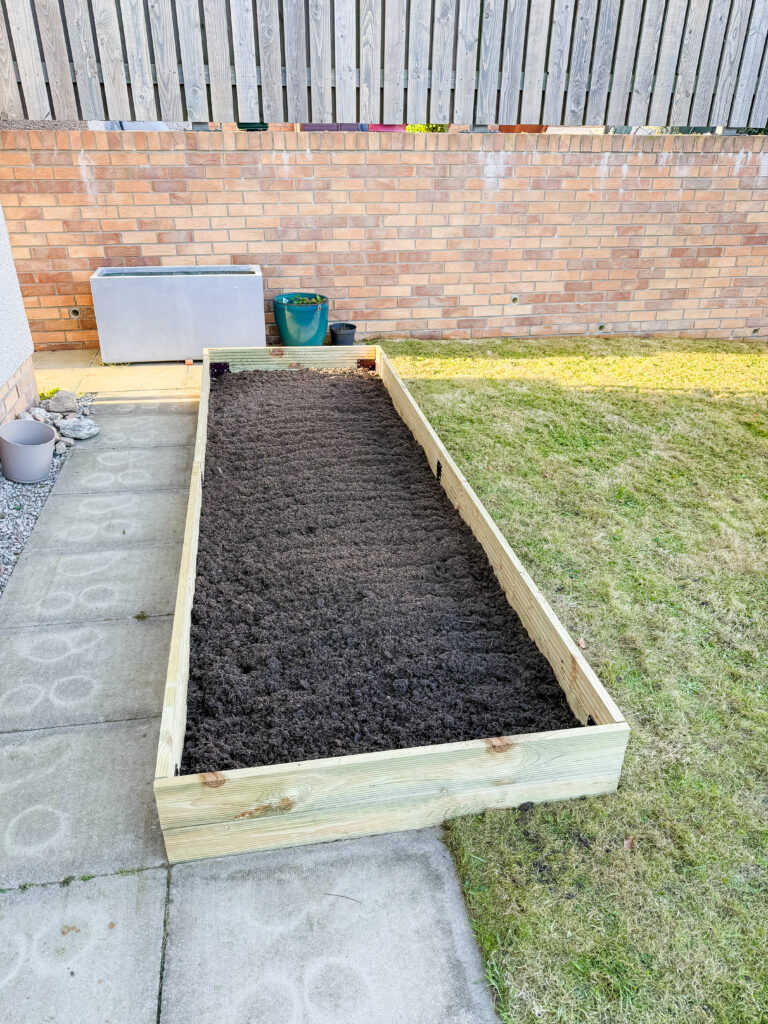
Step 5: Fill and Plant
With the frame in position, fill the planter with soil. We used a mix of topsoil and compost to give the growing mix plenty of nutrients. You don't need to buy anything fancy for the base layer, especially since the decomposing turf underneath will add goodness as it breaks down. Fill to about 2cm below the rim to allow for watering without everything spilling over the edges.
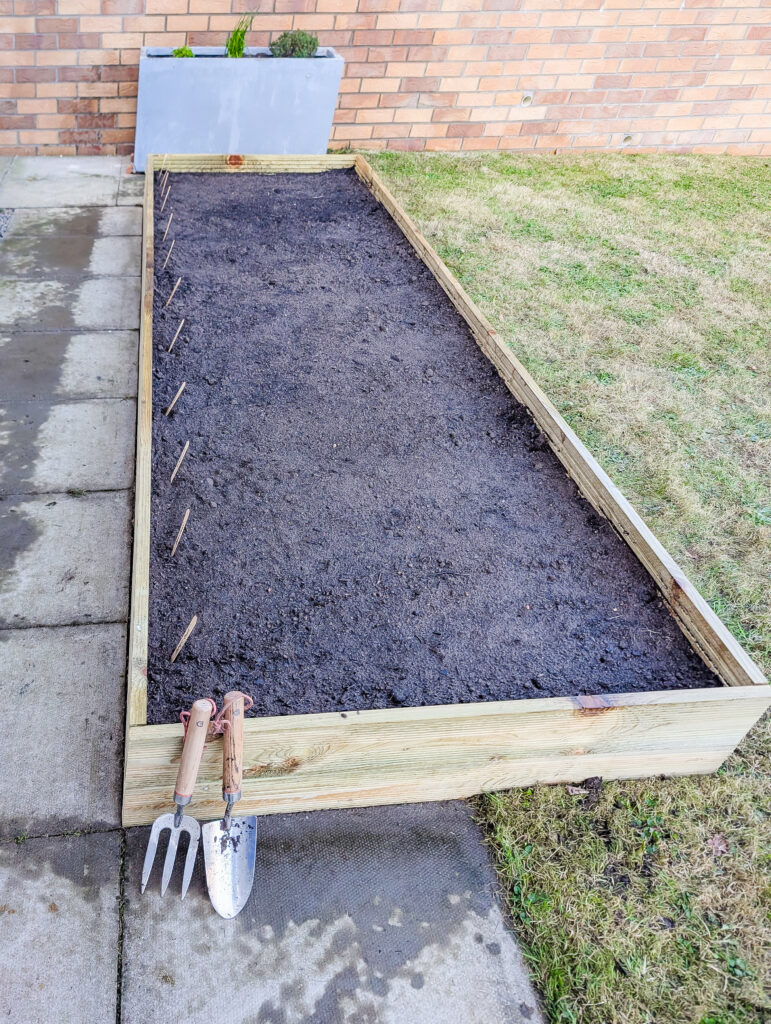
Once filled, sow your seeds according to the spacing instructions on the packets. We went with a mix of vegetables and herbs that we'll actually use in the kitchen, which is the whole point of doing this in the first place.
For marking where everything is planted (because let's be honest, you will forget what you sowed where), we used wooden forks from Tim Hortons as plant markers. They're the perfect size, they're free if you've saved a few, and they have a little flat section where you can write the plant name in permanent marker. Resourceful and surprisingly effective.
Tips for Getting the Best from Your Raised Vegetable Planter
Invest in decent compost for the top layer. The base can be a mix of topsoil and whatever you have, but the top 10cm where the roots will establish should be a good quality peat-free vegetable compost.
Think about sun exposure. Position your planter where it will get at least six hours of direct sunlight a day if you're growing fruiting vegetables like tomatoes, courgettes, or peppers. Leafy greens and herbs are more forgiving with partial shade, so factor that into what you plant and where within the bed.
Don't overcrowd. It's so tempting to cram everything in, especially when you've got a generous planter like this one. But plants need airflow and root space to thrive. Follow the spacing guidance on the seed packets and resist the urge to squeeze in one more row.
Use the perforated plates generously. If your planter is longer than a single board, those mid-span joins are the weak point. Don't skimp on the plates and screws here because once the planter is full of wet soil, there's a lot of outward pressure on the sides. Two plates per join (one on each row of boards) keeps everything solid.
Water consistently. Raised planters dry out faster than ground-level beds because the soil is more exposed to air on all sides. In warm weather, check the soil daily and water in the morning or evening rather than in the heat of the day.
Make It Your Own
The dimensions of our planter were dictated by the space, but the same approach works for any size. A shorter, wider version suits a different garden layout. A narrower planter along a fence line creates a productive border. If bending is difficult, stack three rows of boards high instead of two to bring the growing surface up to a more comfortable height.
You could paint or stain the outside of the boards to match your garden furniture, though we liked the natural treated timber look because it ties in with the rest of the patio area (and I am going to seal it with some decking oil I have in the garage). A dark grey exterior paint would give a more contemporary feel if that suits your space. Composite decking boards are another option if you want something completely maintenance-free and weather-proof, though they're more expensive.
For anyone with room, building two or three planters at different heights and grouping them together creates a tiered kitchen garden effect that looks designed and intentional. Add some climbing frames for runner beans or peas and it starts to look like a proper growing area without any of the heavy groundwork that usually involves.
Frequently Asked Questions
It depends on the size, but our planter used ten standard decking boards. Eight boards made up the two long sides (two end-to-end per row, two rows high, on each side), and two boards were cut in half to make the short ends (two halves stacked at each end). Measure your space and plan the cuts before buying so you know exactly what you need.
Yes, modern pressure-treated decking boards are considered safe for use around edible plants. The treatment used on softwood timber in the UK has changed significantly from older, more toxic methods. If you want an extra layer of reassurance, you can line the inside with landscaping membrane to create a barrier between the wood and the soil.
We used steel perforated plates screwed to the inside of the boards where two met end-to-end. These are inexpensive (a couple of pounds from B&Q), easy to fit, and create a strong, rigid join. Make sure you use outdoor-rated screws so they don't rust over time.
For most common vegetables, a depth of 25 to 30cm (10 to 12 inches) works well. Our two-board-high build gives roughly this depth, which suits salad leaves, herbs, tomatoes, courgettes, radishes, and most other kitchen garden staples. Root vegetables like carrots and parsnips need closer to 40cm, so stack three boards high if those are on your growing list.
Salad leaves, herbs, spring onions, radishes, tomatoes, courgettes, strawberries, and dwarf beans all thrive in raised planters. Anything that likes warm, well-drained soil will do well. Avoid very large or sprawling crops like pumpkins or sweetcorn in a planter this size as they'll quickly take over.
Because our planter sits directly on the ground with no solid base, water drains naturally through the soil underneath. This is one of the advantages of building on grass rather than on a hard patio surface. If you did build on paving, you would want to ensure water can escape, either through gaps between the boards or by drilling a few drainage holes.
A well-built planter using pressure-treated decking boards should last five to ten years or more, depending on the quality of the timber and how much moisture it's exposed to. Composite boards last even longer as they don't degrade at all. Keeping the inside lined with membrane and ensuring good drainage will extend the life of a timber planter significantly.
Building this planter was one of those weekend projects that has a small budget, took a couple of hours, and has already made a noticeable difference to how the garden looks. Turning a scruffy, awkward strip of grass into somewhere we're actually growing our own food feels properly satisfying. If you give this a go, I'd love to see how yours turns out. Tag me on Instagram or drop a comment below.
Stay tuned to see if we actually manage to grow anything in here…
If you're looking for more weekend projects and home ideas, have a browse through the DIY and home section for more inspiration.