Few things feel more like a proper winter treat than wrapping your hands around a mug of rich, creamy hot chocolate. Now imagine dropping in a gorgeous chocolate-coated marshmallow on a stick, watching it slowly melt into the cocoa, and knowing you made it yourself in about twenty minutes. That is exactly what these homemade hot chocolate stirrers deliver, and they are so much simpler than they look.
These are the kind of thing you see in fancy Christmas markets and beautiful independent gift shops, wrapped in cellophane with a ribbon tied round the top, priced at about £4 each. The lovely thing is that you can make a whole batch at home for a fraction of the cost, and they look every bit as special. Whether you are making them for a cosy night in, a thoughtful teacher gift, or a gorgeous addition to a hot chocolate bar at a Christmas gathering, they always get a wonderful reaction.
The recipe itself is barely a recipe at all. It is really more of an assembly job with melted chocolate, marshmallows, and whatever toppings take your fancy. But the result is something that feels genuinely luxurious, the kind of small, considered touch that turns an ordinary evening into a little occasion.
They look like something from a boutique gift shop but take about twenty minutes to make from start to finish. Most of that time is just waiting for the chocolate to set.
They make the most thoughtful homemade gift. Wrap them in a little cellophane bag with a ribbon and a tag, and you have a present that people genuinely remember.
Children absolutely love making them. The dipping and decorating is brilliant fun, and you end up with something they are genuinely proud of.
You can customise them endlessly. Different chocolates, different toppings, different colour schemes for different occasions. They work for Christmas, bonfire night, Valentine's Day, or simply a cold Tuesday in January.
They make hot chocolate taste noticeably better. As the chocolate melts off the stick, it adds richness and depth that a packet of cocoa powder simply cannot match.
A batch of twelve costs roughly the same as buying two from a shop. Everyday luxury at its best.
What You'll Need – Ingredients
Everything here is easy to find in any major UK supermarket. You probably have most of it in the cupboard already.
For the Stirrers:
200g (7oz) good quality chocolate; milk, dark, or white, or a mixture of all three
12 large marshmallows; the big, squidgy ones, not the mini ones
12 lollipop sticks or sturdy wooden skewers
Mini marshmallows for topping, roughly 50g (2oz)
For Decorating (choose your favourites):
Crushed candy canes or peppermint bark, roughly 30g (1oz)
Festive sprinkles or chocolate vermicelli
A pinch of flaky sea salt
Edible gold or silver stars
Chopped pistachios or freeze-dried raspberries for a more grown-up finish
Cacao nibs for a sophisticated dark chocolate version
UK readers note: Tesco, Sainsbury's, and Waitrose all stock lollipop sticks in the baking aisle, usually near the cake decorating supplies. If you cannot find them, sturdy wooden skewers cut in half work perfectly well. For the chocolate, anything from Green & Black's to Cadbury Dairy Milk will work, though a higher cocoa percentage will give you a richer, more complex flavour when it melts into the hot chocolate.
Equipment You'll Need
A heatproof bowl and a small saucepan (for a double boiler) or a microwave-safe bowl
A baking tray lined with baking parchment
A teaspoon or small offset spatula
Cellophane bags and ribbon if you are wrapping them as gifts
That is genuinely it. No specialist equipment, no piping bags, nothing that requires a trip to a kitchen shop. A Le Creuset stoneware mug makes a gorgeous vessel for serving these alongside proper hot chocolate, though.
How to Make Hot Chocolate Stirrers
Step 1: Prepare Your Workspace
Line a baking tray with baking parchment and lay out your toppings in small bowls or on plates so everything is within easy reach. Once the chocolate is on the marshmallows, you need to work fairly quickly before it sets, so having everything ready to go makes the whole process relaxed rather than frantic. This is especially important if you are making these with children. A little preparation goes a long way.
Step 2: Skewer the Marshmallows
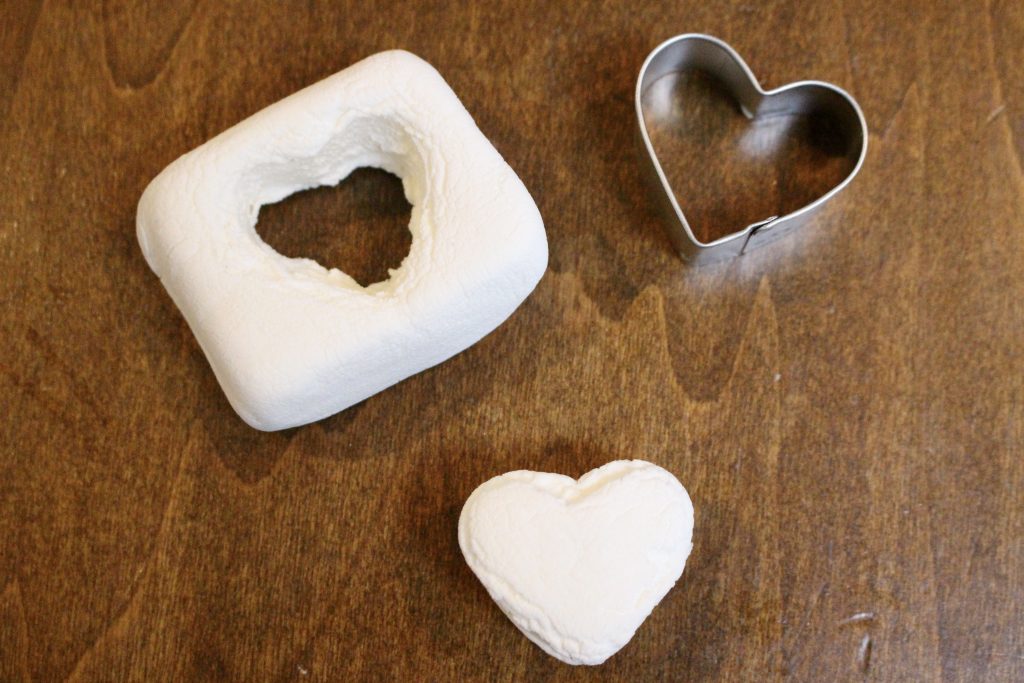
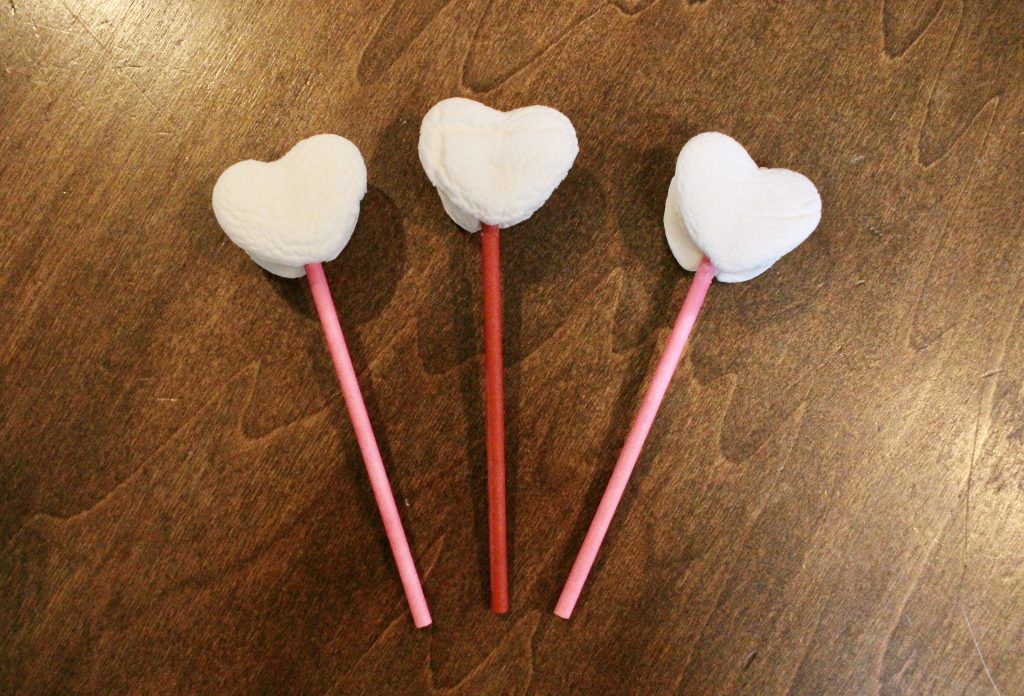
Cut your marshmallow into your desired shape (or don't it's up to you). Push a lollipop stick or wooden skewer into the flat base of each large marshmallow, about halfway through. The marshmallows are naturally sticky, so they grip the stick well. If any feel a little loose, a tiny dab of melted chocolate on the tip of the stick before inserting it will act as glue. Set them aside on the prepared tray.
Step 3: Melt the Chocolate
Break the chocolate into small, even pieces and place them in a heatproof bowl set over a pan of gently simmering water. Make sure the bottom of the bowl does not touch the water. Stir occasionally until the chocolate is completely smooth and glossy. If you prefer the microwave method, heat in 20 second bursts, stirring between each one. Chocolate burns easily, so patience is everything here.
Step 4: Dip and Coat
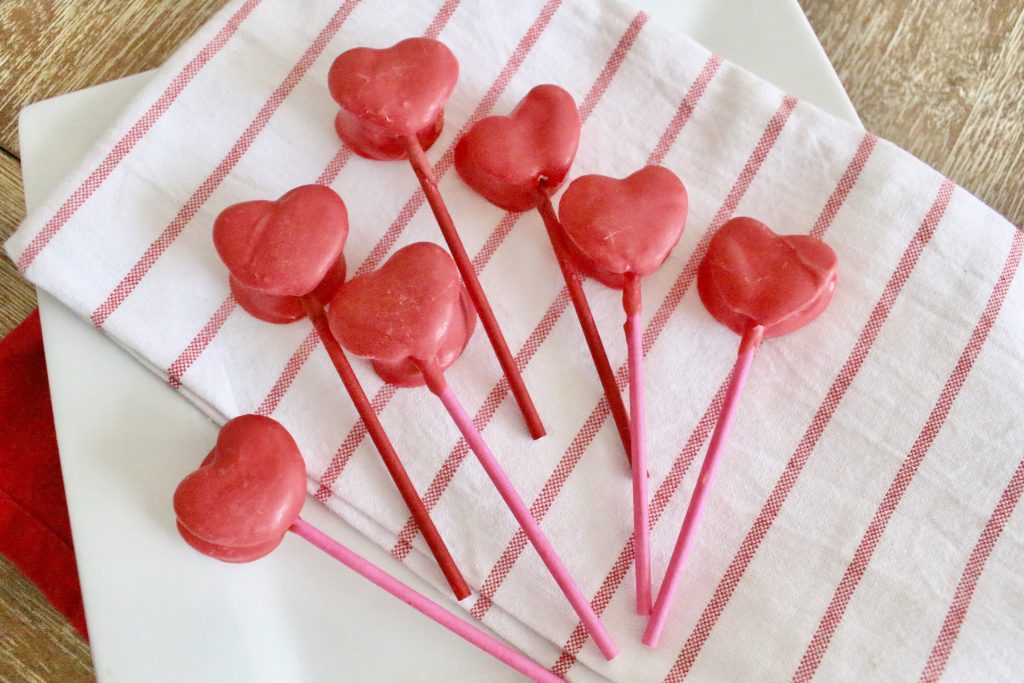
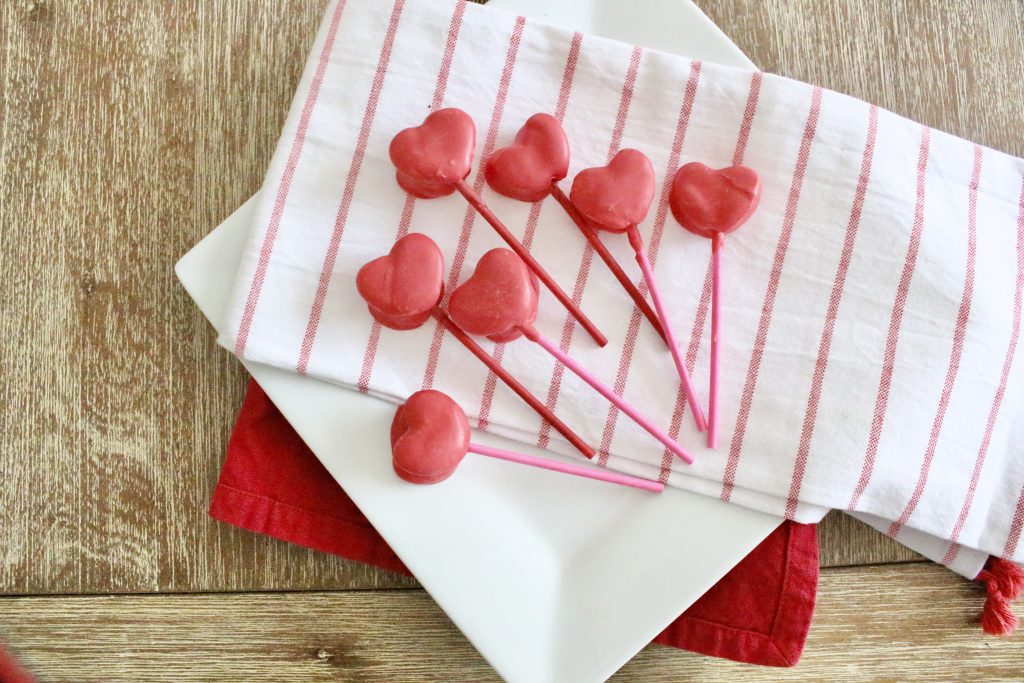
Hold each marshmallow by the stick and dip it into the melted chocolate, turning gently to coat. You can cover the entire marshmallow or just the top half, whichever you prefer. Let the excess chocolate drip back into the bowl for a few seconds, then place the marshmallow, stick pointing up, on the parchment-lined tray. For a thicker chocolate shell, let the first coat set for ten minutes, then dip again. This gives a more satisfying snap when the stirrer goes into the hot chocolate.
Step 5: Decorate While Still Wet
While the chocolate is still tacky, scatter or press your chosen toppings onto the marshmallow. Mini marshmallows, crushed candy cane, sprinkles, chopped nuts, whatever you fancy. Work one at a time so the chocolate does not set before you have finished decorating. This is the fun, creative bit, and where children really come into their own.
Step 6: Set and Serve (or Wrap)
Leave the hot chocolate stirrers on the tray at room temperature until the chocolate has fully hardened, usually about 30 to 45 minutes. If you are in a hurry, ten minutes in the fridge will speed things up. Once set, they are ready to use. Pop one into a mug, pour over hot milk or hot chocolate, and stir gently as the chocolate and marshmallow melt into something absolutely gorgeous.
Tips for the Best Hot Chocolate Stirrers
Use the best chocolate you can. This is the single ingredient that makes the biggest difference. The chocolate is the flavour, so investing in something you would happily eat on its own is always worth it. Green & Black's, Lindt, or even a good supermarket own-brand cooking chocolate will give you a far better result than cheap compound chocolate or candy melts.
Do not overheat your chocolate. Overheated chocolate goes grainy and dull, and there is no recovering it. Low, gentle heat is the rule. If using a double boiler, keep the water at a gentle simmer, not a rolling boil. If using the microwave, 20 second bursts with a stir between each are much safer than one long blast.
Work in small batches. If you are making a large number of stirrers, melt your chocolate in stages. It is easier to keep a small amount smooth and workable than to manage a big bowl that starts setting before you have finished.
Double dip for a thicker shell. If you want that satisfying crack when the stirrer meets the hot chocolate, let the first coat of chocolate set, then dip again. Two thin layers give a better result than one thick one.
Make a flavoured version. Stir a few drops of peppermint extract into your melted chocolate for a gorgeous peppermint hot chocolate stirrer. Orange extract works beautifully too, and a tiny pinch of chilli flakes in dark chocolate is genuinely wonderful if you like a bit of warmth.
Consider the presentation. Even a simple cellophane bag tied with a ribbon transforms these from a kitchen project into a proper gift. Add a small tag with instructions (“Stir me into a mug of hot milk”) and you have something really special. This is the kind of thoughtful, homemade present that people appreciate far more than yet another candle.
Make It Your Own
The base recipe is a blank canvas, and that is half the fun.
For a peppermint candy cane version, use dark chocolate and crushed candy canes. The combination of rich, slightly bitter chocolate and cool peppermint is perfect for Christmas Eve hot chocolate or as a Boxing Day treat.
For a white chocolate and raspberry version, dip in white chocolate and top with freeze-dried raspberries and a light dusting of edible glitter. These look absolutely stunning and taste like a berry and cream dessert in a mug.
A salted caramel version is as simple as drizzling a little caramel sauce over the chocolate coating and finishing with a pinch of flaky Maldon sea salt. Serve with hot milk for the most indulgent hot chocolate you have ever had.
For a grown-up after dinner version, use a high-quality dark chocolate (70% cocoa or higher), top with cacao nibs and a dusting of espresso powder. Stir into hot milk with a splash of Baileys or Cointreau for something genuinely special.
If you want a children's party version, use milk chocolate and let the children go wild with rainbow sprinkles, mini marshmallows, and chocolate buttons. Set up a decorating station with bowls of toppings and let everyone make their own. It is a brilliant, low-mess party activity.
For a vegan option, use a good quality dairy-free dark chocolate and swap the marshmallows for vegan marshmallows, which are increasingly easy to find. Dandies and Freedom are both widely available in UK health food shops and some supermarkets.
Frequently Asked Questions
How long do hot chocolate stirrers last?
Wrapped in cellophane or stored in an airtight container at room temperature, your hot chocolate stirrers will keep for two to three weeks. If you have used marshmallows, bear in mind they can start to firm up after about a week, so for the best texture, aim to use or gift them within ten days.
Can I make hot chocolate stirrers in advance?
Absolutely, and they are ideal for batch-making before Christmas or a party. Make them up to two weeks ahead, wrap them individually in cellophane, and store them in a cool, dry place. They actually make brilliant assembly-line projects for a weekend afternoon.
What chocolate is best for hot chocolate stirrers?
A good quality chocolate that you enjoy eating on its own will give you the best flavour. For a richer taste, look for milk chocolate with at least 30% cocoa solids or dark chocolate around 50 to 70%. Avoid very cheap chocolate or candy melts as these can taste waxy and do not melt as smoothly.
Can I use candy canes instead of lollipop sticks?
Yes, and they look gorgeous. Snap off the curved top of a candy cane to use as the handle and push the straight end into the marshmallow. You get a built-in peppermint flavour as a bonus. Just be gentle when inserting them as candy canes are more fragile than lollipop sticks.
Do hot chocolate stirrers work with just hot milk?
They do, and beautifully. Heating a mug of milk (dairy or plant-based) and stirring in one of these turns plain milk into a proper, rich hot chocolate. The chocolate melts off the stick and creates the hot chocolate itself, so you do not need a separate cocoa mix at all.
Can children make hot chocolate stirrers?
This is one of the best kitchen activities for children. The melting part should be supervised by an adult, but the dipping and decorating is perfectly safe and endlessly entertaining. Children from about four upwards will love choosing toppings and designing their own creations.
How do I stop the toppings falling off?
The key is to add your toppings while the chocolate is still wet and tacky. If the chocolate has started to set, the toppings will not stick properly. Work one stirrer at a time, dip it, decorate it, then move on to the next.
How to Store and Gift
Room temperature: Store finished stirrers in a single layer in an airtight container, separated by parchment paper if stacking. They will keep for two to three weeks in a cool, dry place. Avoid storing them anywhere warm as the chocolate will soften.
Fridge: You can refrigerate them, but chocolate can develop a white bloom (a harmless cocoa butter film) when chilled and then brought back to room temperature. This does not affect the taste but is less visually appealing. If you do refrigerate, keep them in an airtight container.
Freezer: Hot chocolate stirrers freeze well for up to two months. Wrap each one individually in cling film, then place them in a freezer bag. Let them come to room temperature before unwrapping to avoid condensation on the chocolate.
Gifting tip: Place each stirrer in a clear cellophane bag, tie with a ribbon, and attach a small tag that reads “Stir me into a mug of hot milk” or “Add to your favourite hot chocolate.” Pair with a beautiful mug or a tin of quality hot chocolate powder for a complete gift set. This makes a wonderful teacher gift, neighbour gift, or stocking filler.
Recipe Card
Homemade Hot Chocolate Stirrers
Chocolate-dipped marshmallow pops that melt into gorgeous hot chocolate when stirred into warm milk. Perfect for cosy evenings in or as a beautiful homemade gift.
Toppings of your choicecrushed candy canes, sprinkles, chopped nuts, freeze-dried fruit, flaky sea salt, edible glitter
Equipment
Heatproof bowl and small saucepan (double boiler) or microwave-safe bowl
Baking tray
Baking parchment
Teaspoon or small offset spatula
Cellophane bags and ribbon (for gifting)
Method
Line a baking tray with parchment paper. Lay out toppings in small bowls.
Push a lollipop stick into the flat base of each large marshmallow, about halfway through.
Break the chocolate into small pieces. Melt gently in a heatproof bowl over simmering water, stirring occasionally until smooth. Alternatively, microwave in 20 second bursts, stirring between each.
Dip each marshmallow into the melted chocolate, turning to coat. Let excess drip off, then place stick-side up on the tray.
While the chocolate is still wet, press or scatter your chosen toppings onto the marshmallow.
Leave at room temperature for 30–45 minutes until fully set, or refrigerate for 10 minutes.
To serve, place a stirrer in a mug, pour over hot milk, and stir gently as the chocolate melts.
Notes
For a thicker chocolate shell, let the first coat set, then dip a second time before adding toppings. Store in an airtight container at room temperature for up to two weeks. Wrap individually in cellophane for gifting. For a peppermint version, stir a few drops of peppermint extract into the melted chocolate before dipping.
If you make a batch of these, I would love to see how you decorate them. Tag me on Instagram at @gillianfromhome or drop a comment below with your favourite topping combination. And if you are looking for more cosy kitchen ideas, have a browse through my recipe collection.