How to Create a Weathered Wood Ceiling: Transforming a Pine Plank Ceiling from Dated to Beautiful


There's something about looking up and seeing a beautifully finished ceiling that completely changes the way a room feels. When we moved into our home, the family room had wall-to-wall pine plank ceilings, and while I appreciate the warmth of natural wood, this particular situation felt a little… trapped in time. The floors and ceilings were the same tone, the whole space had a distinctly 1980s wood cabin energy, and it desperately needed breathing room. My first instinct was to paint it white and be done with it, but our painter suggested something entirely different: a weathered wood ceiling treatment that would keep the character of the wood while giving it an elevated, modern finish. And honestly, I'm so glad we listened.
A weathered wood ceiling turned out to be the perfect middle ground. It kept the texture and dimension of the original pine planks but completely transformed the mood of the room. Instead of feeling closed in and heavy, the space suddenly felt lighter, brighter, and far more considered. It's the kind of finish that makes people look up and notice the ceiling the moment they walk in, which is exactly what you want from a statement feature like this.
If you've been staring at a dated pine ceiling (or any wood-clad surface, really) and wondering what to do with it, this post is for you. Whether you're planning to hire a professional or tackle it yourself, here's everything you need to know about creating a beautiful weathered wood look that feels anything but ordinary.
Why a Weathered Wood Ceiling Works So Well
Before jumping into the how, it's worth talking about the why. A weathered wood ceiling finish is one of those rare design choices that manages to feel both rustic and refined at the same time. It softens the heaviness of natural pine without losing the character that wood brings to a space. The grey tones add a sense of calm and sophistication, while the natural grain still shows through, giving you all the texture and warmth of real wood with none of the dated feel.
This kind of finish works beautifully in cottage-style homes, farmhouse interiors, and even more contemporary spaces where you want to add an organic element without it feeling too rustic. It pairs gorgeously with white walls, neutral furnishings, and soft textiles, creating an atmosphere that feels curated and intentional rather than accidental.
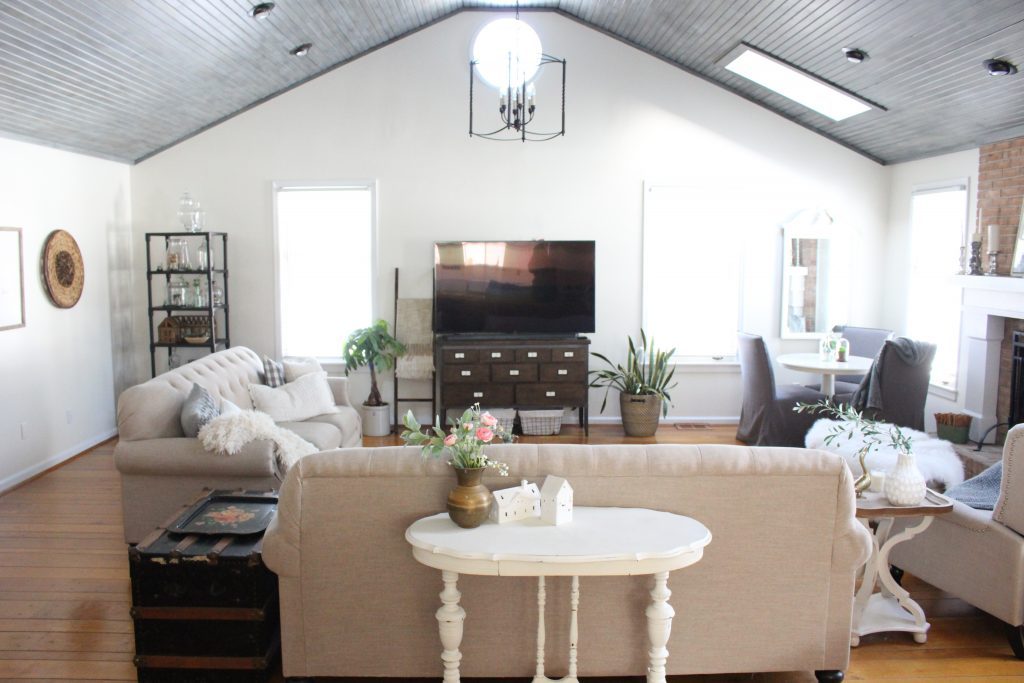
For us, it also made the room feel significantly larger. That matchy-matchy effect of identical wood tones on the floor and ceiling had been making the space feel smaller than it actually was. Breaking up those tones with a lighter, grey-washed weathered finish on the ceiling gave the room much-needed visual separation and made it feel open and airy.
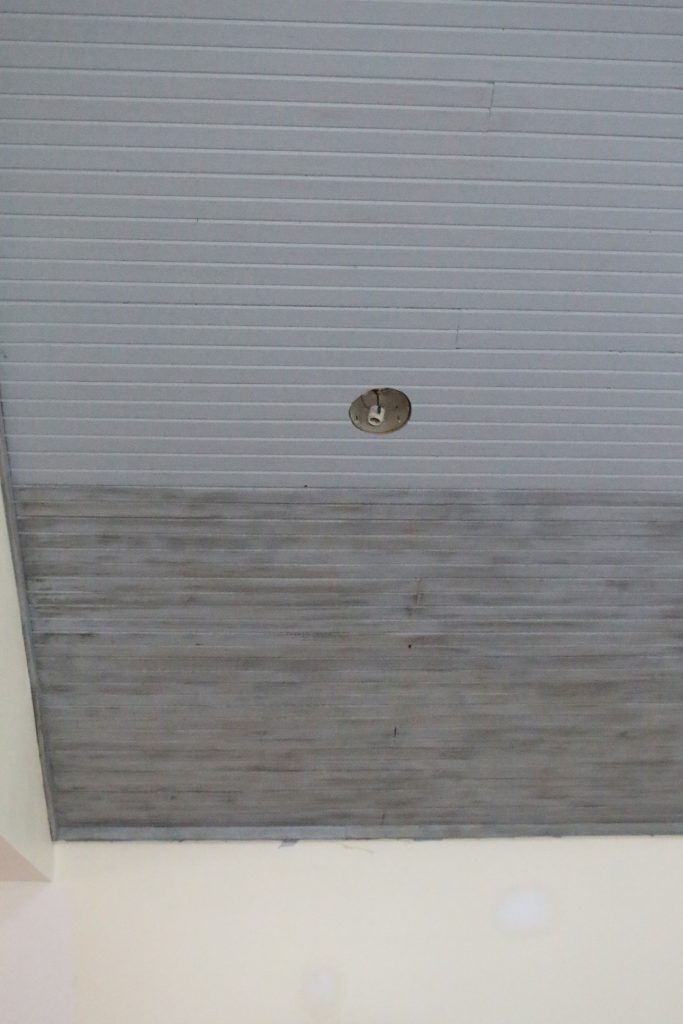
The Before: What We Were Working With
To give you an idea of just how much wood we were dealing with, here's what the ceiling looked like when we first moved in. Wall-to-wall pine planks, vaulted ceiling, all in that warm honey tone that was popular decades ago. It wasn't ugly by any means, but paired with similar-toned floors, it felt overwhelming. The room needed something to break up all that wood, and the ceiling was the obvious candidate.


The Process: How to Create a Weathered Wood Look on a Pine Ceiling
Here's the method our painter used to create the weathered wood ceiling, along with tips she shared with us along the way. This technique works on any pine or softwood surface, so if you're not ready to commit to a ceiling project, you could absolutely try it on a smaller piece first, like a wood-panelled wall, a set of shelves, or even a piece of furniture.
What You'll Need
- 123 Primer, tinted to grey
- Dark grey stain
- Tan stain
- Acrylic glaze
- Paint sprayer (for the primer)
- Good quality brushes (for the glaze work)
- Mixing containers
- Scrap wood for testing
- Scaffolding (if working on a ceiling)
Step 1: Prepare and Prime
The first step is applying 123 Primer tinted to grey using a paint sprayer. This creates a consistent base layer that tones down the warm orange of raw pine and gives you a neutral foundation to build your weathered finish on. A sprayer is ideal for a ceiling because it gives even coverage quickly, but if you're working on a smaller surface, a roller or brush would work too.
Don't skip the primer. Working directly with stain on raw pine often results in a patchy, uneven finish because pine absorbs stain differently across its grain. The tinted primer evens things out and sets the stage for a much more polished result.
Step 2: Mix Your Glaze
This is where the magic happens. Mix your dark grey and tan stains with an acrylic glaze. The glaze extends the working time of your stain, giving you the ability to manipulate it on the surface rather than watching it soak in immediately. It also creates a translucent quality that lets the wood grain show through, which is exactly what gives weathered wood its beautiful, layered depth.
According to our painter, getting the ratio right was a process of trial and error. She mixed and sampled multiple combinations until she found the exact blend that gave us the look we wanted. Every piece of wood takes colour slightly differently, so there's really no substitute for testing first.
Step 3: Apply the Glaze by Hand
Once your glaze mix is ready, brush it on by hand in small sections, working your way across the wood. Hand-brushing rather than spraying is important here because it's what gives the finish its variation and natural-looking depth. You want some areas to be slightly darker than others, mimicking the way real weathered wood looks after years of natural ageing.
Work in manageable sections so the glaze doesn't dry before you've had a chance to manipulate it. A ceiling is a big surface, so having a plan for where you'll start and how you'll work your way across is essential.
Step 4: Step Back and Tweak
Once you've worked through a section, stand back and look at it from a distance. This is where you fine-tune. Add more glaze to areas that look too light, or blend out sections that feel too heavy. The beauty of working with a glaze is that it's forgiving; you can build up layers gradually until you're happy with the overall effect.
This step is genuinely the most important part of the whole process. What looks right up close might look patchy from across the room, so keep stepping back to check the balance.
Step 5: Let It Dry and Assess
Once you've finished the full surface, let it dry completely before making any final judgements. Stain and glaze often look slightly different when dry, and you want to see the finished result in different lighting before deciding if you need to add another layer anywhere.
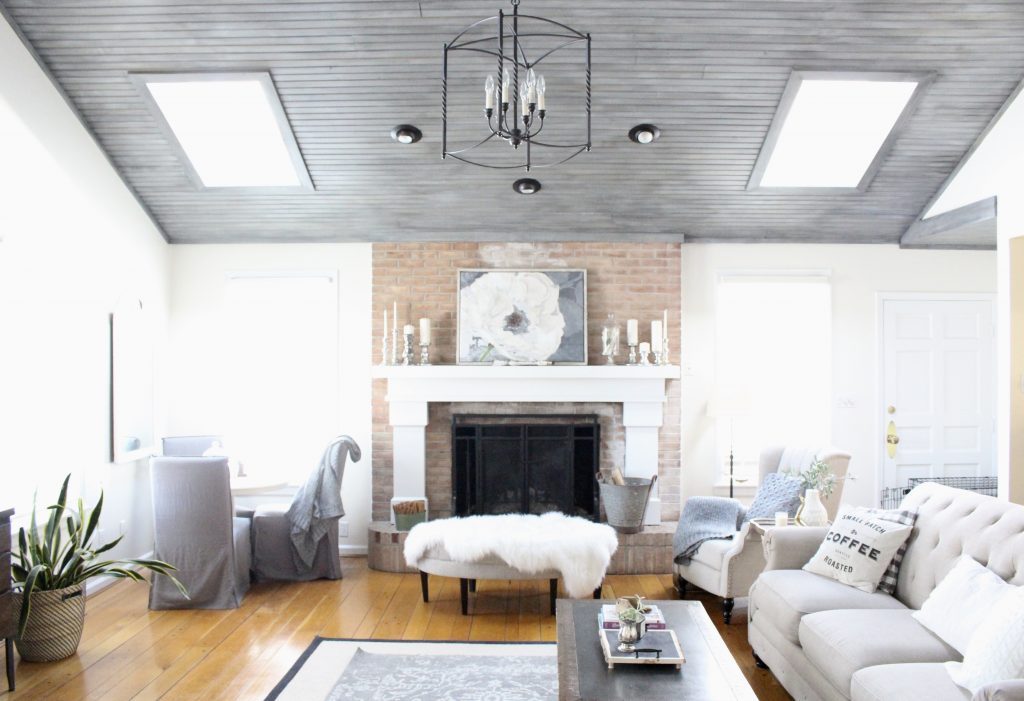
The Result: A Ceiling That Completely Transformed the Room
The difference was genuinely dramatic. What had been a heavy, dated pine ceiling became a beautiful weathered grey focal point that gave the entire room a lighter, more elevated feel. The grey tones play beautifully against white walls and soft furnishings, and the natural wood grain still adds warmth and texture. It's the kind of feature that looks expensive and intentional without feeling overdone.
We couldn't be happier with how it turned out. It was a big job (and I'm very glad we had a professional handle it, particularly given the scaffolding involved), but the impact on the room was absolutely worth it.
Tips If You're Thinking of Doing This Yourself
While we hired a painter for ours (working overhead on scaffolding isn't for the faint of heart), this is a technique you could absolutely take on as a DIY project. Here are a few things worth keeping in mind.
Always test on scrap wood first. This cannot be overstated. Grab some offcuts of pine and experiment with your primer, stain, and glaze ratios until you find a combination you love. What looks gorgeous on one piece of wood might look completely different on another, so testing is essential.
Invest in good quality brushes. Cheap brushes leave streaks and lose bristles, which is the last thing you want on a ceiling you'll be looking at every day. A good set of brushes makes the application smoother and gives you far more control over the finish.
Work in natural light where possible. Artificial lighting can be deceiving when you're trying to judge colour and balance. If you can, work during the day with as much natural light in the room as possible.
Don't rush it. This isn't a one-afternoon project if you're doing a full ceiling. Take your time with each section and allow yourself breaks to step back and assess. A weathered wood finish is all about subtlety and variation, and that's much easier to achieve when you're not racing against a deadline.
Consider the rest of the room. A weathered wood ceiling looks best when the rest of the space complements it. White or light grey walls, natural textures like linen and jute, and warm metallics all work beautifully alongside grey-washed wood.
Could This Work in Your Home?
A weathered wood ceiling isn't just for cottage-style homes or farmhouse interiors. This technique works anywhere you have existing wood that feels tired or dated, including pine-clad walls, wood panelling, beams, or even wooden furniture. The principle is the same: tone down the warmth of natural wood with grey, build up layers of depth with a glaze, and let the natural grain do the rest.
If you've been debating whether to paint over your pine or leave it as is, a weathered wood finish might be the perfect compromise. It's the kind of detail that makes a room feel thoughtfully designed without losing any of the character that real wood brings.
Shop the Room

If this has given you the itch to pick up a paintbrush (or at the very least, start browsing paint swatches), you'll find plenty more projects like this over in my DIY section. From small weekend updates to full room transformations, it's where I share all the home projects we've tackled, what worked, what didn't, and whether I'd do it again. Have a browse and see what inspires you.


I love the grey ceiling. The whole room looks so much different with it. Great transformation! I love the painting above the fireplace, did you made it or did you bought it?
Wow, this is beautiful. This is helpful. Thanks for this. However, hiring the professional and right contractor is really important because it will surely get the job done right without any accident or damage.
[…] out for what it wants to be and this space wanted a more feminine cottage look. With our gray- washed ceiling and pastel pattern rug, we have gradually been adding new pieces of furniture in variations of […]
I love the grey ceiling. The whole room looks so much different with it. Great transformation! I love the painting above the fireplace, did you made it or did you bought it? If you bought it, can you share a link?
Thank you, Eva. I got it at HomeGoods. Man, I wish you could shop them online. Do you have one near you?
This turned out beautifully, Amy, and gives the room such a brighter, lighter feeling than before!
I love the look of the gray ceiling! You always have such great ideas. I never thought of the wooden planks on the ceiling????I love it!
Thank you, I think it came together really well!