

Every kitchen has at least one wall that just sits there doing nothing. For the longest time, mine was the big stretch behind the kitchen door; too awkward for furniture, too hidden for artwork, and too large to ignore. Then a trip to IKEA, a drill, and a very simple IKEA cookbook shelf hack turned that forgotten wall into one of my favourite spots in the entire house. If you have been searching for clever cookbook storage that looks intentional rather than improvised, this is the project for you.
What You'll Need: The Shopping List
The beauty of this project is that everything comes from one IKEA trip (or online order, no judgement) and the whole thing costs well under £50. Here is what to pick up:
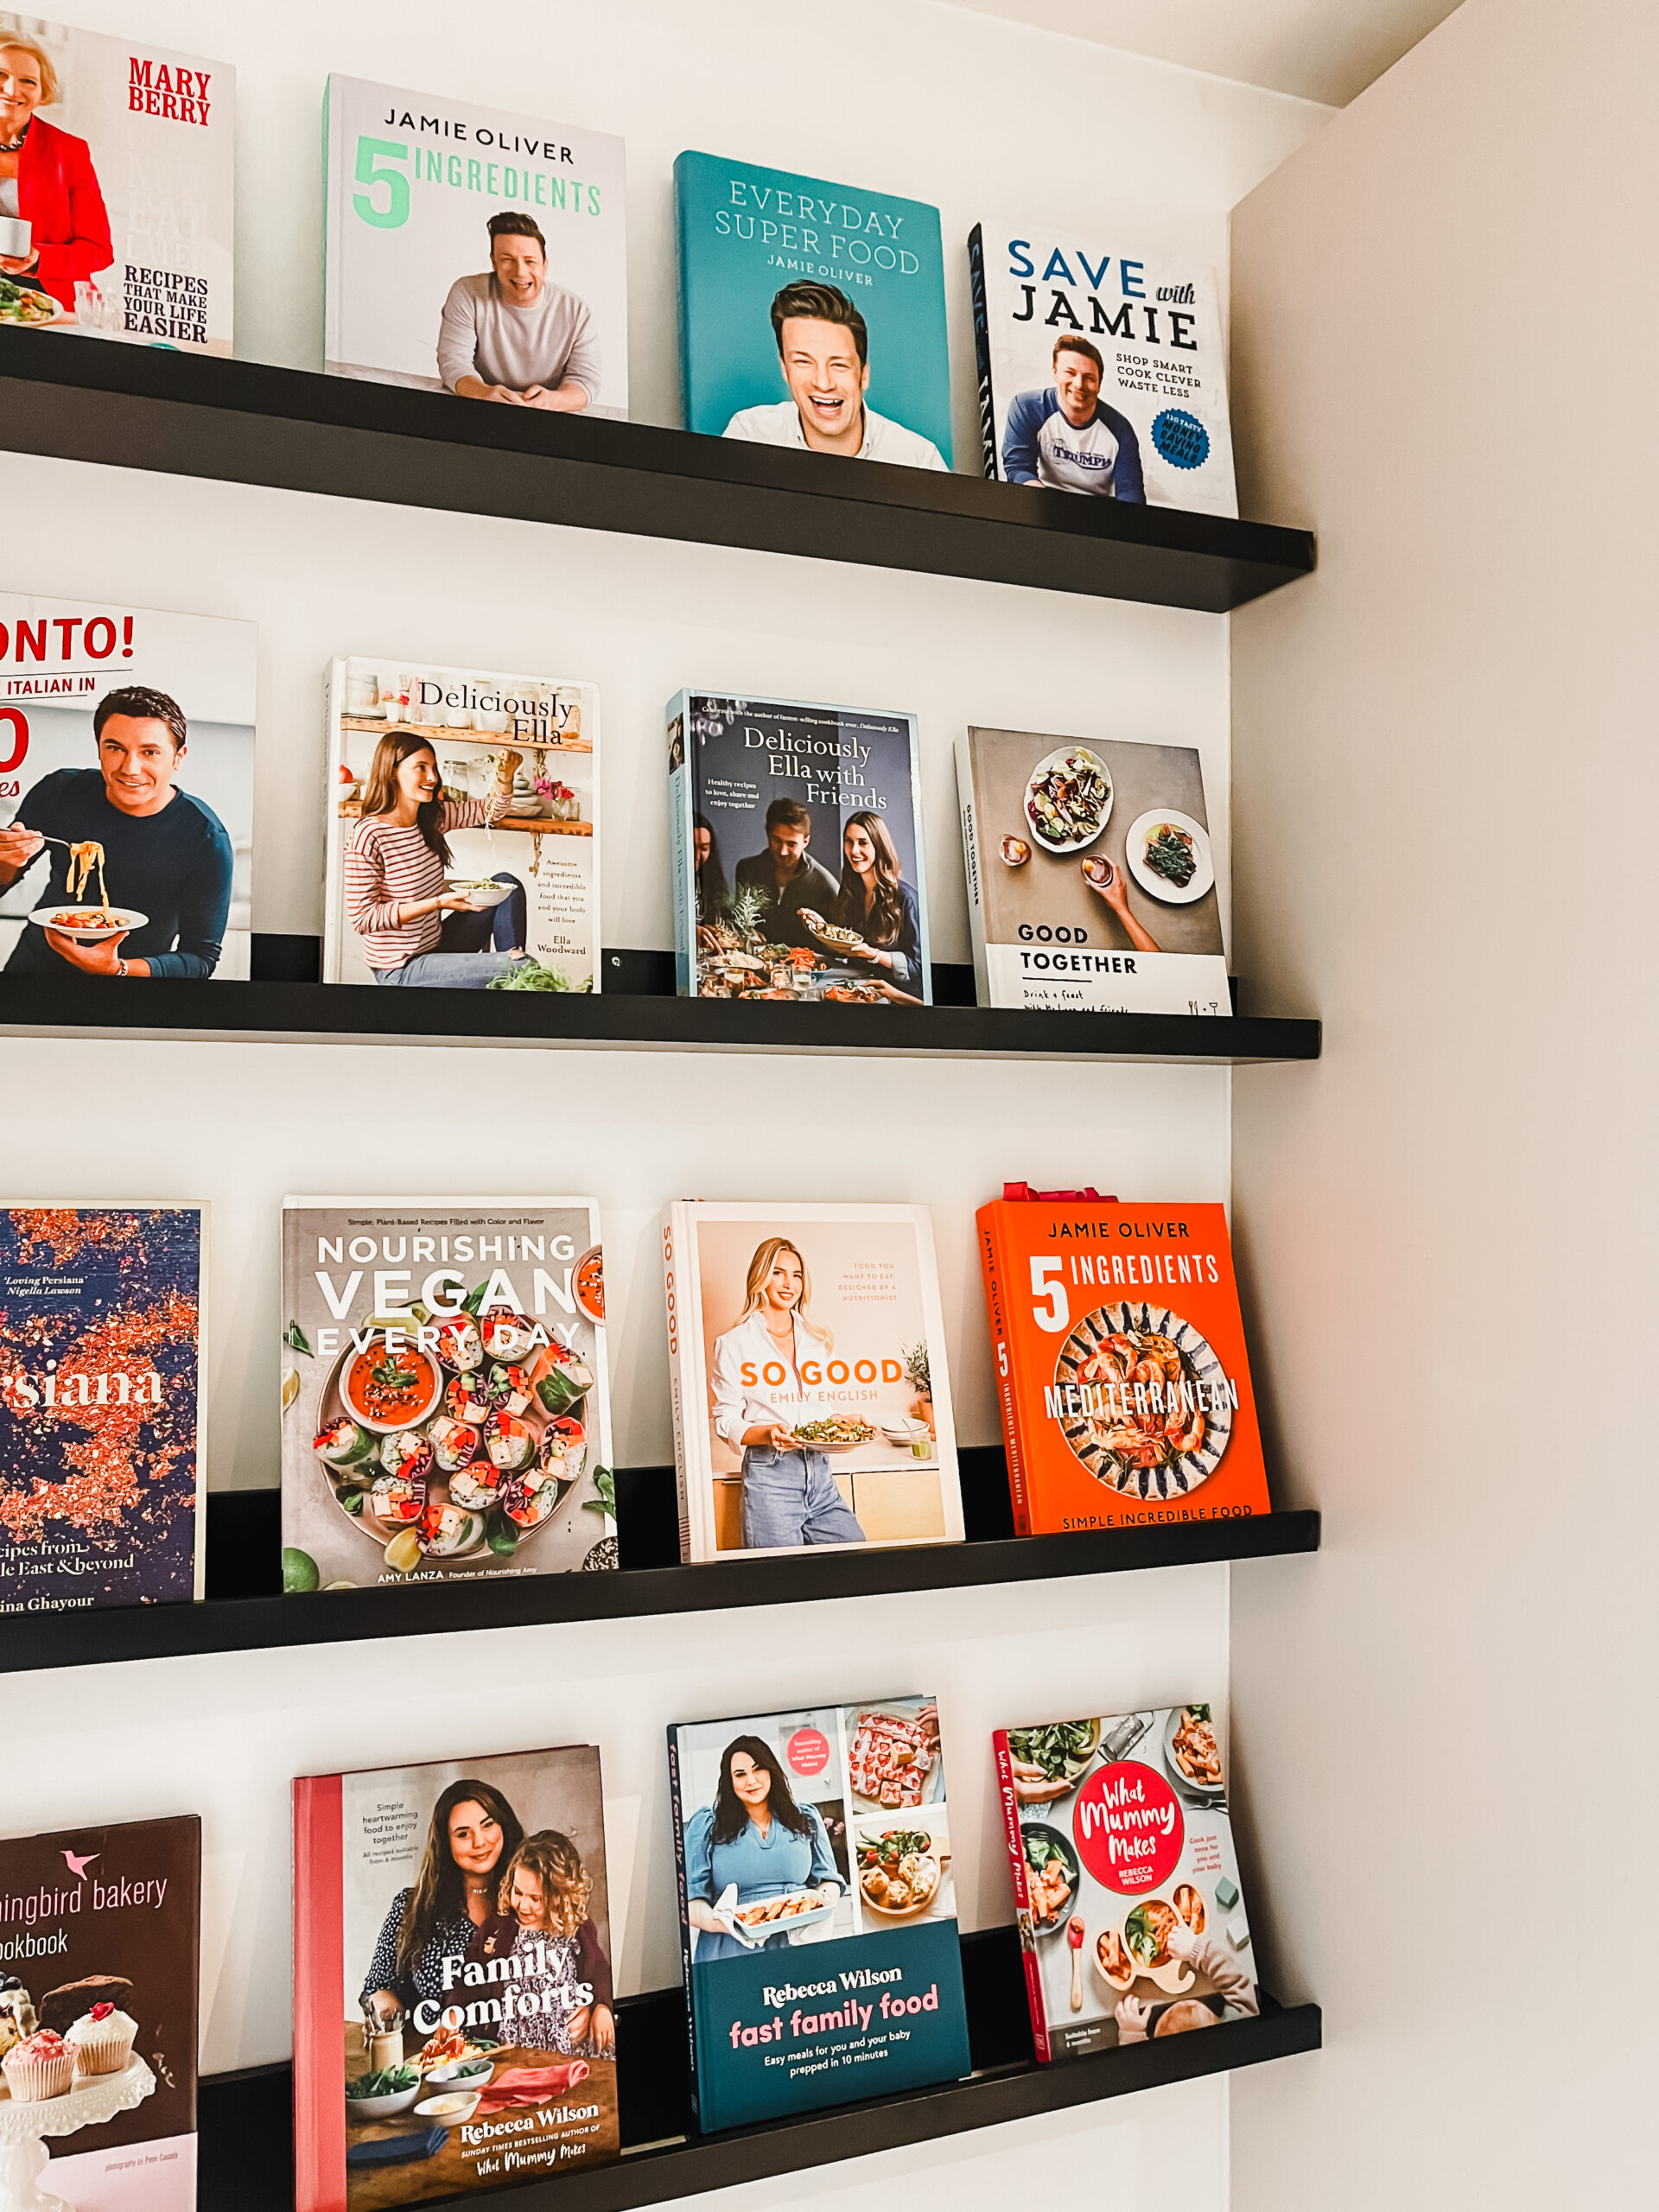
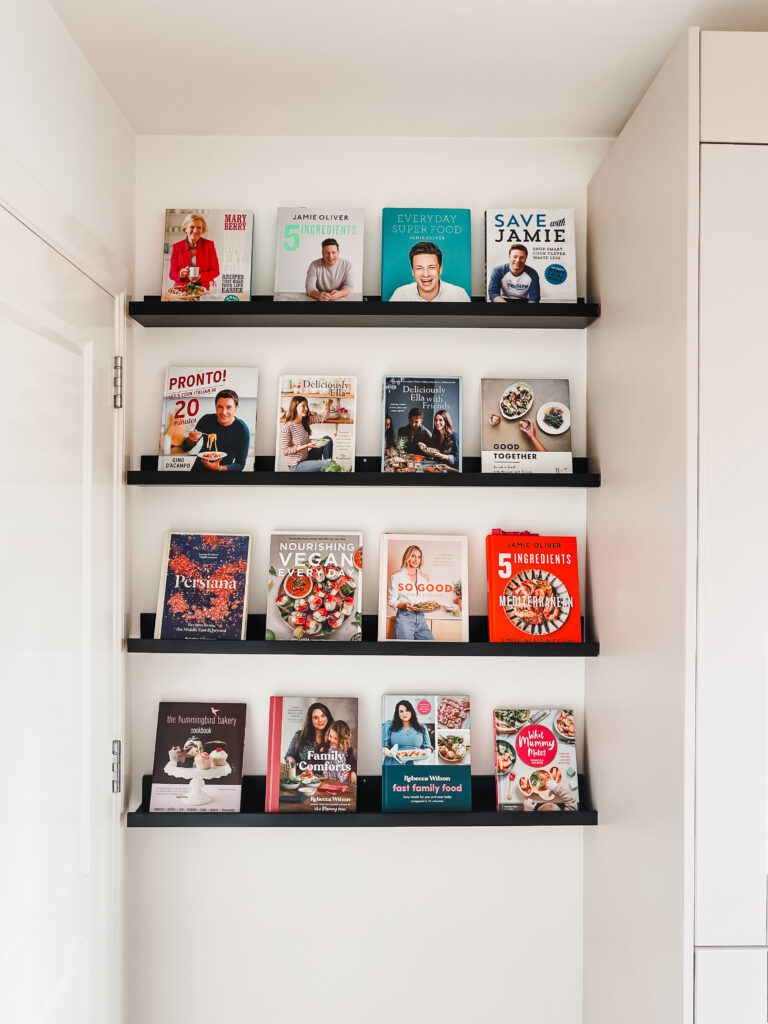
- IKEA Mosslanda picture ledges, 115cm length, in your preferred finish (white, black, oak effect, or walnut effect). The number you need depends on your wall space; four worked perfectly for my setup.
- A spirit level.
- a drill with a masonry or plasterboard bit depending on your wall type.
- wall plugs and screws suitable for your wall (IKEA includes screws but not wall plugs).
- a pencil.
- a tape measure.
That is genuinely it. No specialist tools, no woodworking experience, and no panic.
Why the IKEA Mosslanda Works So Well for Cookbooks
The Mosslanda is technically a picture ledge, designed to hold framed prints at a slight angle. But it turns out that the little groove along the front, the one meant to stop picture frames sliding off, is absolutely perfect for keeping cookbooks upright. The ledge is deep enough to hold most standard cookbooks without them toppling forward, and the lip along the front means you can even prop a book open while you cook without it falling to the floor.
Each 115cm shelf holds a maximum load of 7.5kg, which translates to around six or seven average cookbooks per ledge. Four shelves gave me space for my entire collection and still left room for a small plant and a couple of decorative pieces to break things up visually if I wanted.
The other reason the Mosslanda is ideal for this hack is price. At the time of writing, each 115cm ledge costs around £9, making a four shelf cookbook wall well under £30 before you factor in fixings. For a project that completely changes the look and feel of a kitchen, that is remarkably good value.
How to Build a DIY IKEA Cookbook Shelf in Under an Hour
The installation itself is straightforward, even if you are not particularly confident with a drill. Here is how the whole project came together.
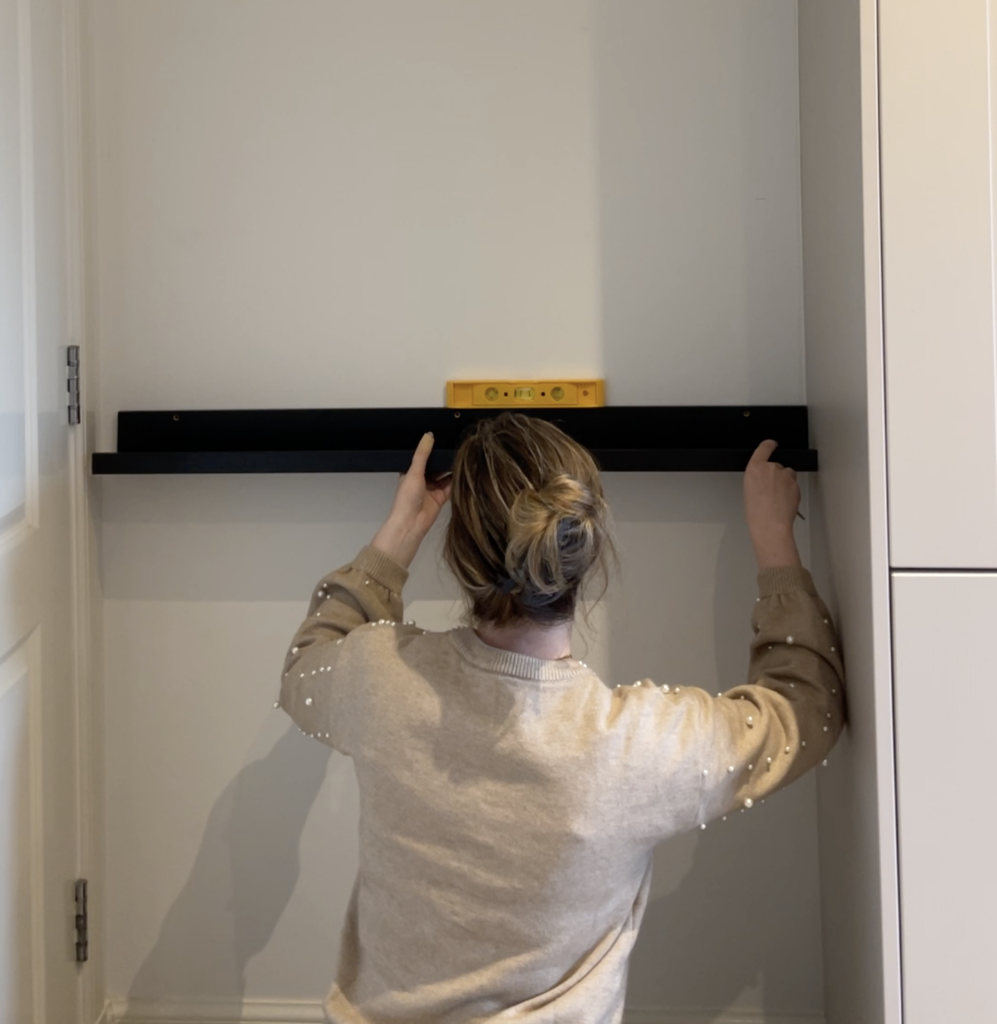
Step 1: Plan Your Layout
Before picking up the drill, hold each shelf against the wall and decide on spacing. Cookbooks are taller than picture frames, so you will want more vertical space between shelves than IKEA's suggested layout for artwork. Somewhere between 30cm and 40cm between each shelf works well for standard cookbooks, though it is worth measuring your tallest book first and adding a few centimetres of clearance.
Use a pencil to lightly mark where the top of each shelf will sit, then step back and check the spacing looks even from the other side of the room. This takes two minutes and saves a lot of regret later.
Step 2: Find Your Fixings
The wall behind my kitchen door is plasterboard over a timber frame, which meant finding the studs was important for a secure fit. If your wall is solid brick or block (common in older UK homes), you will need masonry drill bits and wall plugs rated for the weight. A quick knock on the wall usually tells you what you are dealing with: hollow sounding means plasterboard, solid and dull means masonry.
The Mosslanda comes with screws but not wall plugs, so pick up a pack that suits your wall type. This is genuinely the only extra purchase you need beyond the shelves themselves.
Step 3: Level and Drill
This is the stage where a spirit level earns its keep. Hold the shelf in position, place the level on top, and adjust until the bubble sits dead centre. Mark your drill holes through the pre-drilled holes in the back of the shelf, then set the shelf aside and drill.
A tip that saved me a lot of frustration: get someone to hold the shelf in place while you mark the holes. Trying to balance a shelf, a spirit level, and a pencil with only two hands is a recipe for wonky results.
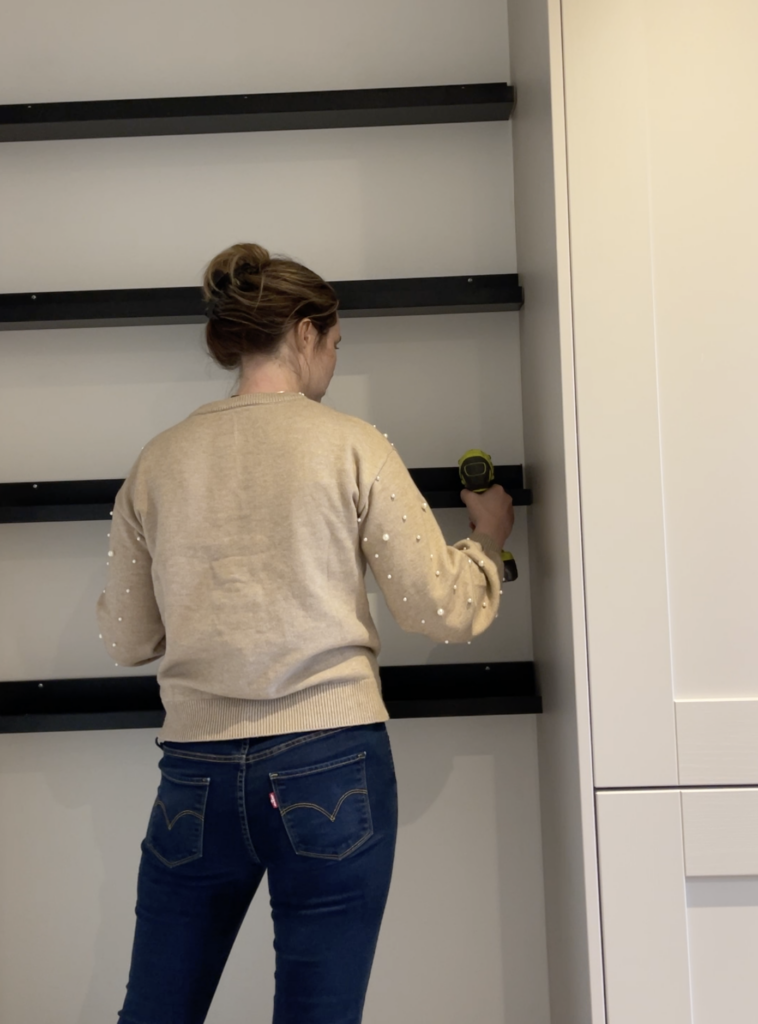
Step 4: Fix the Shelves
Drive the screws through the shelf and into the wall plugs, and give each shelf a firm tug once it is up to make sure it feels solid. Cookbooks are heavier than they look, and you want full confidence in the fixings before loading them up.
Step 5: Style and Fill
This is the enjoyable part. Load your cookbooks onto the shelves, play around with the arrangement, and add a few decorative pieces to keep things looking curated rather than cluttered. More on styling below.
How Do You Make a Cookbook Shelf Out of IKEA Picture Ledges?
The short answer: buy two or three IKEA Mosslanda picture ledges, fix them to a kitchen wall at evenly spaced intervals using a drill and the appropriate wall fixings, and fill them with your cookbook collection. The entire project takes under an hour and costs less than £30 for a three shelf setup. The Mosslanda's front groove keeps books upright, making it one of the simplest and most affordable cookbook storage solutions for small kitchens.
Styling Your IKEA Cookbook Shelf: Making It Look Intentional
A wall of cookbooks can look incredible, or it can look like a charity shop clearance table. The difference is in how you arrange things. Here are the approaches that worked for my space.
Group by theme or colour. Arranging cookbooks by cuisine (baking together, Italian together, quick weeknight meals together) makes the shelf feel purposeful and makes it easier to grab the right book when you need it. If your collection is visually varied, grouping by spine colour creates a more polished look.
Leave breathing room. It is so tempting to cram every shelf full, but a little negative space makes the whole display feel more considered. Leaving a gap at one end of each shelf, or spacing a few books slightly apart, stops the wall from feeling overwhelming.
Mix in one or two non-book items. A small trailing plant, a beautiful olive oil bottle, a ceramic vase, or a mortar and pestle all work well tucked between groups of books. These touches are what take the shelf from “storage” to “feature wall,” and they are the reason guests will comment on it rather than walking straight past.
Face one or two covers outward. If you have a cookbook with a gorgeous cover (and let's be honest, most of us have at least one), turn it face forward so the cover art is on display. It breaks up the row of spines and draws the eye.
Why This IKEA Hack Works Better Than a Traditional Bookcase
A freestanding bookcase in a kitchen takes up valuable floor space, collects dust behind it, and rarely looks like it belongs. Wall mounted shelves, especially slim ones like the Mosslanda, keep the floor clear, make the room feel larger, and create a feature out of what was previously dead wall space.
For anyone working with a smaller kitchen, this is a particularly meaningful difference. The Mosslanda is only about 12cm deep, which means it barely protrudes from the wall. You get full cookbook storage without sacrificing a single centimetre of worktop or walkway. In a galley kitchen or a kitchen diner where every bit of space matters, that is a significant advantage over bulkier storage solutions.
The other benefit is flexibility. If you move house, the shelves come with you. Fill the old screw holes, touch up the paint, and the wall is back to how it was. Try doing that with a fitted bookcase.
Frequently Asked Questions
Each 115cm Mosslanda picture ledge has a maximum load of 7.5kg, which comfortably holds around six to seven standard cookbooks. Thinner paperback cookbooks allow for a few more; oversized coffee table editions may reduce that number slightly. Three shelves will accommodate most personal cookbook collections with room to spare.
If your rental allows picture hooks and small fixings, the Mosslanda is a great option. The screws leave only small holes that are easy to fill and paint over when you move out. For walls where no drilling is allowed at all, heavy duty adhesive strips designed for plasterboard can work for lighter loads, though they are less reliable for the weight of a full shelf of cookbooks.
The Mosslanda picture ledge is the most popular choice for a cookbook wall because the front groove holds books upright, the slim depth does not intrude into the room, and the price point is excellent. The IKEA Bekvam spice rack is another common option, particularly for smaller displays, though it holds fewer books per shelf.
Yes, provided you use the correct fixings. For plasterboard walls, use plasterboard anchors. For solid brick or block walls, use masonry drill bits and wall plugs. The shelves themselves are the same regardless of wall type; it is the fixings that need to match your wall.
Between 30cm and 40cm between each shelf works well for most cookbook sizes. Measure your tallest book and add at least 5cm of clearance above it so you can easily slide books in and out without scraping the shelf above.
Absolutely. A light sand, a coat of primer suitable for laminate surfaces, and two coats of your chosen colour will give you a completely custom finish. This is a lovely way to match the shelves to your kitchen cabinetry or to an accent colour in the room.

The Finished Result
What started as a bit of a puzzle (what on earth do you do with a big wall behind a door?) ended up being one of my favourite changes in the kitchen. The shelves turned dead space into a focal point, and there is something genuinely lovely about walking into the room and seeing all of my favourite cookbooks on display. It makes the kitchen feel more personal, more considered, and more like the kind of space where good food happens.
The whole project cost under £40, took less than an hour, and required nothing more advanced than a drill and a spirit level. If you have a wall that is not pulling its weight, this is one of the simplest ways to change that.
If you are looking for more ways to make your home work harder without spending a fortune, have a look through the home and interiors section for more projects and ideas.