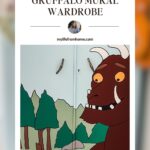
How I Turned a Free Facebook Marketplace Wardrobe Into a Hand-Painted Gruffalo Mural (Full Step-by-Step Guide)


Some DIY projects begin with a mood board, a Pinterest folder, and a carefully costed budget spreadsheet. And then there are projects like this one, which began with a casual scroll through Facebook Marketplace, a wardrobe being given away for free, and absolutely zero plan.
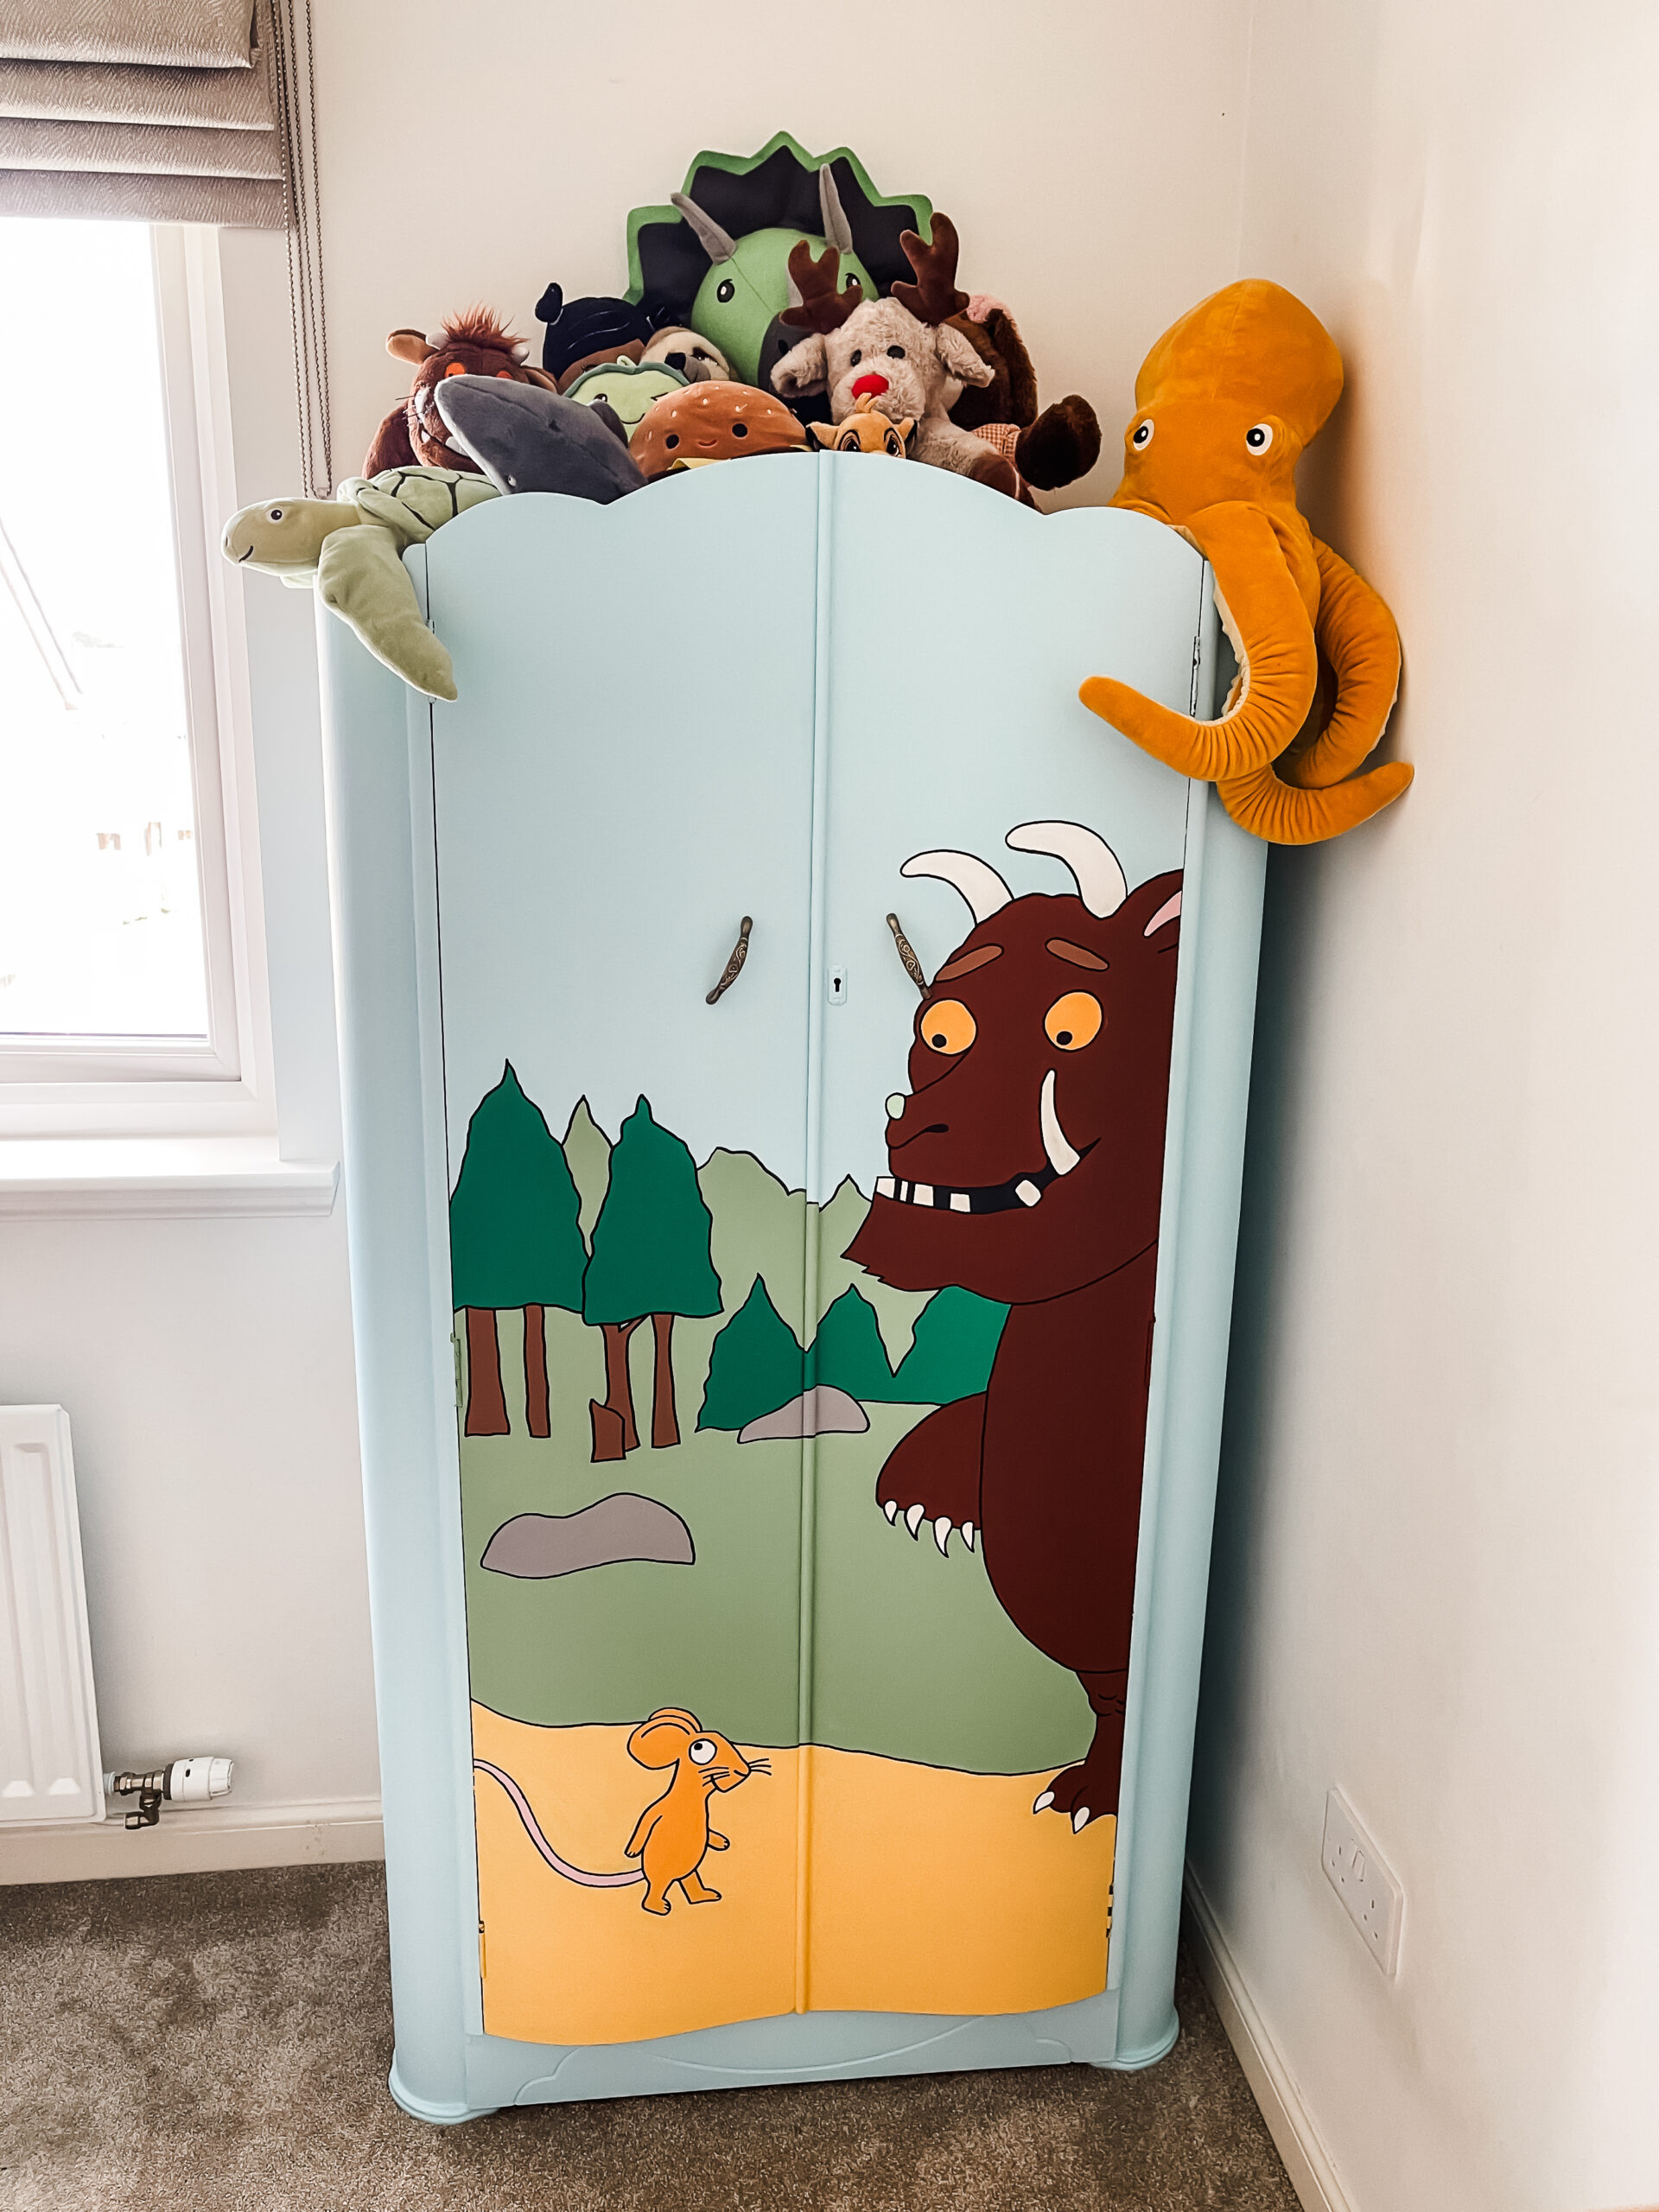
What followed was one of the most chaotic, creative, occasionally painful, and ultimately magical things I've ever made. The finished result is a hand-painted Gruffalo mural wardrobe that lives in my kids' bedroom and genuinely makes me stop and smile every time I walk past it. It looks like something from a high-end children's interiors shoot. It cost next to nothing. And I did it myself, with a power drill, a projector, and about fifteen sample pots of brown paint.
This is the full story, from finding the wardrobe to the grand reveal (including my son's absolute betrayal of a reaction at the end). Whether you're an experienced DIYer or you've never touched a paintbrush in your life, this guide will walk you through every single stage so you can create something just as special.
I filmed the whole journey across two YouTube videos. Pop them on while you read!
Why a Gruffalo Mural Wardrobe Is the Ultimate Kids' Bedroom Project
Before we get into the how, it's worth talking about the why. Because there are easier ways to update a kids' bedroom, and yet this project is one I'd recommend to anyone.
The Gruffalo is one of those timeless stories that holds a genuinely special place in British childhood. Julia Donaldson's clever little mouse and his monstrous imaginary friend have been beloved by children and adults across the UK for decades, and in Scotland especially, the book feels like part of the cultural furniture. My children are completely obsessed with the Gruffalo and all his friends, so bringing that story to life on a piece of furniture in their room felt like the most personal, meaningful thing I could do.
The other thing worth saying is that this project proves something I believe in deeply: that beautiful, luxurious-feeling things don't have to cost a fortune. This wardrobe was free. The paint came in well under budget. The projector is surprisingly affordable. And the result looks like commissioned artwork. That is everyday luxury at its absolute finest, and it's the kind of project that your kids will remember for the rest of their lives.

Everything You'll Need for This Project
Getting your supplies sorted before you start is genuinely one of the most important things you can do. Running back to the hardware shop halfway through a paint stage is both annoying and expensive, so learn from my experience and gather everything upfront.
For the prep and priming stage:
- A wardrobe (Facebook Marketplace, Gumtree, and local charity shops are brilliant for free or cheap pieces)
- Sandpaper in medium and fine grit
- Wood primer and undercoat
- Paintbrushes in various sizes
- A small paint roller for larger flat surfaces
- A Ryobi power drill and drill bits
- A set of screwdrivers in multiple sizes
- Frog Tape for masking edges
For the mural:
- Valspar Stay A While Blue in furniture paint for the base colour
- Valspar sample pots in a range of browns, yellows, and greens (more shades than you think you need)
- Fine detail paintbrushes
- A mini projector (the single most important tool in this entire project, honestly)
- A pencil for tracing
- Acrylic marker pens for outlining
- The Gruffalo book for reference (use the illustrations as your guide)
Optional but helpful:
- Safety gloves (I did not use these and I regretted it, more on that shortly)
- Access to a garage or covered outdoor space
- A very good playlist and a lot of coffee
Step One: Finding the Right Wardrobe
This whole project started with a free wardrobe on Facebook Marketplace. It was being given away, it was a beautiful old piece with real character, and I could not believe my luck.
When you're searching for a wardrobe to upcycle, don't be put off by pieces that look tired, dirty, or chipped. Those are actually ideal candidates, because you're going to sand and repaint them anyway. What you want to look for is solid construction and good bones. Anything with ornate details or vintage hardware will look stunning once refreshed. Wobbly joints, warped doors, or missing panels are more of a problem than surface-level shabbiness.
The wardrobe I found had gorgeous vintage shelves inside with little metal label holders, which I fell in love with immediately. Even hidden on the inside, those kinds of details add so much charm to a piece.
Once it was home, I could really see what I was working with. And what I was working with was an extremely dirty wardrobe that turned out not to be cream underneath, but actually a very clean white once the grime was dealt with. Always expect surprises with second-hand furniture.
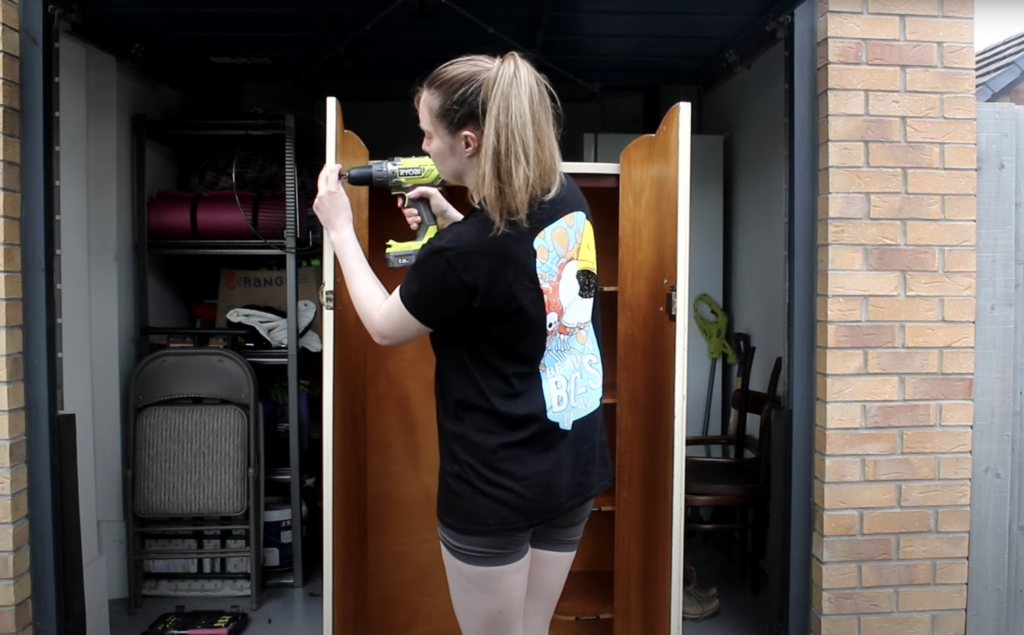
Step Two: Removing the Hardware
The first proper task was stripping the wardrobe back to its bare bones. Off came the handles, hinges, and any other hardware. Sounds simple. Was not entirely simple.
This particular wardrobe was quite old, with little clip covers over the screws that made getting started genuinely fiddly. I worked through several screwdrivers trying to find the right fit before accepting that I needed the Ryobi power drill, which then made short work of everything.
A word of warning: please wear protective gloves for this stage. I did not. My first injury of the project happened when I stabbed myself in the finger with the drill, which was both painful and entirely avoidable. Health and safety exists for a reason, and I say this as someone who learned the hard way.
Also worth mentioning: think carefully before you start removing things. In my enthusiasm I took off some internal components that did not actually need to come off, which caused unnecessary complications when it came to reassembly. Less is more. Remove only what you need to in order to paint properly, and leave the rest where it is.
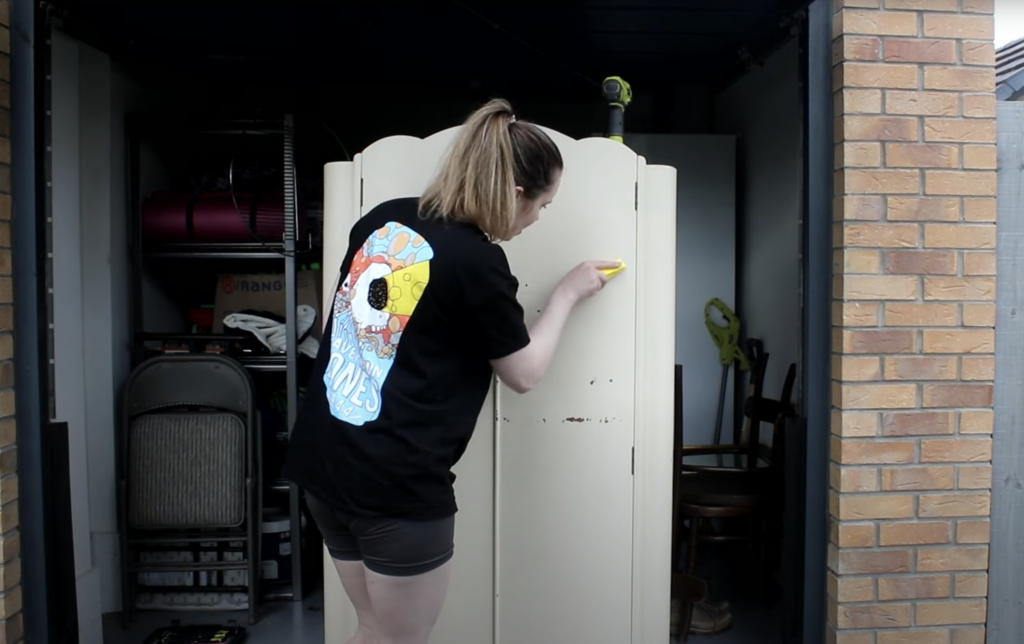
Step Three: Sanding the Surface
With the hardware off, it was time to prep the surface for paint. I had a tin of paint stripper, but when I read the instructions and realised it needed around one litre per square metre to work effectively, I quickly decided that sanding was both more practical and far more cost-effective for a piece this size.
Was sanding the technically correct approach? Honestly, I wasn't entirely sure at the time. But sometimes the best way to learn is to do, and it worked beautifully in the end. The goal of this stage isn't to get the wardrobe back to bare wood. It's simply to remove any loose or flaking paint, smooth out rough patches, and give the primer a decent surface to grip onto.
Start with a medium-grit sandpaper and work your way to a finer grit for the final pass. Pay attention to any areas where the paint is chipping or bubbling, and make sure those are fully smoothed before you move on. Once you're done sanding, wipe the whole thing down with a damp cloth to remove all the dust. This step is easy to skip and very worth not skipping.
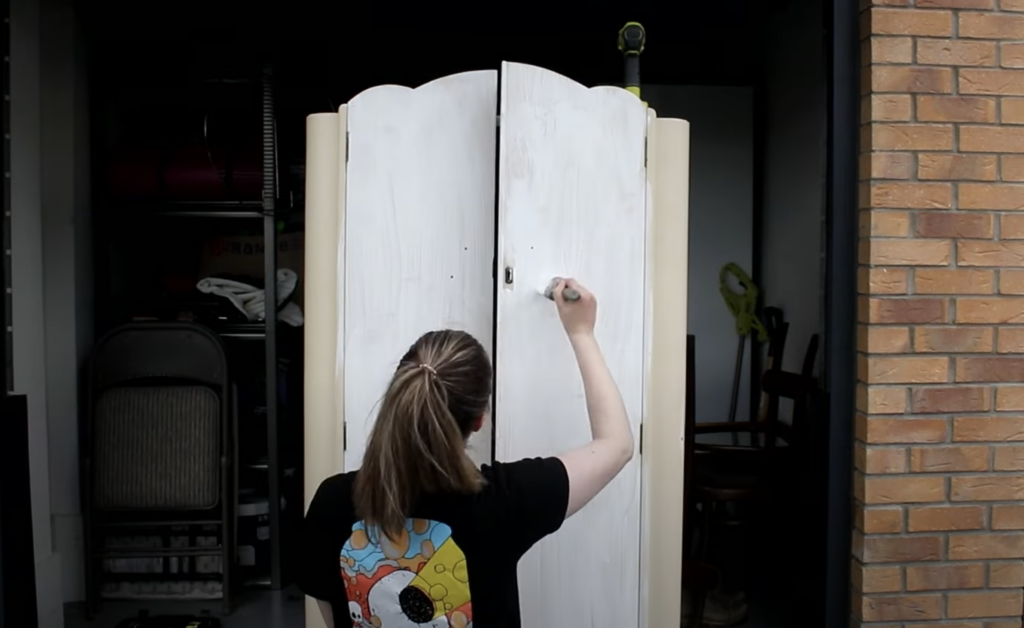
Step Four: Priming
Priming is the step that separates a DIY project that looks amazing from one that looks like a DIY project. Do not skip this stage.
My reasoning was simple: if I wasn't stripping the old paint back completely, the primer needed to do a lot of the work in creating a clean, sealed surface for the new colour to sit on. I used a standard wood primer and applied it with a brush, working it into any grooves and details carefully.
Here's the moment that genuinely surprised me: once the primer went on, I discovered that the wardrobe wasn't the cream colour I thought it was. It was just profoundly dirty. The primer revealed a fresh, clean surface underneath, and the whole piece transformed even at this early stage. Two coats of primer, with a full dry between each one, and it was ready for colour.
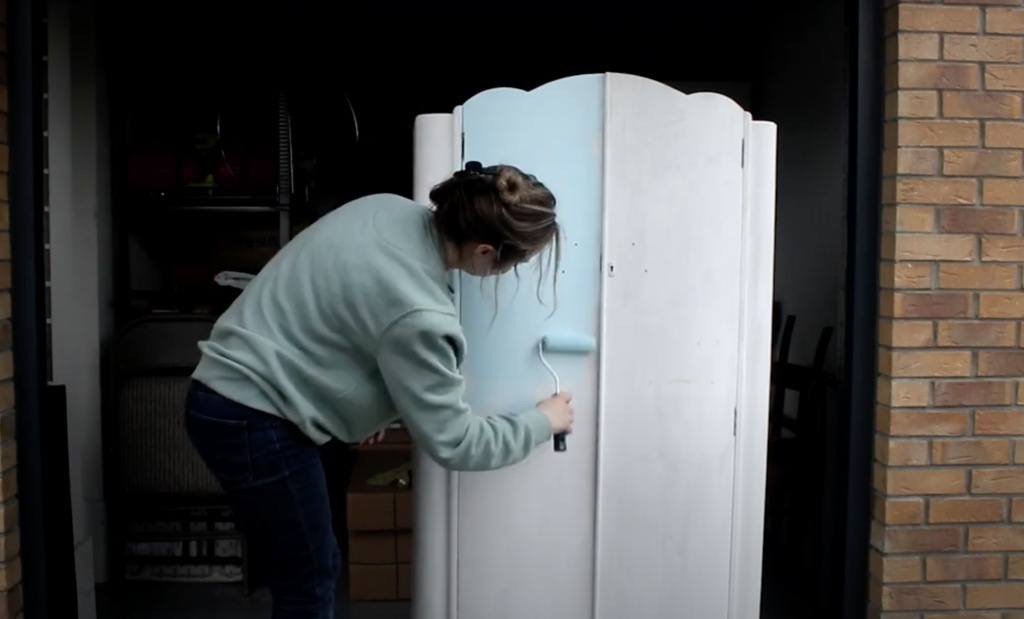
Step Five: Painting the Base Colour
For the base, I chose Valspar's Stay A While Blue in their multi-surface furniture paint.
The colour itself is a beautiful, deep, dreamy blue that immediately made the wardrobe feel like a storybook backdrop. Paint it on in smooth, even strokes, using the small roller for the flat door panels and a brush for the edges and any detailed areas.
Living in Scotland, I was also dealing with the unpredictable Scottish weather throughout this stage, working in and out of the garage depending on what the sky was doing. If you're tackling this project in the UK (which, hi, you probably are), build extra drying time into your schedule. Paint in Scotland does not dry at the speed paint in Spain dries. This is a fact.
The bugs were also a challenge. Multiple small insects landed on the wet paint during this stage, and I spent a significant portion of the base coat phase gently removing them with a toothpick and quietly asking them to please stop. They did not stop. Eventually I accepted it and moved on.
Also: I tried to carefully paint around the hinges. I eventually gave up and painted over them. They look completely fine.
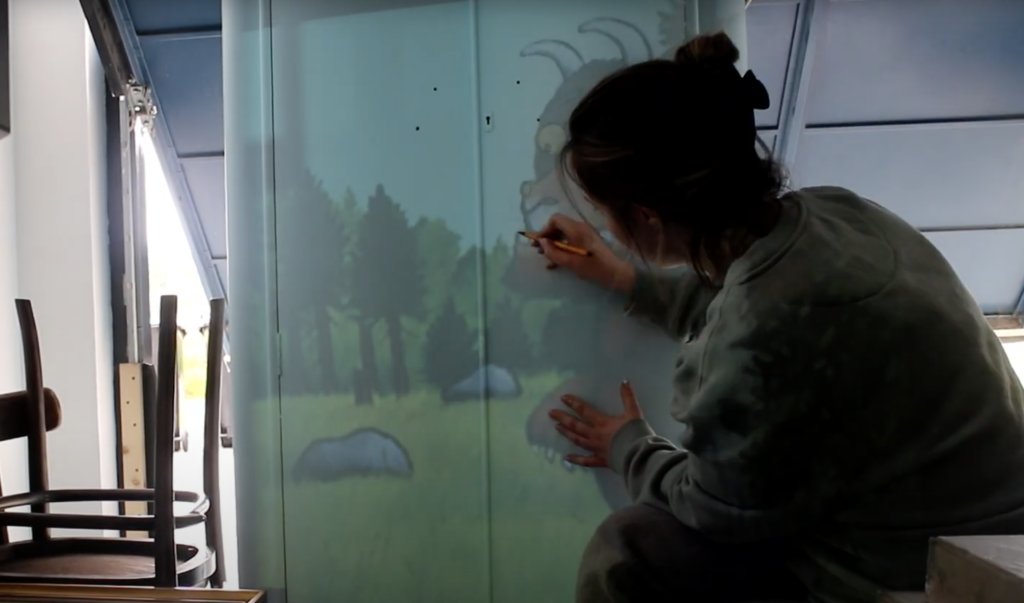
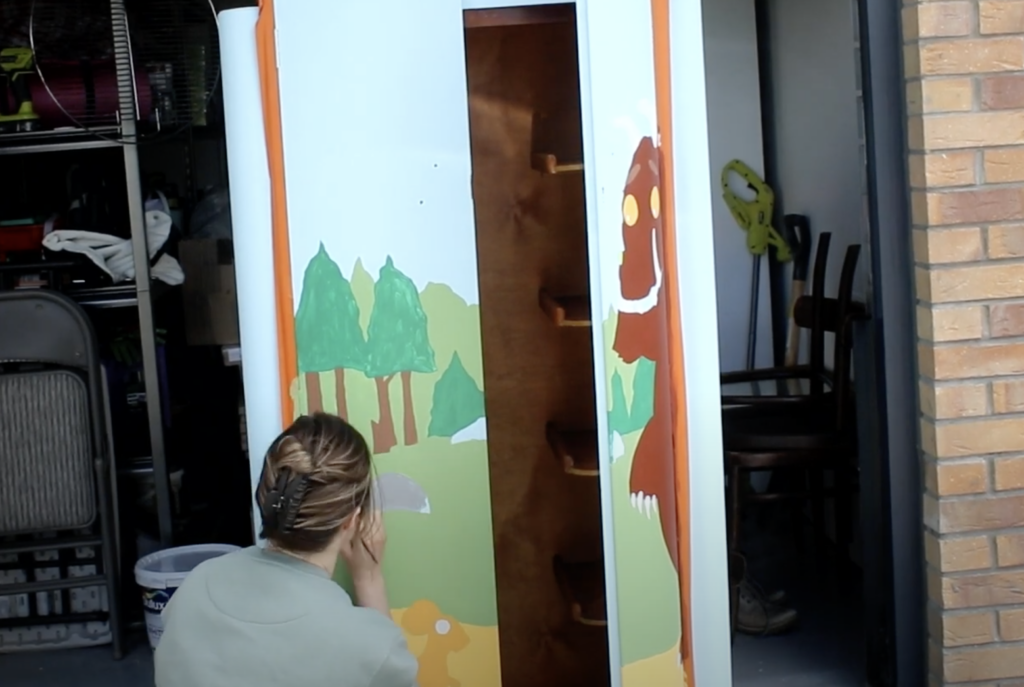
Step Six: Projecting and Tracing the Mural Outline
This is the stage that transforms a painted wardrobe into something truly extraordinary, and it's where the mini projector becomes the single most valuable thing you own.
Using a projector to trace a mural outline is not cheating. I want to say this clearly, because I know some people feel like it should all be done freehand. It isn't cheating. It's a completely legitimate, professional technique used by muralists all over the world. You don't get extra points for struggling through proportions freehand when a projector will give you perfect placement in twenty minutes.
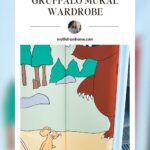
Set up the projector so the image fills the wardrobe doors at the scale you want. I used The Gruffalo book illustrations as my reference, projecting the Gruffalo himself, the mouse, and the background forest elements. Then, carefully and patiently, trace all the outlines in pencil. The Gruffalo's knobbly knees, his turned-out toes, the poisonous wart on his nose, the purple prickles on his back. The mouse, small but mighty, front and centre.
Take your time with this stage. Getting the placement and proportions right here means the painting stage is relaxed and enjoyable rather than anxious. You're working with guidelines, not guessing.
Step Seven: Blocking In the Colours
With the outlines traced, I took myself to the Valspar paint counter with a very specific brief. The man behind the counter watched me request approximately fifteen different sample pots covering every shade of brown, yellow, green, and grey imaginable, and I could tell from his expression that he had questions. I did not explain. It was all entirely intentional.
For a project like this, sample pots are perfect. You need a range of shades but not large quantities of any single one, and sample pots are inexpensive enough that you can get far more colour variety than you'd ever manage buying full tins.
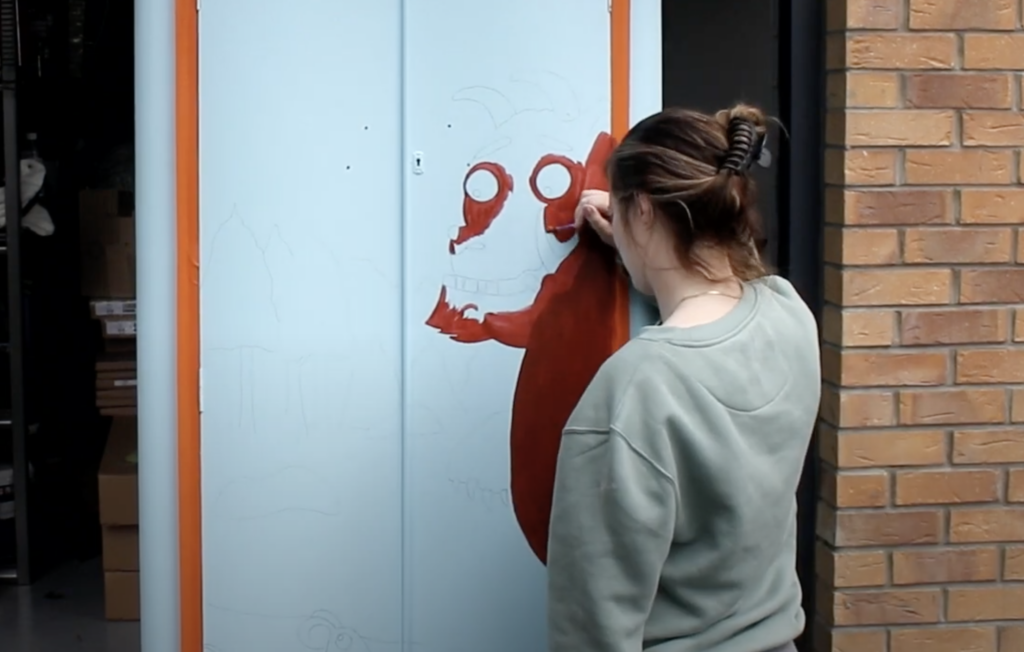
Start with the larger areas and work towards the smaller details. For the Gruffalo, I built up the colour in multiple coats, letting each one dry fully before adding the next. The base coat means each new layer of colour sits cleanly and evenly on top. Do the same for the mouse, the trees, and any background foliage.
A note on painting order: I've always found it easier to paint the main subjects first and then add the background around them. Is that unusual? Possibly. But it works. Get the Gruffalo and the mouse looking exactly right, then fill the space around them with the forest.
Don't rush the layering. Multiple thin coats will always look better than one thick coat. Patience at this stage is what gives the finished mural that solid, clean, almost printed quality.
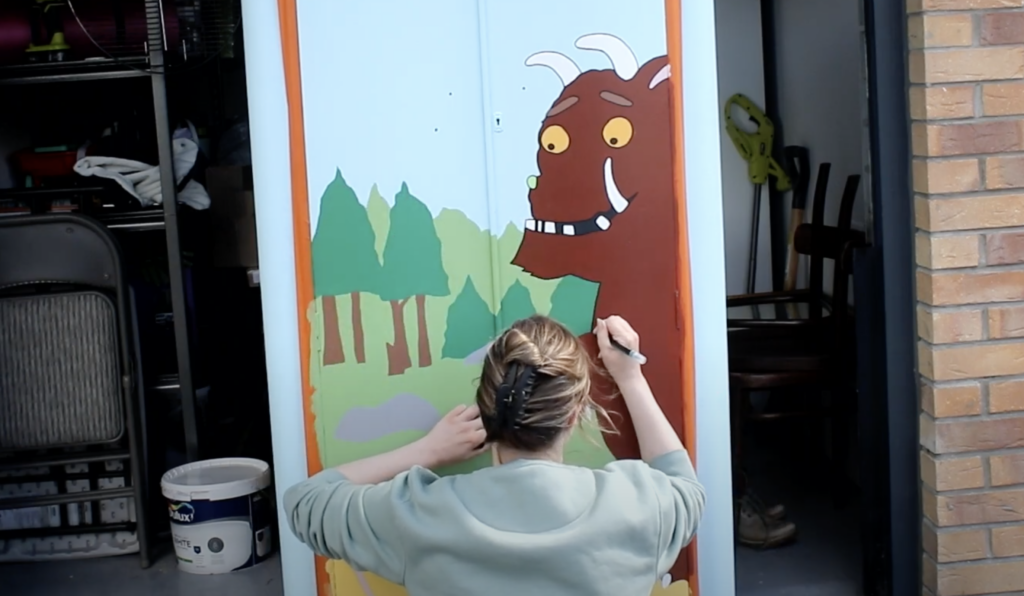
Step Eight: Outlining with Acrylic Marker Pens
This is the step that makes the whole thing look professional. Once all the paint was dry, I went over every element of the mural with acrylic marker pens, outlining every shape, every feature, every tiny detail.
The Gruffalo's eyes. The texture of his fur. His knobbly knees and turned-out toes. The poisonous wart on the end of his nose. All of it outlined carefully and precisely to give the mural that distinctive children's book illustration quality that makes it feel like the image has jumped straight off the page of the book.
This stage requires full concentration and a steady hand. Do it when you're not tired, not rushing, and have had something to eat. The outlines are the difference between a lovely piece of painted furniture and something that looks genuinely extraordinary. It's worth taking your time.
Step Nine: The Grand Reveal
After all the painting was done and everything was fully dry, it was time for the single most satisfying moment in any DIY project: peeling off the Frog Tape.
If you haven't experienced the joy of Frog Tape peel-off, you're missing one of life's genuinely great small pleasures. The clean edges, the bold colours, the Gruffalo looking back at you in full, glorious detail. It was everything I had imagined it would be, and honestly a little more.
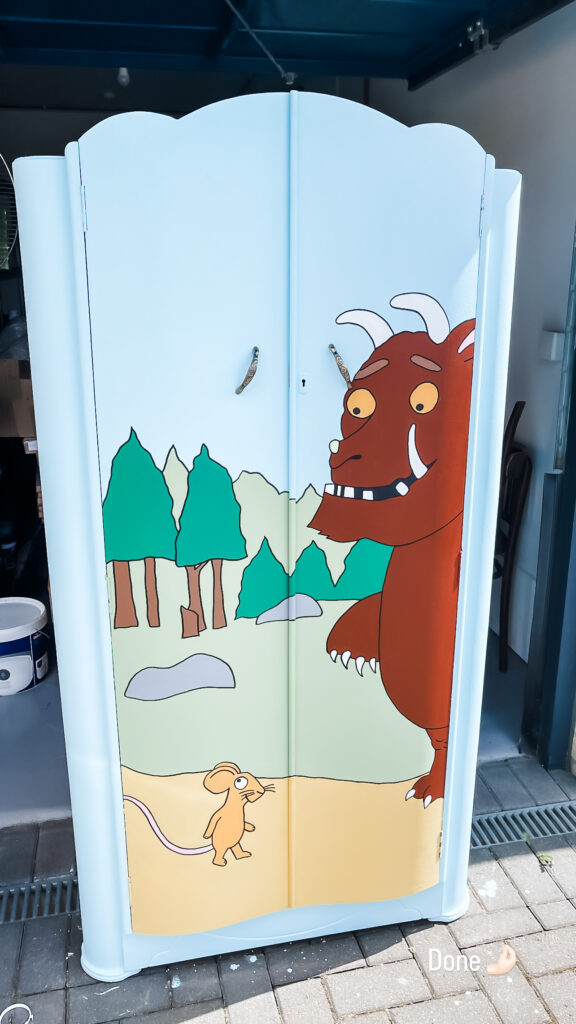
The wardrobe went back into the kids' room. The hardware was reattached. And I stood back and looked at what had started as a free piece of furniture from Facebook Marketplace and was now a piece of functional art that would live in my children's bedroom for years.
And then my son walked in, looked at it for a long moment, and said: “I don't like the Gruffalo. I want a Zog wardrobe instead.”
We had a very good laugh about that. The wardrobe is staying exactly as it is. (although I must admit I caved and later turned his bedroom into a giant Zog mural)
My Honest Lessons From This Project
Prep is genuinely half the job. Sanding and priming properly makes everything that follows easier. Cut corners here and you'll notice it all the way through.
A projector is the right tool for this. Don't let anyone make you feel like using one is taking the easy route. It's a professional technique and it gives professional results. This is like the one I used and it was worth every penny.
Sample pots are your best friend. For mural work where you need lots of shades in small amounts, sample pots from the Valspar counter are perfect. Get more variety than you think you need.
Work in stages and let things dry properly. This is not a one-weekend project if you want it done well. Treat each stage as its own job and give it the time it needs.
Wear gloves during the hardware removal stage. Please. Learn from me.
Frequently Asked Questions
Not nearly as much as you might think. The projector tracing method means your outlines will be accurate from the start. After that, you're essentially colouring in very carefully. If you have a steady hand and some patience, you can absolutely do this.
Furniture paint for the base and mural work, but once you're fully finished, apply a coat of satin varnish over the painted doors to protect the artwork from little hands and general wear and tear. Regular paint alone will mark over time.
The technique works for absolutely any character or design. The process is the same whether you're painting Peppa Pig, a dinosaur scene, or a jungle mural. The projector method in particular translates to any image.
Spread across multiple sessions with proper drying time, realistically two to three weeks. You could push it into a single weekend if you had to, but the result will show. Let each stage breathe and it'll be worth it.
No. The same prep and priming technique works on MDF and chipboard furniture, which is what a lot of flat-pack pieces are made from. Just make sure you use a primer suitable for the material.
The great thing about acrylic and emulsion paint on a primed surface is that you can paint over mistakes once the layer is dry. If you accidentally paint outside a line, let it dry fully and then carefully repaint the background colour over the error. Nobody will ever know.
Facebook Marketplace is genuinely incredible for this. Set up alerts for wardrobes in your local area and check regularly. Free pieces come up more often than you'd expect. Gumtree, local charity shops, and even council tip resale shops are also brilliant. The less you spend on the wardrobe itself, the more you have for the fun bits.
For most wardrobe hardware, a good screwdriver set will be fine. The drill becomes very useful if you encounter stubborn or rusted screws, or if the hardware is the kind with clip covers over the screw heads. Having one available means you won't get stuck mid-project.
The Full Shopping List
Here's everything in one place for easy reference:
- Ryobi power drill
- Drill bits
- Screwdriver set
- Sandpaper
- Paintbrushes
- Small paint roller
- Frog Tape
- Mini projector
- Fine detail paintbrushes
- Wood primer
- Acrylic marker pens
- The Gruffalo book
- Valspar Stay A While Blue
Final Thoughts
This wardrobe project reminded me that the most memorable things in a home aren't always the most expensive. A free piece of furniture, a handful of paint sample pots, a projector, and a lot of patience turned into something that genuinely looks extraordinary in my children's bedroom. That's the kind of project I love most: the ones that feel luxurious but come from creativity and effort rather than a big budget.
My only problem with this project is that it was so much fun. To the point where I turned a whole room into a Julia Donaldson mural. It was a lot of work…
If you take on your own version of this, whether it's a Gruffalo, Zog, or something entirely different, I'd love to see what you create. Drop a photo in the comments or tag me over on Instagram @gillianfromhome.