The Ultimate DIY Vintage Music Cabinet Restoration Saga: Triumphs, Trials, and a Lot of Sanding


DIY projects have this magical way of being both incredibly fulfilling and unbelievably frustrating. If you’ve ever tackled something like restoring a vintage music cabinet, then you probably know the feeling all too well. In this post, I’m going to take you on a deep dive through a recent restoration adventure involving a vintage music cabinet. Spoiler alert: it didn’t exactly go as smoothly as I had hoped, but I learned a lot along the way, and the results? Totally worth it (well, mostly). Buckle up, because it’s going to be a bumpy, varnish-covered ride.
What to Expect When Restoring Vintage Furniture: Patience & Perseverance
When I first laid eyes on this vintage music cabinet, it seemed like the perfect DIY project. It had these unique fold-down drawers, something I’d never seen before. Hidden inside one of them, I found a surprise, a graduation booklet from Harriet Watt University, dated 1985. I couldn’t help but think, “Has this thing even been cleaned since then?”
The cabinet was coated in layer upon layer of varnish, and honestly, it was a bit intimidating. 37 layers might be an exaggeration, but I swear it wasn’t far off! Who knows how many decades of protective coating I was up against. One thing was certain: this was not going to be the quick-and-easy project I’d hoped for. I’ve learned over time that projects like this — especially larger built-in style projects — almost always take more time, more prep, and more patience than you expect going in.
Step-by-Step Guide to Stripping Varnish: My Best Tips
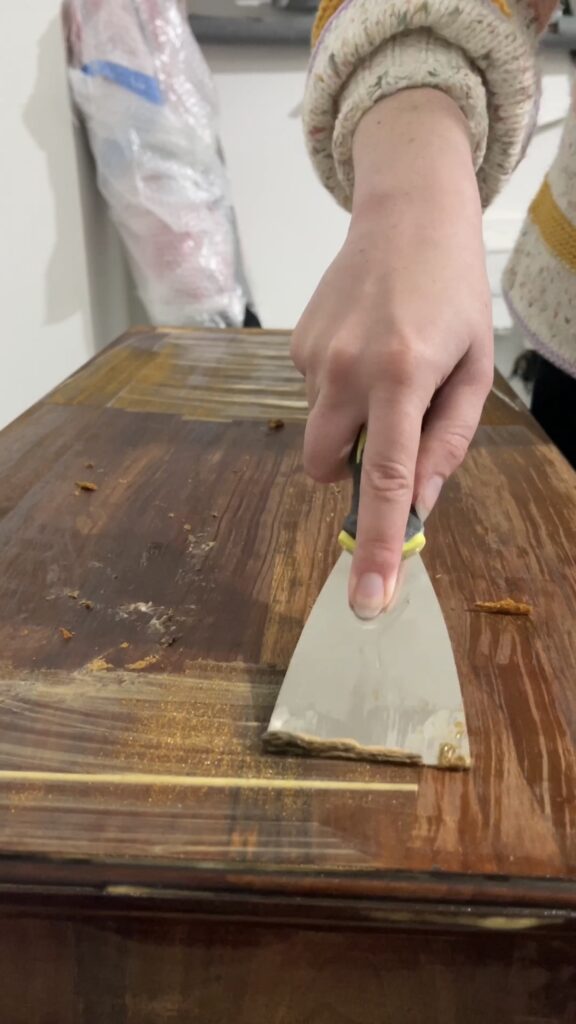
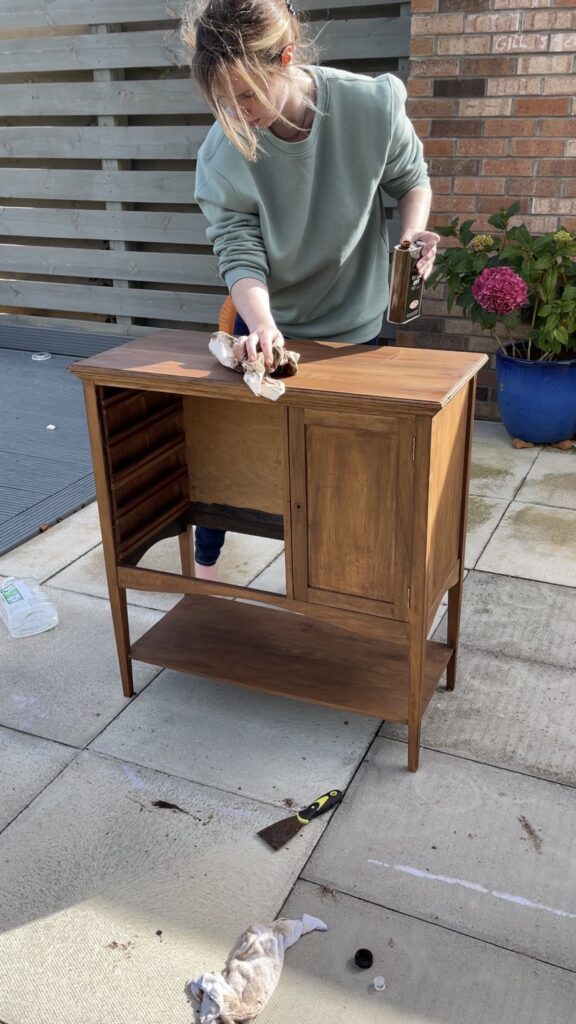
Once I decided to take on the challenge, the first step was stripping the varnish. If you’ve never had the “pleasure” of stripping old varnish, let me fill you in; it’s a messy, time-consuming process, especially when you’re dealing with thick layers that seem impervious to everything.
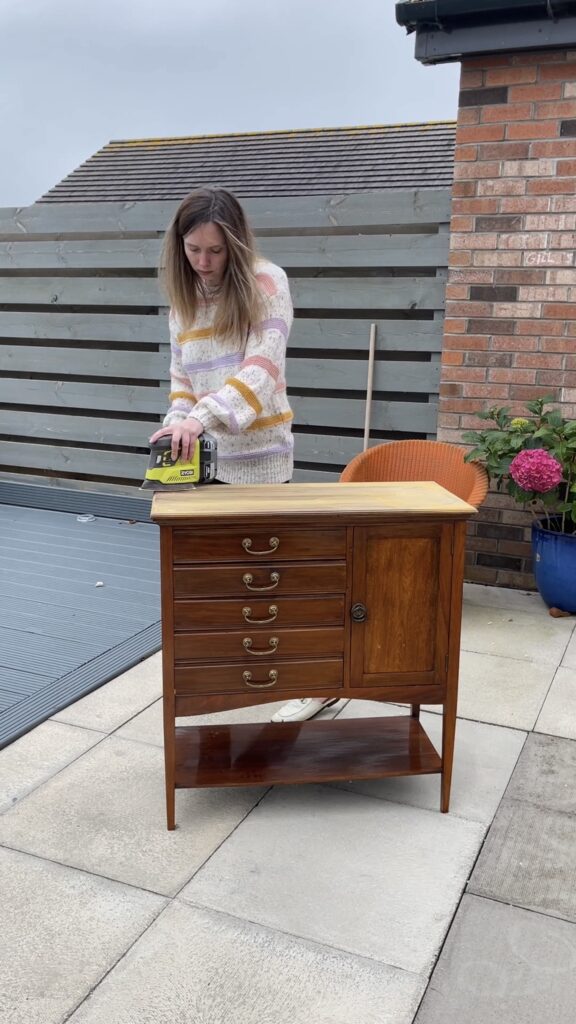
My plan? Start with a light sanding to break the seal of the varnish before using a varnish stripper. For this I used my Ryobi palm sander. What I didn't expect was just how stubborn this stuff was. The sanding alone took hours, and I quickly learned that not all sandpaper is created equal. Pro tip: have a variety of grits on hand, and prepare to test them all out like a professional sandpaper connoisseur!
After sanding the surface, I applied the varnish stripper, and let me tell you, this stuff is no joke. If you’ve got any lingering doubts about your life choices, they’ll come rushing to the surface when you’re elbow-deep in chemicals, waiting for the varnish to peel away.
How to Sand Vintage Furniture Like a Pro
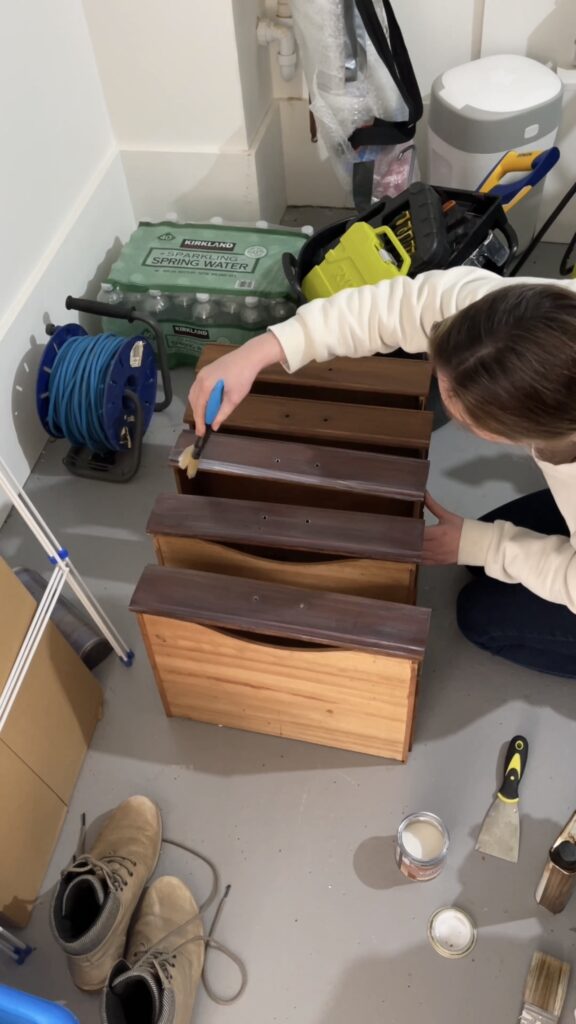
Sanding is crucial, but it can also be one of the most tedious parts of furniture restoration. It’s a task that requires patience, and in my case, lots of it. I learned that using a handheld sander can make a world of difference, especially when dealing with detailed, curved surfaces. But don’t forget those hard-to-reach spots. Sometimes, manual sanding is the only way to get a smooth, even finish. I even had to use steel wool in some spots.
When sanding vintage furniture, always start with coarse sandpaper to remove the old varnish, then work your way up to finer grits to smooth the surface. The key is not rushing this process, your future finish depends on how well you prepare the wood.
The Challenges of Restoring Furniture in Humid or Rainy Weather
Just when I thought I had the sanding under control, the weather decided to throw a curveball. Living in Scotland, rain is a constant companion, but I wasn’t prepared for how much it would interfere with my project. As soon as I applied wood stripper to the drawers, it started raining.
I ended up scrambling to save the drawers by throwing them into my kids’ playhouse, praying they wouldn’t get too wet. Spoiler alert: they did. Rain can wreak havoc on wood restoration projects, causing the surface to absorb moisture and making it harder to achieve a smooth finish.
Is Wood Dyeing Easier Than You Think? Let’s Find Out
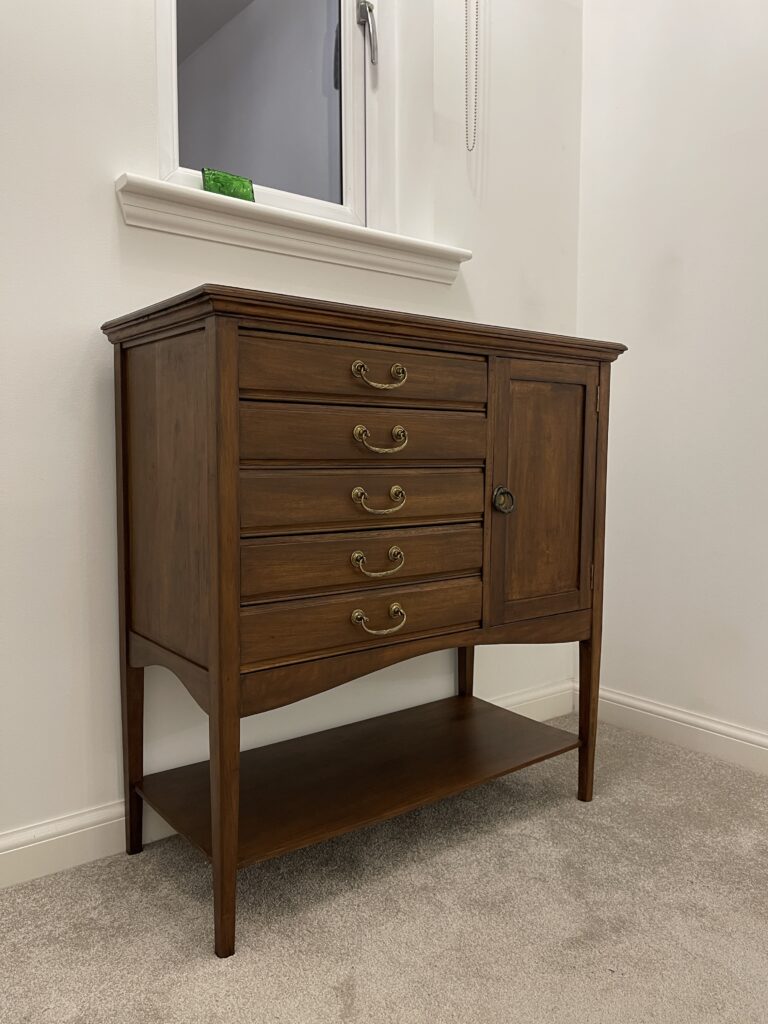
Once the sanding and stripping were finally done, it was time to apply the wood dye, I used Georgian Medium Oak. I’ll admit, this part was easier than expected. With a lint-free cloth in hand, I rubbed the dye onto the cabinet, watching as the color soaked into the wood. The transformation was almost instant, and I finally started to feel like all the hard work was paying off.
But dyeing wood doesn’t always go as far as you think it will. I ended up needing more dye than expected to get even coverage. Lesson learned: always buy more than you think you’ll need. Once the dye dried, I could see the wood grain shining through, giving the cabinet a gorgeous, rustic look.
How to Apply Wood Finish for a Smooth, Professional Look
After dyeing, it was time to apply a wood finish. I chose a clear matt wood sealer to protect the cabinet and bring out the rich tones of the wood. However, applying the finish was a bit of a rollercoaster. At first, it looked… purple. Yes, purple! Panic set in, but I decided to give it time to dry and hoped for the best.
Luckily, the purple hue faded, and the finish turned out fine. When applying wood finish, be sure to use smooth, even strokes with a high-quality brush to avoid streaks or bubbles. And don’t forget to work in a well-ventilated area, trust me, those fumes are no joke.
Dealing with Custom Furniture Drawers: A Lesson in Trial and Error
As if rain and purple finishes weren’t enough, I ran into another issue, custom drawers. Each drawer in this cabinet was handmade to fit a specific slot. After spending what felt like an eternity sanding, dyeing, and sealing them, I realized that none of the drawers fit properly when I tried to reassemble the unit.
It took a lot of trial and error, shuffling the drawers around until they all slid into place. Vintage furniture often comes with quirks like this, so be prepared for a bit of a puzzle when you’re reassembling your piece.
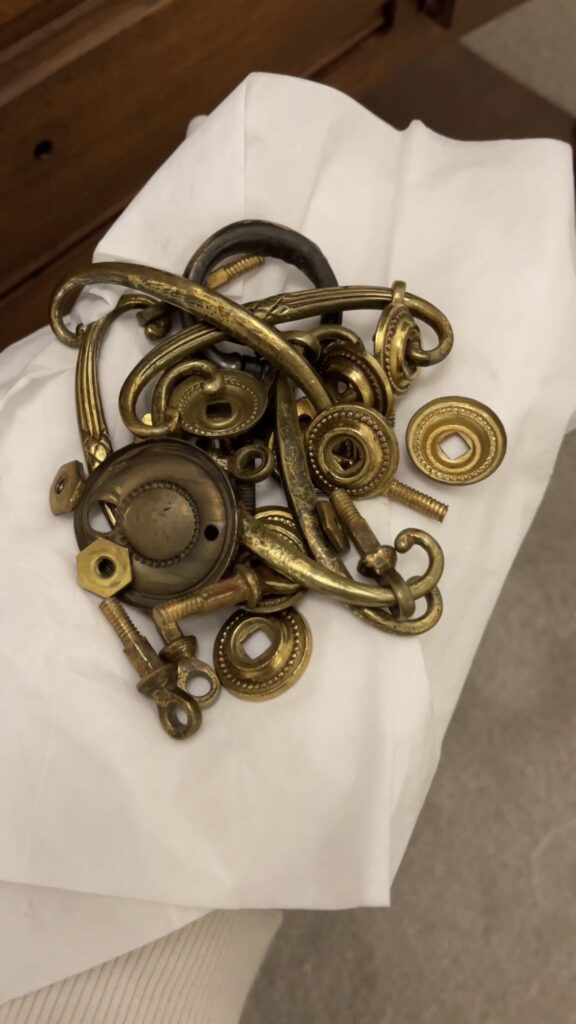
How to Reattach Handles & Hardware on Vintage Furniture
By the time I got to the hardware, I was ready for the finish line. But of course, there was one more hiccup waiting for me. I reattached all the handles upside down. This part of the process took me 45 minutes, when I thought it would maybe take 3.
To make matters worse, I forgot to add the little brass rings that were supposed to sit underneath the handles. Cue another round of undoing my work. If you’re restoring vintage furniture, take your time with the hardware. A small mistake can mean redoing a lot of work, trust me, I learned the hard way.
DIY Furniture Restoration Mistakes to Avoid
Now that I’ve lived through this saga, let me share a few mistakes to avoid when you’re restoring furniture:
- Rushing the stripping process: Let the chemicals do their job. If you rush, you’ll end up with patchy spots that are harder to fix later.
- Skipping steps with sanding: Sand every nook and cranny. Missing a spot means uneven dyeing and finishing.
- Underestimating how much dye or finish you need: Always buy more than you think you’ll use. It’s better to have extra than to run out halfway through.
- Ignoring the weather: Rain can ruin your project, so plan accordingly if you’re working outside or in a garage.
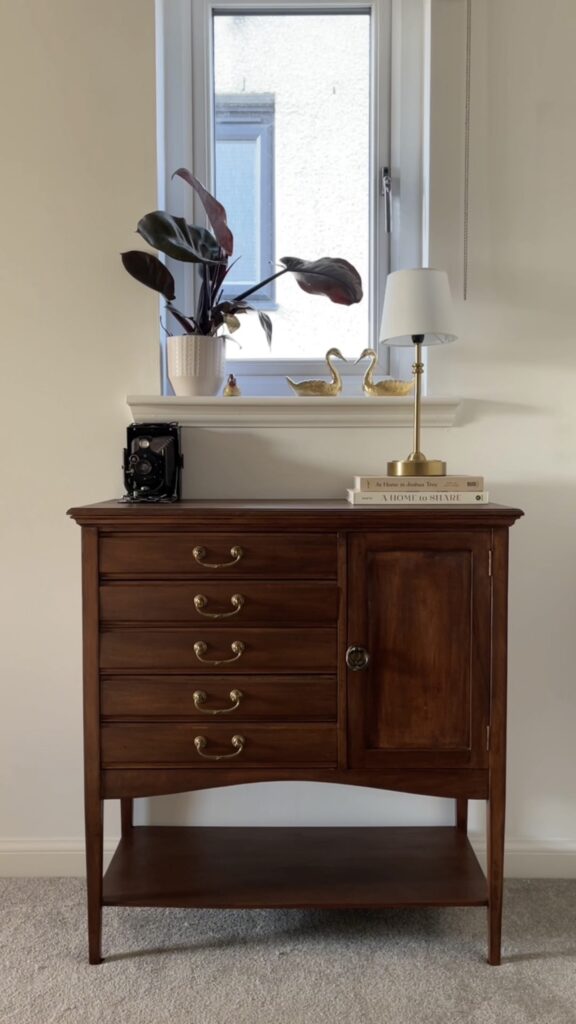
How to Style Your Restored Vintage Furniture Like a Pro
Once the restoration was complete, it was time to style the cabinet in its new home. Vintage furniture pieces have so much character, and the key to styling them is balancing their old-world charm with modern elements.
I paired my restored music cabinet with a few minimal, contemporary accessories to highlight its beauty. The rustic wood tones pop against sleek décor, making it the star of the room. If you’re restoring a piece, don’t overdo it with styling, let the furniture speak for itself.
Final Thoughts: Why You Shouldn't Rush the Process of Furniture Restoration
Furniture restoration is a labor of love. It requires time, patience, and a lot of sandpaper. But the satisfaction of seeing a worn, forgotten piece of furniture come back to life is unmatched. My journey with this vintage music cabinet was long and often frustrating, but in the end, I’m so happy with how it turned out.
So, if you’re thinking about restoring your own piece of vintage furniture, my advice is simple: trust the process. The journey may be tough, but the reward is a one-of-a-kind piece that you can proudly say you brought back to life with your own hands.
Tips for Protecting Your Furniture from Rain & Weather During Restoration
And one last piece of advice: if you live in a place prone to unpredictable weather (like Scotland), always have a backup plan for where you’ll store your furniture during the restoration process. Rain and moisture can ruin a perfectly good restoration, so if you’re working outside, make sure you have a safe, dry place to stash your piece when the clouds roll in.