How to Block a Neighbour’s View With Window Film


There is a specific sort of view that does nothing whatsoever for the soul, and for the longest time, mine was the back of my neighbour's bathroom. Every time I passed through the hallway, the window offered up the same tired stretch of wall, and on the mornings it offered up rather more than that, well, let's just say I came to know the rhythms of next door's household better than anyone really should.
Replacing the glass was never going to happen, not for a window I walk past rather than sit beside. Frosting felt too clinical, the sort of finish you'd expect in a dentist's waiting room rather than a home. What I was after was privacy without losing the light, because this is the only window the hallway has, and blacking it out was never an option.
The answer, when it finally turned up, cost very little and took roughly as long as brewing a pot of tea. Stained glass window film, it turns out, is one of those small changes that quietly outperforms its price tag, and it solved the whole question of how to block a neighbour's view from a window without leaving me in the dark.
Why stained glass window film beats frosting
Most decorative window film falls into one of two camps. There is the plain frosted kind, which does its job but flattens the light into something dull and uniform. Then there is stained glass effect window film, which is patterned and faintly iridescent, designed to catch the sun and throw it back in colour. The frosted version hides a view. The stained glass version hides a view and gives you something lovely in return, which feels like a far better deal.
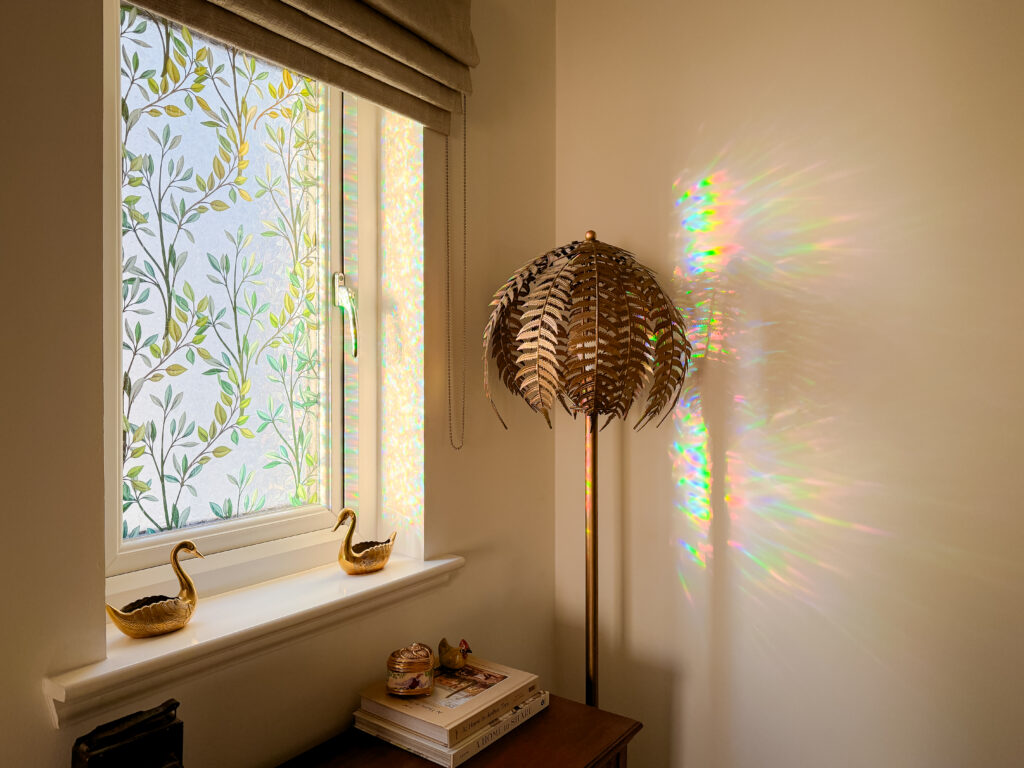
The privacy it offers is genuine. From the outside, the glass reads as decorative and opaque enough that nobody can see in, which is the whole point of using window film for privacy in the first place. From the inside, you lose the grim wall entirely and gain a softly shifting wash of light. On a grey afternoon it is subtle. When the sun does make an appearance, it is something else altogether.
The bit nobody mentions
Here is what sold me, beyond the practicality. Proper leaded stained glass, the kind you find in an Edwardian hallway or a church, costs a small fortune and requires someone who genuinely knows what they are doing. A decent DIY stained glass window film gives you a generous nod to that look for the price of a takeaway, and you can fit it yourself in an afternoon, or, as it turned out, in considerably less.
That is the sweet spot I keep coming back to with this house: the finish that looks considered and a little bit special, without the budget or the upheaval that usually comes attached. A hallway is exactly the right place to spend this kind of small effort, because it is the first thing you and everyone else sees, and it is so often the last corner of the house to get any attention at all.
What to look for when buying decorative window film
A few things separate a film you'll love from one you'll be peeling off in a fortnight:
- Pattern: Geometric and Art Deco styles read as crisp and contemporary, while floral and cathedral designs lean traditional and a touch busier, so it is worth holding a sample up to your own light before you commit.
- The way it sticks: The repositionable, static-cling sort, the kind you apply with water, is far kinder to fit and to remove than the permanent adhesive versions, and for most of us that flexibility is worth more than a marginally stronger hold.
- Direction: South and west-facing glass throws the colour most dramatically, while a north-facing window like mine gives you something gentler and more constant, so measure your pane twice and buy slightly more than you think you need.
The one I used is linked here if you'd like to start with the same.
How to install window vinyl with water, start to finish
Confession before we begin: there is a tool the professionals swear by for this, a little plastic squeegee for smoothing out bubbles, I do not own one of them. Mine didn't come with one either. None of it mattered, which is the best possible news if you, too, are allergic to buying single-use gadgets. The whole DIY window privacy film installation is far simpler than it looks.
- Cut to size: Measure the pane and cut the film roughly to size, leaving a small margin of excess around each edge. Trimming a little extra away later is far easier than discovering you've cut it short.
- Clean the glass: Give it a proper wipe down, because any stray dust, fingerprints, or pet hair, will sit under the film as tiny trapped bubbles.
- Mist the pane: A generous mist of plain water goes straight onto the glass, and this is what makes the whole process so forgiving.
- Peel and align: Peel away the backing, line up the top edge against the wet pane, and smooth the film down with your hands, working from the centre outwards. Because the glass is wet, it glides rather than grabs, so you can lift it and reposition it until it sits straight. Instead of a squeegee, I used a bank card to nudge out any stubborn air bubbles.
- Trim the edges: Run a sharp Stanley knife gently around the edge of the frame to trim away the excess for a clean, finished line.
That genuinely is the lot. Start to finish, the whole thing took me six minutes, most of which was spent admiring my own handiwork rather than doing anything useful.
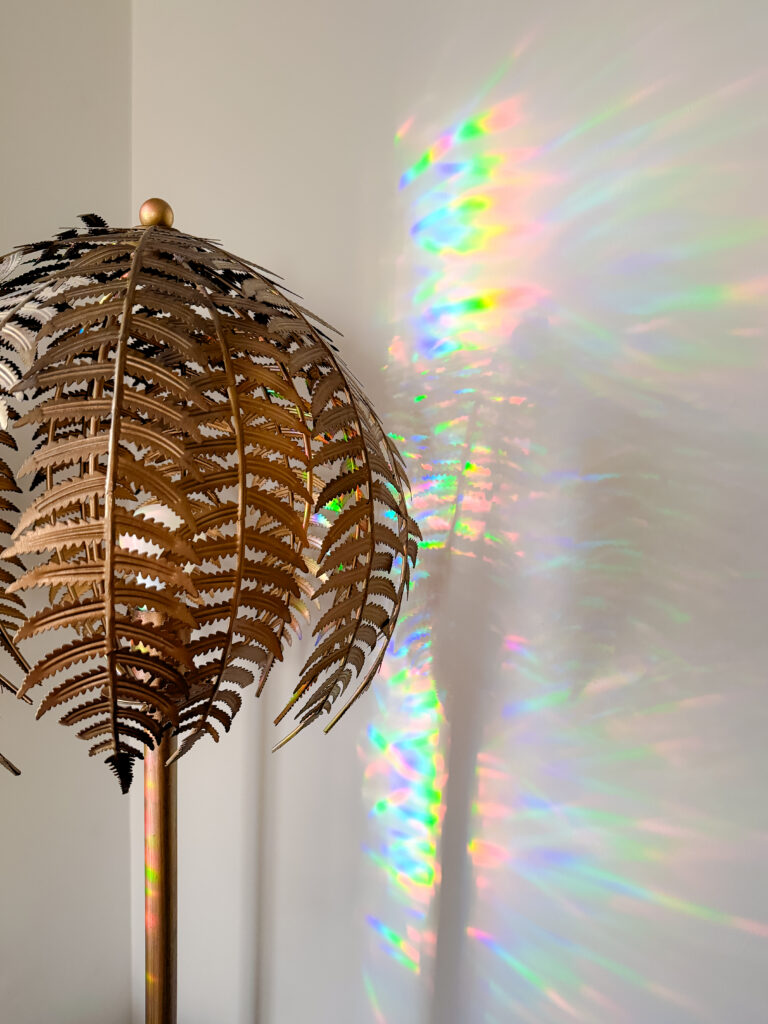
The result: rainbow light that photos can't capture
The honest difficulty with writing this up is that the best part refuses to be captured on camera. Photographs flatten it. In person, when the light comes through at the right angle, the rainbow light window film casts the faintest wash of colour across the floor and up the wall of the hallway, a shimmer that drifts as the day goes on. My little video gets closer than any still photo, so see for yourself:
What it has done, in practical terms, is solve three problems at once. The view has gone, the privacy is total, and the hallway, which used to feel like the dimmest and least loved corner of the house, now has a bit of quiet magic to it. For something so cheap and so quickly done, that is a remarkable return.
Is rainbow suncatcher window film right for you?
If you are after a renter-friendly window privacy fix, this is close to ideal, because the film peels away cleanly when you leave and the landlord need never know it was there. If you own, it is a low-commitment way to test a look before you ever consider the expense of real decorative glass.
It works on any flat pane, so bathrooms, front doors with glazed panels, and those awkward overlooked windows are all fair game. A rainbow suncatcher effect like this one is at its best where there is a bit of sun to play with, so it is worth a thought before you fix it to a permanently shaded pane. The only place I would hesitate is a window you genuinely want to see out of, because pretty as it is, the view becomes the film rather than whatever lies beyond it.
Would I do it again? Without a second thought. The whole exercise was the rare home project that delivered more than it asked for, which is precisely the sort of thing this house, and frankly my patience, needs more of.
If you fancy more small changes that punch above their weight, the rest of my home and DIY writing is full of them.
Leave a Reply
The Sunday Letter
Most Sundays, once the house has gone quiet and it's edging towards nine, a letter goes out. It's the one I'd write to a friend with good taste and not nearly enough time: one thing worth reading, one thing worth buying, and one thing to skip. No noise, no pressure to spend, just the considered version of what I've actually been using, loving, or quietly sending back.
If you like the sort of recommendation that still holds up six months later, leave your email below and I'll write to you on Sunday.